Aurora Sheepskin Winter Set Free Pattern – A Knitted Nordic-Inspired Hat and Mittens Duo
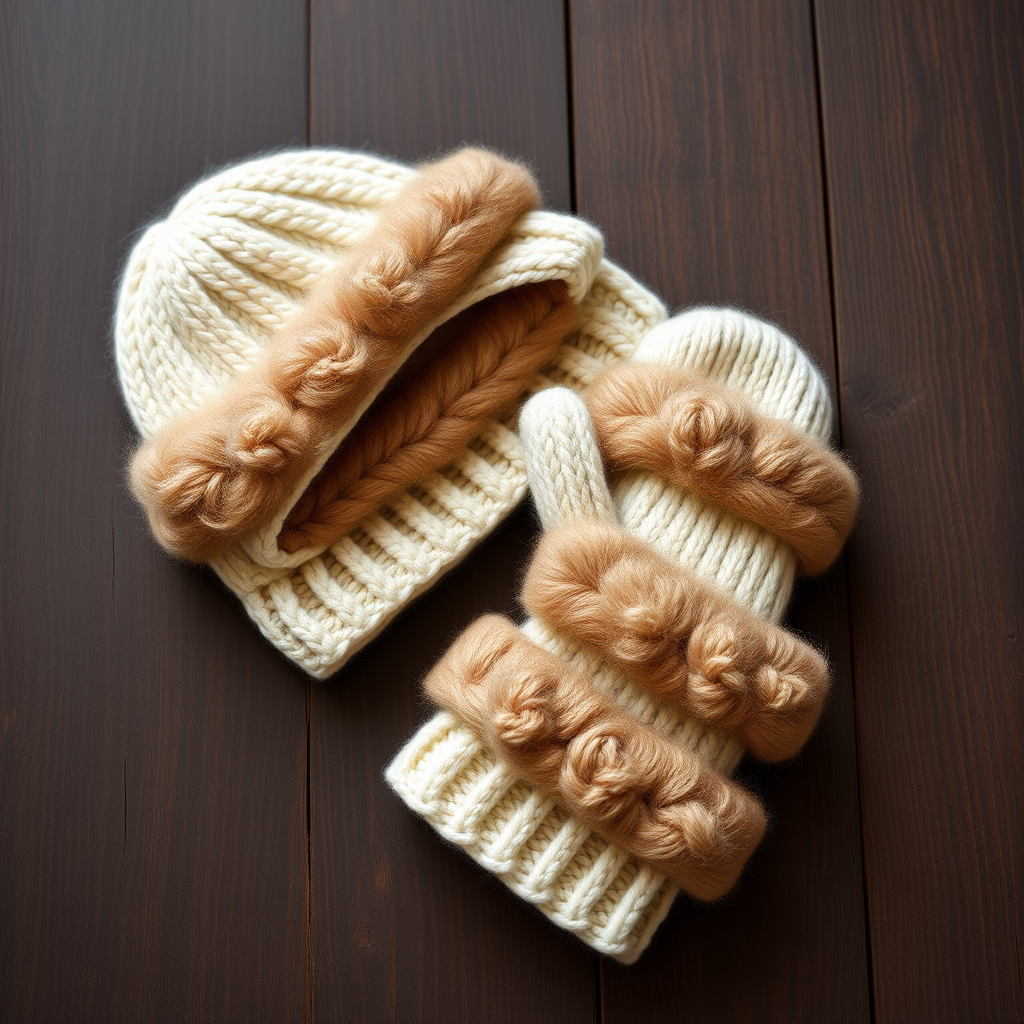
Aurora Sheepskin Winter Set Free Pattern – A Knitted Nordic-Inspired Hat and Mittens Duo
Wrap yourself in the cozy luxury of the Aurora Sheepskin Winter Set, a knitted hat and mitten duo that mimics the plush texture of sheepskin with a modern Nordic twist. This pattern uses a clever combination of faux fur yarn and chunky wool to create a statement set that's both warm and stylish. The cream and warm taupe color palette, combined with the cloud-like faux fur bands, evokes the serene beauty of a winter landscape. Whether you're a seasoned knitter looking for a quick weekend project or a confident beginner ready for a new challenge, this set is designed to be both rewarding and practical. The result is a plush, cozy, and undeniably chic accessory that will keep you toasty from the first snowfall to the last.
This free pattern is perfect for those who love the look and feel of high-end winter wear but prefer the personal touch of handmade. The combination of smooth, worsted-weight wool and fluffy faux fur yarn creates a striking textural contrast that is both visually appealing and incredibly warm. Let's dive into creating your own Aurora set!
Materials Needed
Before you begin, gather all your materials to ensure a smooth knitting experience. This project is portable and uses relatively small amounts of yarn, making it a great stash-buster or a special purchase for a luxurious treat.
- Yarn (Main Color - MC): Worsted weight wool, approximately 300g (about 600 yards). This forms the base of your hat and mittens, providing structure and warmth. Choose a soft, non-itchy wool for maximum comfort.
- Yarn (Faux Fur Color - FC): Faux fur yarn, approximately 150g (about 300 yards). This is the star of the show, creating the sheepskin-like texture. Look for a chunky, fluffy yarn with a good amount of "fluff" to it.
- Needles for Hat: US 8 (5mm) circular needles with a 16" (40cm) cable. The short cable is essential for knitting the hat body in the round without too much excess cable.
- Needles for Mittens: US 8 (5mm) double-pointed needles (DPNs), a set of 4 or 5. These are used for knitting the small circumference of the mittens and thumbs in the round.
- Other Tools: Stitch markers, a tapestry needle for weaving in ends, and a pair of scissors.
- Optional: A faux fur pom-pom to embellish the hat crown.
Gauge
18 stitches x 24 rows = 4 inches (10 cm) in stockinette stitch with Main Color (MC). Achieving the correct gauge is crucial for the final size of your hat and mittens. Always knit a swatch first to ensure your tension matches the pattern. If your gauge is off, adjust your needle size accordingly.
Step-by-Step Instructions
This pattern is worked in the round, which means you'll be creating a seamless tube of fabric. The instructions are broken down into clear sections for the hat and the mittens. Take your time, read through each section, and enjoy the process.
Knitting the Hat
The hat is constructed from the bottom up, starting with a ribbed brim, moving into the stockinette body, adding the faux fur bands, and finishing with a gathered crown.
Ribbing
- With your Main Color (MC) yarn and your 16" circular needle, cast on 80 stitches.
- Place a stitch marker on your right-hand needle to mark the beginning of the round. Join the work in the round, being very careful not to twist the stitches. The cast-on edge should form a neat circle.
- Work in a K1, P1 ribbing pattern (knit 1 stitch, purl 1 stitch) for 2 inches. This creates a stretchy, snug-fitting brim that will keep the hat securely on your head.
Body
- Switch to stockinette stitch, which simply means knitting every round. This will create the smooth, classic fabric of the hat's main body.
- Work even (knit every round) for 5 inches from the cast-on edge. This section forms the main part of the hat that covers your head.
Faux Fur Band
This is where the magic happens! We'll alternate between the faux fur yarn and the main color to create the distinctive sheepskin texture.
- Switch to Faux Fur (FC): Knit 4 rounds with the faux fur yarn. Don't worry if the stitches look a bit messy; the fluff will hide any imperfections.
- Switch back to MC: Knit 2 rounds with your main color yarn. This creates a subtle "channel" that defines the bands.
- Repeat the pattern: Continue alternating 4 rounds of FC and 2 rounds of MC until the piece measures 8 inches from the cast-on edge. Make sure you end with 2 rounds of MC. This will give you a beautiful, textured band section.
Crown Decreases
Now we'll shape the top of the hat by decreasing stitches. The "k2tog" (knit two together) is a right-leaning decrease that is perfect for this crown shaping.
- Round 1: *K8, k2tog*; repeat from * to * around. (72 stitches remain)
- Round 2: Knit all stitches.
- Round 3: *K7, k2tog*; repeat from * to * around. (64 stitches remain)
- Round 4: Knit all stitches.
- Round 5: *K6, k2tog*; repeat from * to * around. (56 stitches remain)
- Round 6: Knit all stitches.
- Round 7: *K5, k2tog*; repeat from * to * around. (48 stitches remain)
- Round 8: Knit all stitches.
- Round 9: *K4, k2tog*; repeat from * to * around. (40 stitches remain)
- Round 10: *K3, k2tog*; repeat from * to * around. (32 stitches remain)
- Round 11: *K2, k2tog*; repeat from * to * around. (24 stitches remain)
- Round 12: *K1, k2tog*; repeat from * to * around. (16 stitches remain)
- Round 13: *K2tog*; repeat from * to * around. (8 stitches remain)
Cut your yarn, leaving a 6-inch tail. Thread the tail onto a tapestry needle, slide it through the remaining 8 stitches, and pull tight to gather the crown. Secure the yarn with a knot and weave in the end.
Knitting the Mittens (Make 2)
Each mitten is worked from the cuff up, with a gusseted thumb. The process is similar to the hat but on a smaller scale using DPNs.
Cuff
- With MC, cast on 32 stitches. Distribute them evenly onto 3 double-pointed needles (e.g., 10, 10, and 12 stitches).
- Place a marker and join in the round, being careful not to twist.
- Work in K1, P1 ribbing for 2.5 inches. This longer cuff will keep your wrists warm and the mittens securely in place.
Hand
- Switch to stockinette stitch (knit every round).
- Work even for 2 inches. This forms the base of the mitten hand.
Thumb Gusset
The thumb gusset is a series of increases that create a wedge of fabric for your thumb. The "M1" (make one) increase is a simple way to add a stitch without leaving a hole.
- Round 1: K15, M1, K2, M1, K15. (34 stitches total)
- Round 2: Knit all stitches.
- Round 3: K15, M1, K4, M1, K15. (36 stitches total)
- Round 4: Knit all stitches.
- Round 5: K15, M1, K6, M1, K15. (38 stitches total)
- Round 6: Knit all stitches.
- Round 7: K15, M1, K8, M1, K15. (40 stitches total)
- Round 8: Knit all stitches.
- Round 9: K15, M1, K10, M1, K15. (42 stitches total)
Separate Thumb
- Next Round: K15, place the next 12 stitches onto a piece of waste yarn or a stitch holder. These are your thumb stitches. Cast on 2 new stitches using the backward loop method, then K15. You now have 32 stitches on your needles for the hand.
- Work even in stockinette stitch on these 32 stitches for 3 inches. This is the main body of the mitten that covers your hand.
Faux Fur Band
- Switch to FC: Knit 4 rounds with the faux fur yarn.
- Switch back to MC: Knit 2 rounds.
- Repeat once more: Knit 4 rounds of FC, then 2 rounds of MC. This creates a total of 12 rounds of the band, matching the hat's aesthetic.
Mitten Top Decreases
Now we shape the top of the mitten to fit your fingers.
- Round 1: *K6, k2tog*; repeat from * to * around. (28 stitches remain)
- Round 2: Knit all stitches.
- Round 3: *K5, k2tog*; repeat from * to * around. (24 stitches remain)
- Round 4: Knit all stitches.
- Round 5: *K4, k2tog*; repeat from * to * around. (20 stitches remain)
- Round 6: *K3, k2tog*; repeat from * to * around. (16 stitches remain)
- Round 7: *K2, k2tog*; repeat from * to * around. (12 stitches remain)
- Round 8: *K1, k2tog*; repeat from * to * around. (8 stitches remain)
Cut your yarn, leaving a 6-inch tail. Thread it onto a tapestry needle, slide it through the remaining 8 stitches, pull tight, and weave in the end.
Thumb
- Carefully transfer the 12 stitches from the waste yarn back onto your DPNs.
- Pick up and knit 2 stitches from the cast-on edge at the base of the thumb. You should now have 14 stitches. Distribute them evenly across 3 DPNs.
- Knit even in stockinette stitch for 2 inches. This covers your thumb completely.
- Decrease Round: *K2tog*; repeat from * to * around. (7 stitches remain)
- Cut your yarn, leaving a tail. Thread it through the remaining 7 stitches, pull tight, and weave in the end.
Finishing
- Weave in all ends: Use your tapestry needle to carefully weave in all loose yarn ends on the inside of your work. This is an important step for a professional finish.
- Block gently: To even out your stitches and give your set a polished look, you can gently block it. For wool, a light steam blocking or a soak in lukewarm water with a bit of wool wash is perfect. Lay flat to dry. Avoid stretching the faux fur bands.
- Optional Embellishment: For an extra touch of luxury, sew a faux fur pom-pom to the top of the hat crown. This adds a playful and fashionable finish.
Congratulations! You've completed your very own Aurora Sheepskin Winter Set. The plush texture and Nordic-inspired design will make this your go-to accessory for the coldest days. The combination of smooth wool and fluffy faux fur is not only stylish but also incredibly warm and comfortable. Enjoy your handmade creation and the compliments that are sure to come your way!



