Mint Mist Patchwork Cowl Free Pattern: A Back-Loop HDC Square Motif Crochet Cowl
Mint Mist Patchwork Cowl: A Beginner-Friendly Back-Loop HDC Square Motif Crochet Cowl
Introduction
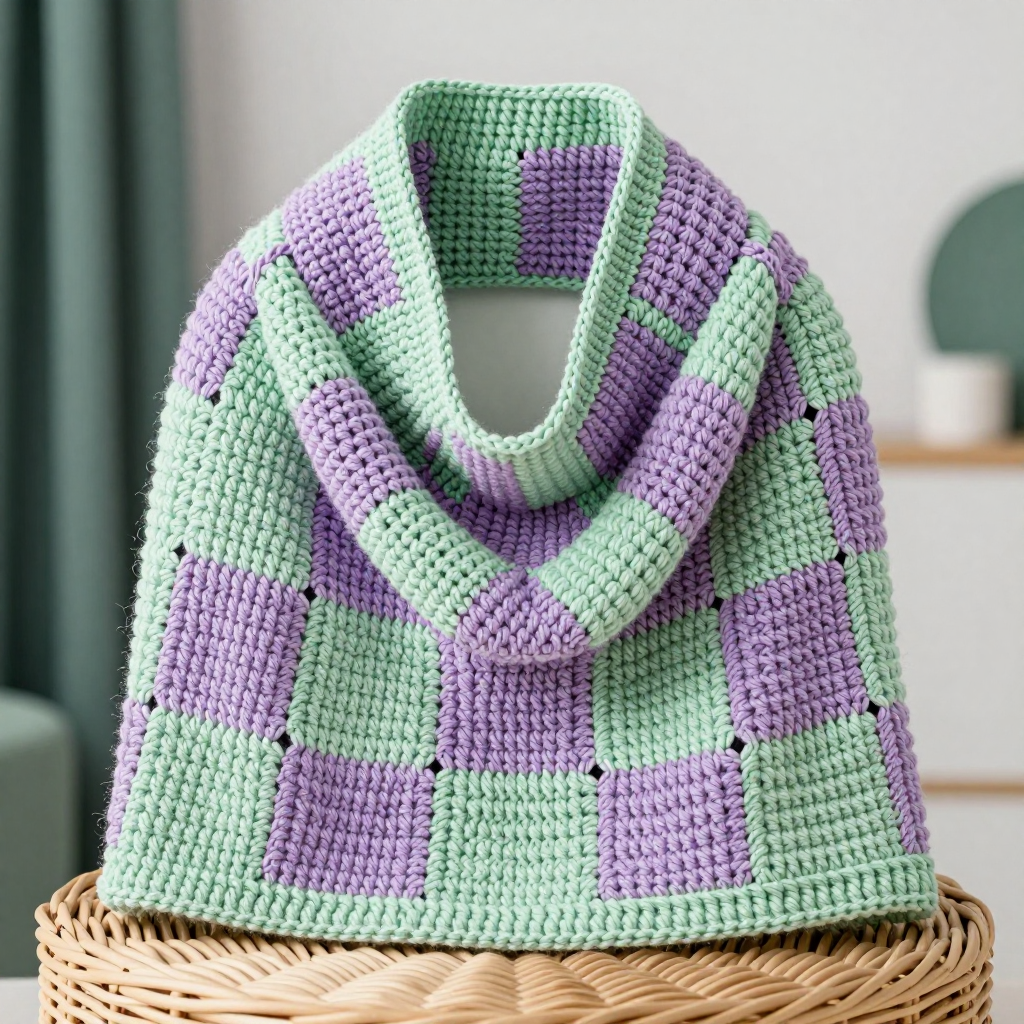
If you have never held a crochet hook before, this cowl is the perfect first real project for you. It is made from 24 small, identical squares, so you only ever have to learn one simple stitch and one simple row, then repeat it until it feels natural. The finished cowl is a soft, warm tube about 28 inches around and 10.5 inches tall, made of alternating pale lavender and soft mint squares in a checkerboard. Each square has gentle horizontal ridges from the back-loop half double crochet, giving the whole piece a cozy, handmade, hygge texture that feels slightly fuzzy and matte against the skin. Wear it looped once around your neck on a cool autumn day and it will feel like a warm hug.
Materials Needed
- Yarn: Fingering weight (category 1) wool yarn, approximately 400–450 yards total: about 200–225 yards lavender and 200–225 yards mint.
- Crochet hook: 3.5 mm (US E/4), or the size you need to match the gauge below.
- Stitch markers: At least 8, to mark square corners and to keep your layout organized.
- Tapestry needle: A blunt-tipped needle with a large eye, for seaming squares and weaving in ends.
- Scissors: Any sharp pair for cutting yarn.
- Measuring tape or ruler: To check that each square measures 3.5 x 3.5 inches (9 x 9 cm).
Finished size: Circumference approximately 28 inches (71 cm) unstretched, stretching comfortably to 34 inches (86 cm) to pull over the head. Height approximately 10.5 inches (27 cm).
Abbreviations and Beginner Glossary
- ch – chain: Make a slip knot on your hook, wrap the yarn over the hook, and pull it through the loop on your hook. That is one chain.
- st / sts – stitch / stitches: One completed loop-and-post unit in your fabric. "Sts" just means more than one.
- hdc – half double crochet: Wrap the yarn over your hook, insert the hook into the next stitch, pull up a loop (3 loops on hook), wrap the yarn over again, and pull it through all 3 loops at once.
- back loop only (BLO) – Every stitch has two top loops: a front loop (closer to you) and a back loop (farther away). "Back loop only" means you insert your hook under the back loop only, not under both. This creates the horizontal ridges.
- sc – single crochet: Insert hook into the next stitch, pull up a loop (2 loops on hook), wrap yarn over, pull through both loops. One single crochet made.
- sl st – slip stitch: Insert hook into the stitch, wrap yarn over, and pull it through both the stitch and the loop on your hook at the same time. It joins without adding height.
- turn – Flip your work over so you can work back across the row you just made.
- fasten off – Cut the yarn a few inches from your work, pull the tail all the way through the last loop, and tug gently to lock it.
- weave in ends – Thread a yarn tail onto a tapestry needle and sew it back and forth through the fabric so it disappears and cannot unravel.
- whipstitch – A simple seaming stitch: bring the needle up through both edges, over the top, and down again, making small slanted stitches along the seam.
Gauge
Gauge: 1 square motif = 3.5 x 3.5 inches (9 x 9 cm) after blocking. In back-loop hdc, 18 hdc x 16 rows = 4 inches (10 cm).
Why gauge matters: Gauge is how big your stitches come out. If your squares are bigger than 3.5 inches, the cowl will be too loose; if smaller, it may not stretch over your head. How to make a gauge swatch: Crochet one complete square exactly as written below, then block it (wet it, pat it flat, and let it dry). Measure it. If it is larger than 3.5 inches, try a smaller hook; if smaller, try a larger hook. One square is your whole swatch, so nothing is wasted.
Beginner Tips Before You Start
- Make all 24 squares before you join anything. This keeps your tension consistent and lets you lay out the checkerboard first.
- Do not pull your yarn too tight. Keep a relaxed, even tension. Tight stitches make stiff squares that are hard to seam.
- Count your stitches at the end of every row. You should always have 16 hdc. If you have 15 or 17, fix it before moving on.
- Use stitch markers on the first and last stitch of each row. Beginners most often lose the very first or very last stitch.
- Keep all your squares the same size. Measure the first few; if they match, keep going with the same hook and tension.
- Leave a 10-inch tail on every square. You will use these tails for seaming, so do not trim them short.
Step-by-Step Instructions
Part 1: The Square Motif (make 24: 12 lavender, 12 mint)
Row 1: With your chosen color, ch 17. Hdc in the 2nd ch from the hook and in each ch across. (16 hdc) Turn.
Row 2: Ch 1 (this does not count as a stitch), hdc in the back loop only of each st across. (16 hdc) Turn.
Rows 3–16: Repeat Row 2. (16 hdc) Do not fasten off after Row 16; instead fasten off leaving a 10-inch (25 cm) tail for seaming.
Check: Each square should measure approximately 3.5 x 3.5 inches (9 x 9 cm). Block all squares lightly to measurement and let them dry completely. You now have 16 rows total per square, which at 16 rows per 4 inches gives the correct 3.5-inch height.
Part 2: Layout
Arrange the 24 finished squares in a flat grid 8 squares wide by 3 squares tall, alternating lavender and mint in a checkerboard so that no two same-color squares touch edge-to-edge. Use stitch markers to pin the corners in place so the layout does not shift. When joined, this grid forms the tube: 8 squares around x 3.5 inches = 28 inches circumference, and 3 squares tall x 3.5 inches = 10.5 inches height.
Part 3: Joining the Squares (flat join)
Join the squares with a simple whipstitch using matching yarn and your tapestry needle (or a single crochet seam with the 3.5 mm hook if you prefer a raised seam).
Step 1 – Vertical seams: With right sides facing up, whipstitch each vertical edge between neighboring squares, working through the back loops of both squares so the seam stays flat. Work all 7 vertical seams across the 8-square width, for all 3 rows.
Step 2 – Horizontal seams: Whipstitch the horizontal edges between the 3 rows, working all 2 horizontal seam lines across the full width.
Step 3 – Close the tube: Bring the short left and right ends of the 8-square strip together and whipstitch them to close the ring. Be careful not to twist the ring before seaming. You now have a tube of 24 joined squares.
Part 4: Top Edge (rectangular band)
With mint yarn, join to any stitch along the top opening.
Round 1: Ch 1, work 1 sc in each stitch around the top edge, working evenly across the seams. (approx. 112 sc) Join with sl st to the first sc.
Round 2: Ch 1, sc in each sc around. Join with sl st. Fasten off and weave in ends.
Part 5: Bottom Edge
Repeat the same two-round sc band along the bottom opening for a matching clean edge.
Round 1: With mint yarn, join to any stitch along the bottom opening. Ch 1, work 1 sc in each stitch around, working evenly across the seams. (approx. 112 sc) Join with sl st to the first sc.
Round 2: Ch 1, sc in each sc around. Join with sl st. Fasten off and weave in ends.
Assembly and Finishing
Seaming: If any seams look wavy, gently pull the seam flat with your fingers while the yarn is still loose, then tighten. Keep your whipstitches small and even so the seams lie flat against the body.
Weaving in ends: Thread each yarn tail onto the tapestry needle and sew it back and forth through about 2 inches of fabric, changing direction once so it cannot pull out. Trim the excess close to the fabric.
Blocking: Wet the finished cowl in cool water, gently squeeze (do not wring) out the excess, and lay it flat in a tube shape on a towel. Pat the seams flat and let it dry completely away from direct heat. This settles the seams and evens out the stitch texture.
Wearing: Wear the cowl with the top edge folded once for extra warmth.
Pro Tips and Variations
- Change the colors: Swap lavender and mint for any two colors you love, such as cream and rust for autumn, or gray and blush for a neutral look. Keep the checkerboard so the patchwork reads clearly.
- Adjust the size: For a longer cowl, add one more square to each row (9 squares around = about 31.5 inches). For a shorter cowl, use 7 squares around (about 24.5 inches). Keep the 3-square height for the same 10.5-inch depth.
- Substitute yarn: A sport weight (category 2) yarn will make slightly larger squares; simply check your gauge square and adjust your hook size to keep each square at 3.5 inches.
- Change the seam: Use a single crochet seam instead of whipstitch for a visible, slightly raised join that adds a nice handmade detail.