Candy Fern Zip-Front Hoodie Free Pattern: Pastel Tweed Knit with Fern Lace
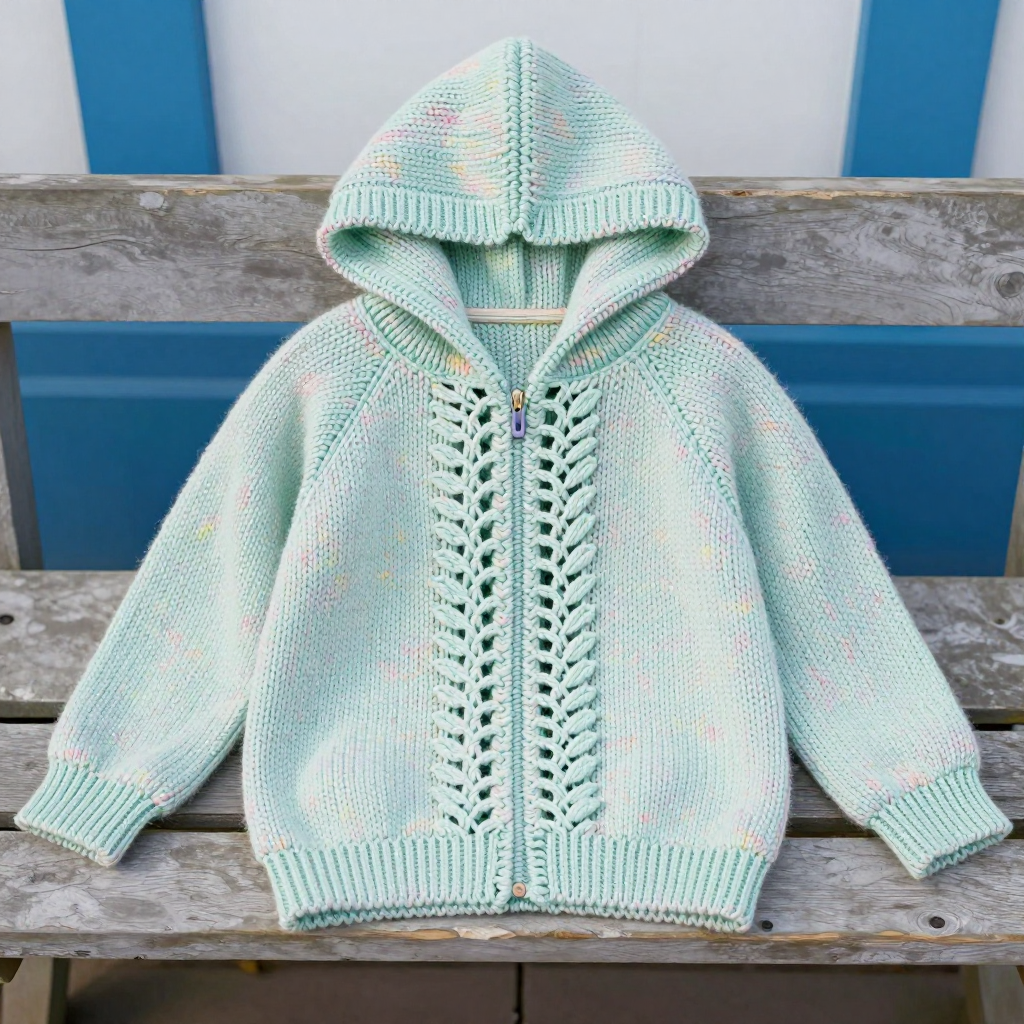
Candy Fern Zip-Front Hoodie: A Free Beginner-Friendly Knitting Pattern
Introduction
Welcome to the Candy Fern Zip-Front Hoodie, a cozy little knit that looks far more complicated than it actually is. This project is perfect for anyone who has just learned to knit and purl and wants to make something truly wearable for a child they love. The body is knit flat as a simple rectangle and then seamed into a tube, so there is no scary circular knitting in the main fabric, and the sleeves are straight and easy. The finished hoodie is soft and squishy in pastel candy tweed wool, with a delicate fern-lace panel running up the center front and a faux zip-line rib that gives it a sporty, mountain-cabin feel. It looks like something from a boutique, but every single stitch is one you already know.
Materials Needed
- Yarn: DK-weight tweed wool (approximately 250–300 m / 273–328 yds per 100 g skein) in a pastel candy colorway (soft mint base with blush pink, butter yellow, and pale lilac flecks). You will need approximately 300 (350, 400, 450) m / 328 (383, 437, 492) yds total.
- Straight knitting needles: 4.0 mm (US 6) for the main fabric.
- Circular needle: 3.5 mm (US 4), 60 cm / 24 in, for the ribbing and hood.
- Stitch markers: at least 4 (to mark the fern lace panel and to track sections).
- Stitch holders or spare yarn: for holding the back neck stitches.
- Tapestry needle: for seaming and weaving in ends.
- Scissors.
- Optional: 1 decorative faux zip pull for the zip-front look.
- Finished sizes: 2 (4, 6, 8) years. Finished chest circumference: 60 (66, 72, 78) cm / 23.5 (26, 28.5, 30.5) in. Finished body length to underarm: 24 (27, 30, 33) cm / 9.5 (10.5, 12, 13) in. Sleeve length to underarm: 22 (25, 28, 31) cm / 8.5 (10, 11, 12) in.
Abbreviations and Beginner Glossary
- k – knit (insert the right needle into the front of the stitch, wrap yarn, pull through, slide old stitch off).
- p – purl (insert the right needle into the front of the stitch from right to left, wrap yarn, pull through, slide old stitch off).
- st(s) – stitch(es).
- k2tog – knit 2 together (insert needle into two stitches at once and knit them as one; this leans right and decreases by one).
- ssk – slip, slip, knit (slip one stitch knitwise, slip a second stitch knitwise, then knit both together through the back loops; this leans left and decreases by one).
- yo – yarn over (wrap the yarn over the right needle to create an extra stitch and a small hole; this is what makes the lace).
- RS – right side (the outside, public face of the fabric).
- WS – wrong side (the inside face of the fabric).
- rep – repeat.
- beg – beginning.
- rem – remaining.
- inc – increase (add a stitch; here, knit into the front and back of the same stitch).
- st st – stocking stitch (knit on the RS, purl on the WS).
- g st – garter stitch (knit every row).
- 2x2 rib – a stretchy pattern of knit 2, purl 2 repeated across the row.
- 1x1 rib – knit 1, purl 1 repeated across the row.
- cast on – the very first row of loops that starts your knitting.
- cast off (bind off) – the final row that secures your stitches so they cannot unravel.
- pick up and knit – insert your needle into the edge of the finished fabric and knit a new stitch from it.
Gauge
22 sts and 30 rows = 10 cm / 4 in in stocking stitch on 4.0 mm needles. 22 sts and 28 rows = 10 cm / 4 in in fern lace pattern on 4.0 mm needles.
Gauge matters because it is how we make sure your hoodie comes out the right size. If your stitches are bigger than mine, the hoodie will be too big; if they are smaller, it will be too small. To check, cast on about 30 stitches on your 4.0 mm needles and work 10 cm of stocking stitch (knit one row, purl one row). Lay it flat without stretching and count how many stitches fit across 10 cm and how many rows fit in 10 cm. If you have more stitches than 22, go up a needle size; if you have fewer, go down a size. Always swatch before you begin.
Beginner Tips Before You Start
- Use stitch markers to track the fern lace panel. Place one marker before and one after the 21 center stitches so you always know exactly where the lace begins and ends.
- Do not pull your yarn too tight. Tension should feel relaxed. Tight stitches make the lace holes close up and make seaming painful.
- Count your stitches at the end of every row. The yarn overs in the lace add stitches and the decreases remove them, so the total should always stay the same.
- Read the whole row before you knit it. Lace rows have repeats; knowing where the repeat ends stops you from drifting off pattern.
- Keep your yarn overs loose. A yarn over that is pulled tight will not show as a pretty fern leaf.
- Write down which row you are on. A simple tally mark on paper saves you from losing your place in the 8-row lace repeat.
Step-by-Step Instructions
Fern Lace Panel (worked over 21 sts, multiple of 8 sts + 5)
Row 1 (RS): k2, yo, ssk, k1, *k2, k2tog, yo, k1, yo, ssk, k1; rep from * to last 5 sts, k2, k2tog, yo, k1.
Row 2 and all WS rows: purl all sts and yarn overs.
Row 3: k1, yo, ssk, k2, *k1, k2tog, yo, k3, yo, ssk; rep from * to last 6 sts, k2, k2tog, yo, k2.
Row 5: k3, yo, ssk, k1, *k2, k2tog, yo, k1, yo, ssk, k1; rep from * to last 4 sts, k2, k2tog, yo, k1.
Row 7: k2, yo, ssk, k2, *k1, k2tog, yo, k3, yo, ssk; rep from * to last 5 sts, k2, k2tog, yo, k1.
Row 8: purl all sts and yarn overs.
Repeat Rows 1–8 for the fern lace pattern.
Back (worked flat)
With 3.5 mm needles, cast on 66 (72, 78, 84) sts.
Rib band: Work in 2x2 rib (k2, p2) for 4 cm / 1.5 in, ending with a WS row.
Change to 4.0 mm needles.
Next row (RS): k all sts, inc 0 (0, 2, 2) sts evenly across — 66 (72, 80, 86) sts.
Body: Work in st st until the piece measures 24 (27, 30, 33) cm / 9.5 (10.5, 12, 13) in from the cast-on edge, ending with a WS row.
Shape armholes: Cast off 4 (4, 5, 5) sts at the beg of the next 2 rows — 58 (64, 70, 76) sts.
Work even until the armhole measures 12 (13, 14, 15) cm / 4.75 (5, 5.5, 6) in, ending with a WS row.
Shape shoulders and neck: Cast off 5 (6, 7, 8) sts at the beg of the next 2 rows, then 5 (6, 7, 8) sts at the beg of the following 2 rows. Place the rem 38 (40, 42, 44) sts on a stitch holder for the hood.
Front (worked flat with fern lace panel)
With 3.5 mm needles, cast on 66 (72, 78, 84) sts.
Rib band: Work in 2x2 rib for 4 cm / 1.5 in, ending with a WS row.
Change to 4.0 mm needles.
Next row (RS): k all sts, inc 0 (0, 2, 2) sts evenly across — 66 (72, 80, 86) sts.
Set up fern lace panel: k22 (25, 29, 32), place marker, work Row 1 of the Fern Lace Panel over the next 21 sts, place marker, k23 (26, 30, 33).
Body: Continue working st st on the side stitches and the fern lace panel between the markers, keeping the markers in place, until the piece measures 24 (27, 30, 33) cm / 9.5 (10.5, 12, 13) in from the cast-on edge, ending with a WS row.
Shape armholes: Cast off 4 (4, 5, 5) sts at the beg of the next 2 rows — 58 (64, 70, 76) sts.
Work even until the armhole measures 8 (9, 10, 11) cm / 3.25 (3.5, 4, 4.25) in, ending with a WS row.
Shape neck: Next row (RS): work 20 (23, 26, 29) sts, cast off the next 18 sts for the neck, work to the end — 20 (23, 26, 29) sts each side.
Work both sides separately, decreasing 1 st at the neck edge every other row 5 times — 15 (18, 21, 24) sts each side.
Work even until the armhole measures 12 (13, 14, 15) cm / 4.75 (5, 5.5, 6) in, ending with a WS row.
Shape shoulders: Cast off 5 (6, 7, 8) sts at the beg of the next 2 rows, then 5 (6, 7, 8) sts at the beg of the following 2 rows.
Sleeves (make 2, worked flat)
With 3.5 mm needles, cast on 34 (38, 42, 46) sts.
Cuff: Work in 2x2 rib for 3 cm / 1.25 in, ending with a WS row.
Change to 4.0 mm needles.
Shape sleeve: Work in st st, inc 1 st at each end of every 6th row 6 (7, 8, 9) times — 46 (52, 58, 64) sts.
Work even until the sleeve measures 22 (25, 28, 31) cm / 8.5 (10, 11, 12) in from the cast-on edge, ending with a WS row.
Cast off all sts loosely.
Hood
Sew the shoulder seams first.
With the 3.5 mm circular needle, RS facing, pick up and knit 18 sts along the right front neck, 38 (40, 42, 44) sts from the back neck holder, and 18 sts along the left front neck — 74 (76, 78, 80) sts.
Work in st st for 18 (20, 22, 24) cm / 7 (8, 8.75, 9.5) in, ending with a WS row.
Shape hood top: Next row (RS): k37 (38, 39, 40), k2tog, turn. Next row: p37 (38, 39, 40), p2tog, turn. Repeat these 2 rows until all sts are worked, then graft or three-needle bind off the rem sts.
Hood rib edging: With the 3.5 mm circular needle, RS facing, pick up and knit 1 st in each st along the hood opening edge. Work in 2x2 rib for 3 cm / 1.25 in. Cast off loosely in rib.
Faux Zip-Line Rib Detail (front center)
With 3.5 mm needles, RS facing, pick up and knit 1 st in each row along the center front from the neck edge to the hem. Work in 1x1 rib (k1, p1) for 2 cm / 0.75 in. Cast off loosely in rib. Repeat on the opposite center front edge. This creates the faux zip-line detail.
Assembly and Finishing
Seam the sides: Lay the front and back flat with RS together. Thread your tapestry needle with yarn and, using a simple whipstitch or mattress stitch, sew from the underarm down to the hem on each side, matching the rib bands. Do not pull the seam tight; it should lie flat.
Seam the sleeves: Fold each sleeve in half with RS together and sew the long underarm seam from the cuff to the underarm cast-off.
Set in the sleeves: With the hoodie inside out, pin each sleeve into an armhole, matching the sleeve underarm seam to the body side seam and the center of the sleeve top to the shoulder seam. Sew in place all the way around, then repeat for the second sleeve.
Weave in ends: Thread each loose tail onto the tapestry needle and run it through the back of several stitches, then trim. Never knot your ends; weaving hides them securely.
Block: Soak the hoodie in cool water for 15 minutes, gently squeeze out the water (do not wring), roll it in a towel, then lay it flat on a towel to the finished measurements. Pat the lace panel open so the fern leaves show. Let it dry completely.
Optional: Attach a decorative faux zip pull at the top of the center front rib for the zip-front look.
Pro Tips and Variations
- Change the colorway: Use a solid DK wool for a cleaner look, or a self-striping yarn so the fern lace panel shifts color as it grows.
- Adjust the size: To make it longer, add rows evenly in the body before the armhole shaping; to make it wider, cast on in multiples of 4 extra stitches (to keep the 2x2 rib even).
- Substitute yarn: Any DK-weight yarn works; just check your gauge again, because a cotton or acrylic blend may knit at a different tension than tweed wool.
- Skip the lace: If you are nervous about yarn overs, work the whole front in stocking stitch and keep the faux zip-line rib for the sporty detail.