Ember & Oak Cocoon Cardi Free Knitting Pattern – Oversized Waffle Stitch Wrap

Ember & Oak Cocoon Cardi: A Cozy Waffle Stitch Knitting Pattern
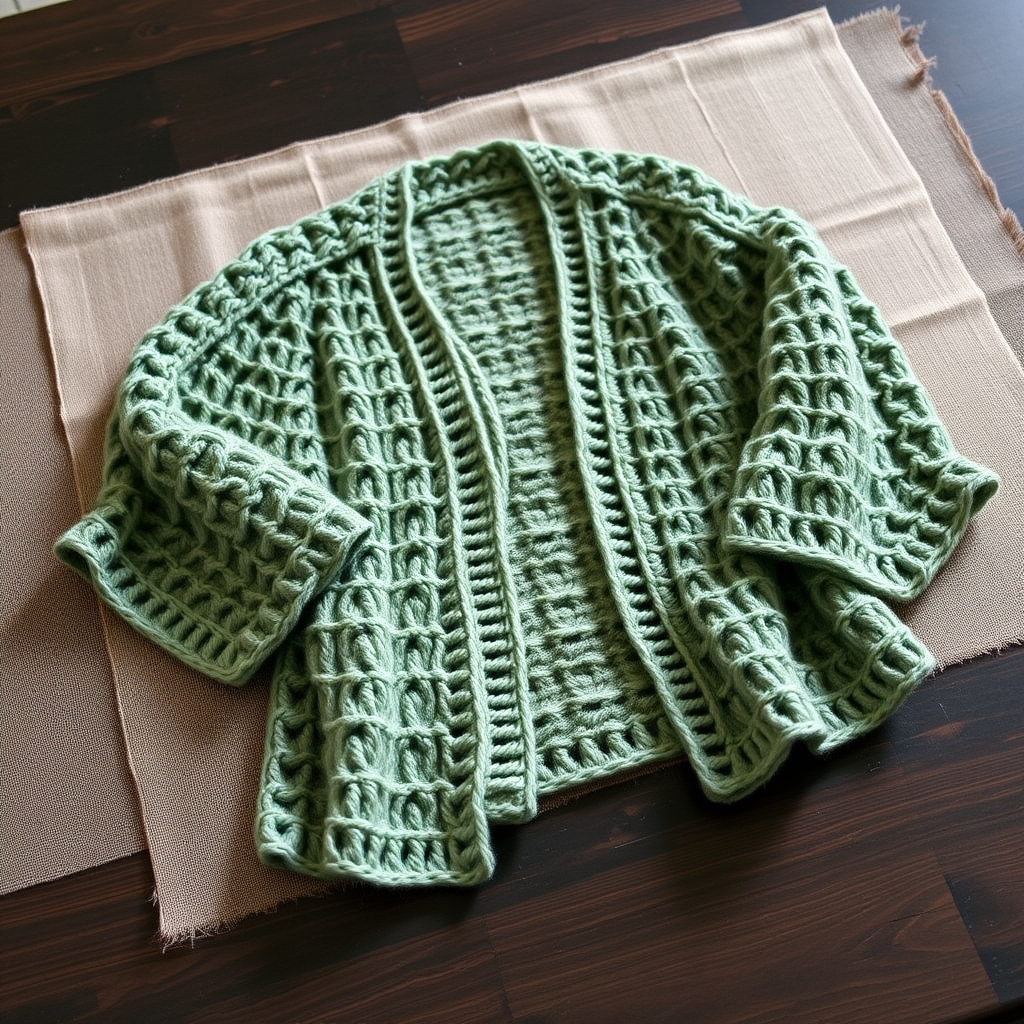
Wrap yourself in the warm embrace of the Ember & Oak Cocoon Cardi—a generously oversized cardigan that feels like a hug in knitted form. This free pattern uses super bulky yarn and a simple four-row repeat to create a modern, architectural waffle stitch texture that's both visually stunning and incredibly cozy. The rich burnt orange color evokes autumn leaves and crackling fires, making it the perfect layering piece for chilly days. Whether you're a seasoned knitter or a confident beginner looking for a rewarding project, this cocoon cardigan is designed to be both achievable and impressive.
With its relaxed, boxy silhouette, drop shoulders, and deep V-neckline, this cardigan is as stylish as it is functional. The dense, plush fabric drapes beautifully and provides exceptional warmth. Best of all, it's knit flat in one piece from the bottom up, then seamed—making it a manageable project that doesn't require complex circular yoke construction. Let's dive into everything you need to create this stunning statement piece.
Materials Needed
Before you begin, gather the following supplies to ensure a smooth knitting experience:
- Yarn: Super bulky weight yarn (size 6), approximately 900–1100 yards. Excellent choices include Lion Brand Wool-Ease Thick & Quick or Malabrigo Rasta for a luxurious, squishy finish.
- Needle: US 13 (9 mm) circular knitting needle, 32 inches or longer (to accommodate the large number of stitches comfortably).
- Gauge: 8 stitches and 10 rows = 4 inches in waffle stitch pattern (after blocking). Always knit a gauge swatch first to ensure your finished cardigan matches the intended measurements.
- Extras: Tapestry needle for weaving in ends, stitch markers (optional but helpful), and blocking mats with pins.
Understanding the Waffle Stitch Pattern
The waffle stitch is the heart of this design, creating a thick, squishy fabric with a beautiful geometric grid. It's surprisingly simple to memorize and works up quickly with chunky yarn. Here's the pattern you'll use throughout the project:
Waffle Stitch Pattern (multiple of 4 + 2 stitches)
- Row 1 (RS): K2, *P2, K2; repeat from * to end of row.
- Row 2 (WS): P2, *K2, P2; repeat from * to end of row.
- Row 3 (RS): K2, *P2, K2; repeat from * to end of row.
- Row 4 (WS): Knit all stitches.
- Repeat Rows 1–4 for the pattern.
Pro Tip: The combination of knit and purl columns on Rows 1–3 creates the "walls" of the waffle squares, while the all-knit Row 4 forms the "floor." This creates the deep, textured pockets that make this stitch so distinctive.
Step-by-Step Instructions
This cardigan is constructed in five main pieces: a back panel, two front panels, and two sleeves. Follow each section carefully, and you'll have all the pieces ready for assembly in no time.
Abbreviations
- CO: Cast on
- K: Knit
- P: Purl
- K2tog: Knit two stitches together (decrease)
- P2tog: Purl two stitches together (decrease)
- Sl: Slip
- Rep: Repeat
- St(s): Stitch(es)
- BO: Bind off
- M1: Make one increase (pick up the bar between stitches and knit through the back loop)
Back Panel
- Cast On: CO 74 stitches.
- Body: Work in the waffle stitch pattern (Rows 1–4) until the piece measures 28 inches from the cast-on edge, ending with a wrong-side row. This creates the length of the cardigan body.
- Shape Shoulders: Bind off 10 stitches at the beginning of the next 4 rows. Here's how it works:
- Row 1: BO 10 sts, work to end of row, turn.
- Row 2: BO 10 sts, work to end of row, turn.
- Row 3: BO 10 sts, work to end of row, turn.
- Row 4: BO 10 sts, work to end of row.
Left Front Panel
- Cast On: CO 38 stitches.
- Body: Work in the waffle stitch pattern until the piece measures 24 inches from the cast-on edge, ending with a wrong-side row. This is slightly shorter than the back to allow for the neck shaping.
- Shape Neck: On the next right-side row, bind off 6 stitches at the beginning of the row (this is the neck edge), then work to the end of the row. Now, decrease 1 stitch at the neck edge on every right-side row 4 times. To decrease, work K2tog (if the next stitch is a knit) or P2tog (if the next stitch is a purl) at the neck edge. You will have 28 stitches remaining.
- Continue Straight: Work even in pattern until the piece measures 28 inches from the cast-on edge, ending with a wrong-side row.
- Shape Shoulder: On the next right-side row, bind off 10 stitches, then work to the end. Work 1 wrong-side row. Bind off the remaining 18 stitches.
Right Front Panel
- Cast On: CO 38 stitches.
- Body: Work in the waffle stitch pattern until the piece measures 24 inches from the cast-on edge, ending with a right-side row.
- Shape Neck: On the next wrong-side row, bind off 6 stitches at the beginning of the row (neck edge), then work to the end. Now, decrease 1 stitch at the neck edge on every wrong-side row 4 times (using K2tog or P2tog as appropriate). You will have 28 stitches remaining.
- Continue Straight: Work even in pattern until the piece measures 28 inches from the cast-on edge, ending with a right-side row.
- Shape Shoulder: On the next wrong-side row, bind off 10 stitches, then work to the end. Work 1 right-side row. Bind off the remaining 18 stitches.
Sleeves (Make 2)
- Cast On: CO 34 stitches.
- Increase Section: Work in the waffle stitch pattern, increasing 1 stitch at each end of every 6th row, 8 times total. To increase, use the M1 method (pick up the horizontal bar between stitches and knit through the back loop). After all increases, you will have 50 stitches.
- Continue Straight: Work even in pattern until the sleeve measures 18 inches from the cast-on edge, or your desired length. Bind off all stitches loosely.
Finishing and Assembly
Now that all your pieces are complete, it's time to bring your Ember & Oak Cocoon Cardi to life. Follow these steps for a professional finish:
- Block All Pieces: This is a crucial step for a polished look. Soak the pieces in lukewarm water with a gentle wool wash, then gently squeeze out excess water (never wring). Lay them flat on blocking mats, pinning to the measurements specified in the pattern. Allow to dry completely. Blocking will even out the waffle stitches and give your cardigan a beautiful drape.
- Sew Shoulder Seams: Using a tapestry needle and matching yarn, sew the shoulder seams of the front panels to the back panel using a mattress stitch or whip stitch. The back panel's 34 neck stitches will sit between the front panels' neck edges.
- Sew Side Seams: With right sides together, sew the side seams from the bottom edge up to 8 inches below the shoulder seam. This leaves openings for the armholes. Repeat on both sides.
- Sew Sleeve Seams: Fold each sleeve in half lengthwise with right sides together, and sew the underarm seam.
- Set in Sleeves: Turn the cardigan inside out. Insert each sleeve into its armhole opening, matching the sleeve seam to the underarm point. Pin in place, easing any fullness evenly around the armhole. Sew the sleeves in place using a firm backstitch or mattress stitch.
- Add the Edging: With the right side facing you, pick up and knit stitches evenly around the entire front opening and neckline. The number of stitches should be divisible by 2 for the ribbing to work correctly. Work in K1, P1 ribbing for 6 rows. Bind off loosely in pattern. This creates a neat, stretchy edge that frames the cardigan beautifully.
- Weave in All Ends: Use your tapestry needle to weave in all loose yarn ends securely on the wrong side of the fabric. Trim any excess.
Final Thoughts
Your Ember & Oak Cocoon Cardi is now complete! This oversized, textured wrap is destined to become a wardrobe staple—perfect for layering over chunky sweaters, cozy dresses, or simple tees. The waffle stitch creates a fabric that's both substantial and soft, while the drop-shoulder silhouette gives it that effortlessly chic, modern look.
Don't be afraid to customize! You can easily adjust the length by working more or fewer rows before shaping, or swap the burnt orange for a deep forest green, warm camel, or classic oatmeal. The possibilities are endless with this versatile pattern.
We'd love to see your finished cardigan! Share your photos on social media using the hashtag #EmberAndOakCardi and tag us so we can admire your beautiful work. Happy knitting!