Willow & Wren Cocoon Cardigan Free Pattern – Knit a Misty Meadow Layer

Willow & Wren Cocoon Cardigan Free Pattern – Knit a Misty Meadow Layer
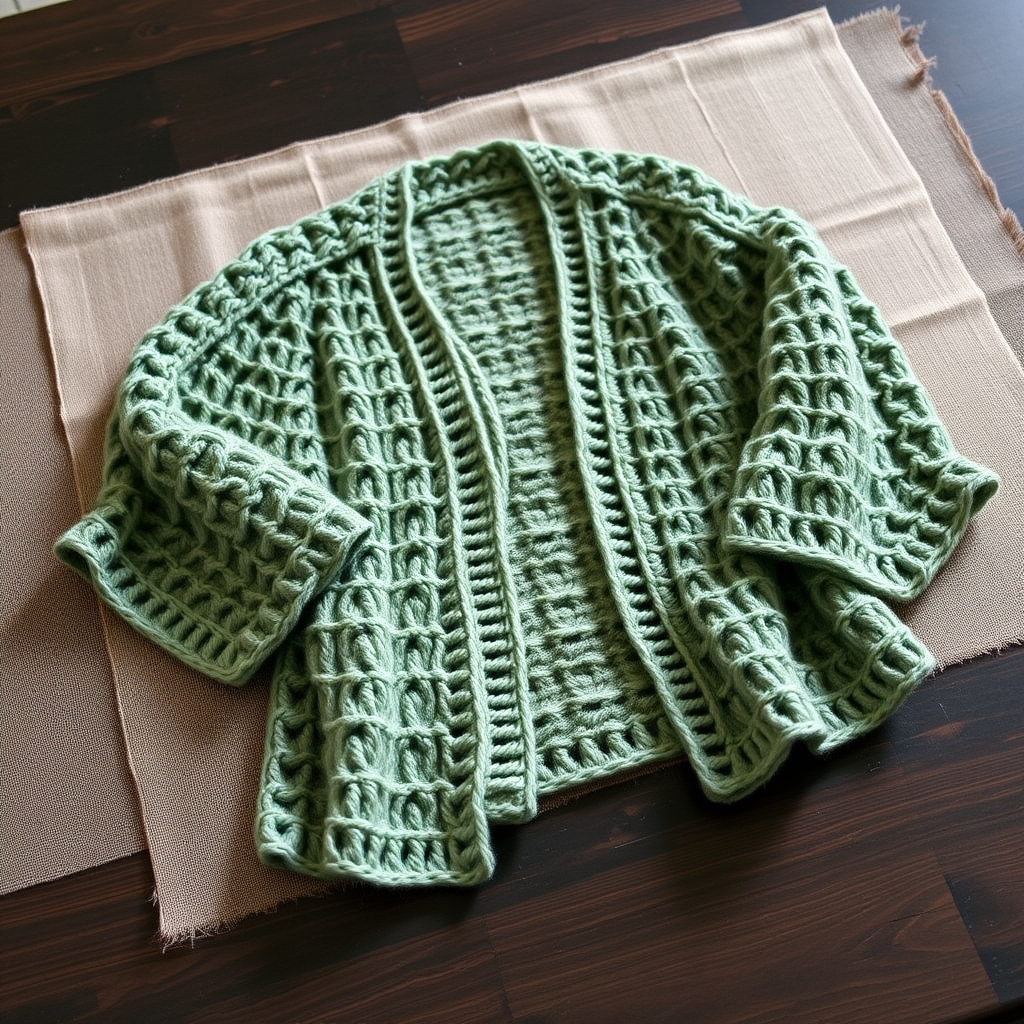
Wrap yourself in the softest embrace of nature with this oversized, textured cocoon cardigan, featuring a delicate leaf lace panel that cascades down the back. Knitted in a heathered sage green, it's the perfect layering piece for crisp autumn walks and cozy evenings by the fire. This free knitting pattern is designed for intermediate knitters who want to expand their skills while creating a stunning, nature-inspired garment. The sideways construction creates a beautiful drape, and the batwing-style sleeves add a touch of drama to this otherwise cozy, everyday piece.
Whether you're a seasoned knitter looking for a new challenge or a confident beginner ready to tackle lace work, this cardigan offers a rewarding project with a breathtaking result. The combination of simple garter stitch edges and an intricate leaf lace panel makes this pattern both accessible and engaging. Let's dive into creating your own misty meadow layer!
Materials Needed
Before you begin, gather the following materials to ensure a smooth knitting experience:
- Yarn: Worsted weight yarn in heathered sage green (approx. 1200-1400 yards for sizes S/M/L). Look for a soft, natural fiber blend like wool or alpaca for the best drape and warmth.
- Needles: US 9 (5.5mm) circular knitting needles with a 32-inch cable (essential for the sideways construction). US 9 (5.5mm) double-pointed needles for sleeves (optional, if you prefer magic loop, you can use the circular needle).
- Notions: Stitch markers (at least 6), tapestry needle for weaving in ends, scissors, measuring tape.
- Gauge: 16 stitches and 22 rows = 4 inches in stockinette stitch, blocked. Always knit a gauge swatch to ensure your finished cardigan matches the intended measurements.
Understanding Your Pattern
This cardigan is constructed sideways, meaning you'll knit the panels from side to side rather than bottom-up. This clever technique creates a beautiful drape and eliminates the need for complex shaping at the shoulders. The leaf lace panel is the star of the show, running vertically down the center of the back and symmetrically on each front panel.
Sizes and Measurements
Sizes: S/M (M/L) – Finished bust: 48 (52) inches, length: 24 (26) inches. Designed for a relaxed, oversized fit. The generous ease means you can comfortably layer this over sweaters or wear it as a statement piece.
Abbreviations
Familiarize yourself with these standard knitting abbreviations before starting:
- k = knit
- p = purl
- yo = yarn over
- k2tog = knit two together (right-leaning decrease)
- ssk = slip slip knit (left-leaning decrease)
- pm = place marker
- sm = slip marker
- st(s) = stitch(es)
- RS = right side
- WS = wrong side
Step-by-Step Instructions
Special Stitch – Leaf Lace Panel (worked over 17 sts)
This 24-row repeat creates the beautiful leaf motif. The panel is worked between stitch markers, with garter stitch on either side. Take your time with this section – the rhythm becomes intuitive after a few repeats.
Row 1 (RS): k2, yo, ssk, k9, k2tog, yo, k2
Row 2 and all WS rows: purl all stitches
Row 3: k3, yo, ssk, k7, k2tog, yo, k3
Row 5: k4, yo, ssk, k5, k2tog, yo, k4
Row 7: k5, yo, ssk, k3, k2tog, yo, k5
Row 9: k6, yo, ssk, k1, k2tog, yo, k6
Row 11: k7, yo, ssk, yo, k2tog, yo, k7 (note: this row has an extra yo to maintain stitch count)
Row 13: k6, k2tog, yo, k1, yo, ssk, k6
Row 15: k5, k2tog, yo, k3, yo, ssk, k5
Row 17: k4, k2tog, yo, k5, yo, ssk, k4
Row 19: k3, k2tog, yo, k7, yo, ssk, k3
Row 21: k2, k2tog, yo, k9, yo, ssk, k2
Row 23: k1, k2tog, yo, k11, yo, ssk, k1
Row 24: purl all stitches. Repeat rows 1-24 for pattern.
Pro Tip: Place a removable stitch marker on Row 1 of your lace pattern so you can easily track where you are in the repeat. Count your stitches after each row to catch any mistakes early.
Back Panel (worked sideways)
Cast on: 96 (104) sts loosely. Work in garter stitch (knit every row) for 6 rows.
Next row (RS): k2, pm, work Leaf Lace Panel over next 17 sts, pm, knit to end. Continue in this manner, working the leaf panel between markers and garter stitch on the edges, until piece measures 24 (26) inches from cast-on edge. Bind off loosely.
Understanding the construction: The garter stitch edges will form the bottom hem and the top edge of the cardigan. The leaf panel runs horizontally as you knit, but when the piece is turned sideways during assembly, it will cascade vertically down the back – this is the magic of sideways knitting!
Front Panels (make 2, worked sideways)
Cast on: 48 (52) sts. Work in garter stitch for 6 rows.
Next row (RS): k2, pm, work Leaf Lace Panel over next 17 sts, pm, knit to end. Continue as for back until piece measures 24 (26) inches. Bind off loosely.
Make two identical front panels. The leaf lace will be positioned closer to the center front edge, creating a symmetrical design when the cardigan is worn.
Sleeves (make 2, worked top-down)
Pick up and knit: 64 (72) sts around armhole opening (see assembly instructions). Place marker at underarm. Work in stockinette stitch (knit RS, purl WS) in the round, decreasing 2 sts every 6 rounds (k2tog at beginning and ssk at end of round) until 40 (44) sts remain.
Work even until sleeve measures 18 (19) inches from underarm. Bind off loosely.
Sleeve shaping note: The decreases create a gentle taper from the wide batwing-style top to a more fitted wrist. If you prefer a wider sleeve, you can decrease less frequently or skip the decreases entirely.
Assembly
Now it's time to bring your pieces together. Lay everything flat and take a moment to admire your work before the final steps.
Step 1: Lay back panel flat. Place front panels on top, aligning the cast-on/bind-off edges with the back panel's edges, leaving a 9 (10) inch opening at the top for the neck.
Step 2: Sew shoulder seams (top 4 inches of each side). Use mattress stitch for a seamless finish.
Step 3: Sew side seams from underarm to bottom edge. The garter stitch edges make this easy to match up.
Step 4: Sew sleeve seams, leaving top 9 (10) inches open. This opening will form the armhole.
Step 5: Sew sleeves into armholes, matching underarm seams. Take your time here – a neat armhole attachment makes a huge difference in the final look.
Step 6: Weave in all ends. Block to finished measurements.
Finishing
With RS facing: pick up and knit 80 (88) sts along the front opening edges and neckline. Work in garter stitch for 4 rows. Bind off loosely.
This creates a clean, finished edge that complements the garter stitch borders on the panels. Weave in ends. Block again if desired.
Tips for Success
- Blocking is essential: This pattern truly comes alive after blocking. The lace opens up, the drape improves, and the measurements become accurate. Don't skip this step!
- Use lifelines: When working the lace panel, consider adding a lifeline every few repeats. If you make a mistake, you can easily rip back to the lifeline without losing all your work.
- Choose your yarn wisely: A yarn with good stitch definition will showcase the lace pattern beautifully. Look for a smooth worsted weight yarn in a heathered or semi-solid colorway.
- Take breaks: The sideways construction means long rows. Take regular breaks to avoid hand fatigue and maintain even tension.
Your Willow & Wren Cocoon Cardigan is now complete! This nature-inspired piece will become a wardrobe staple, perfect for layering over everything from simple tees to cozy sweaters. The oversized silhouette and delicate lace details make it equally at home in the city or the countryside. Enjoy wearing your handmade misty meadow layer, and don't forget to share your creation with the knitting community – we'd love to see how your cardigan turns out!