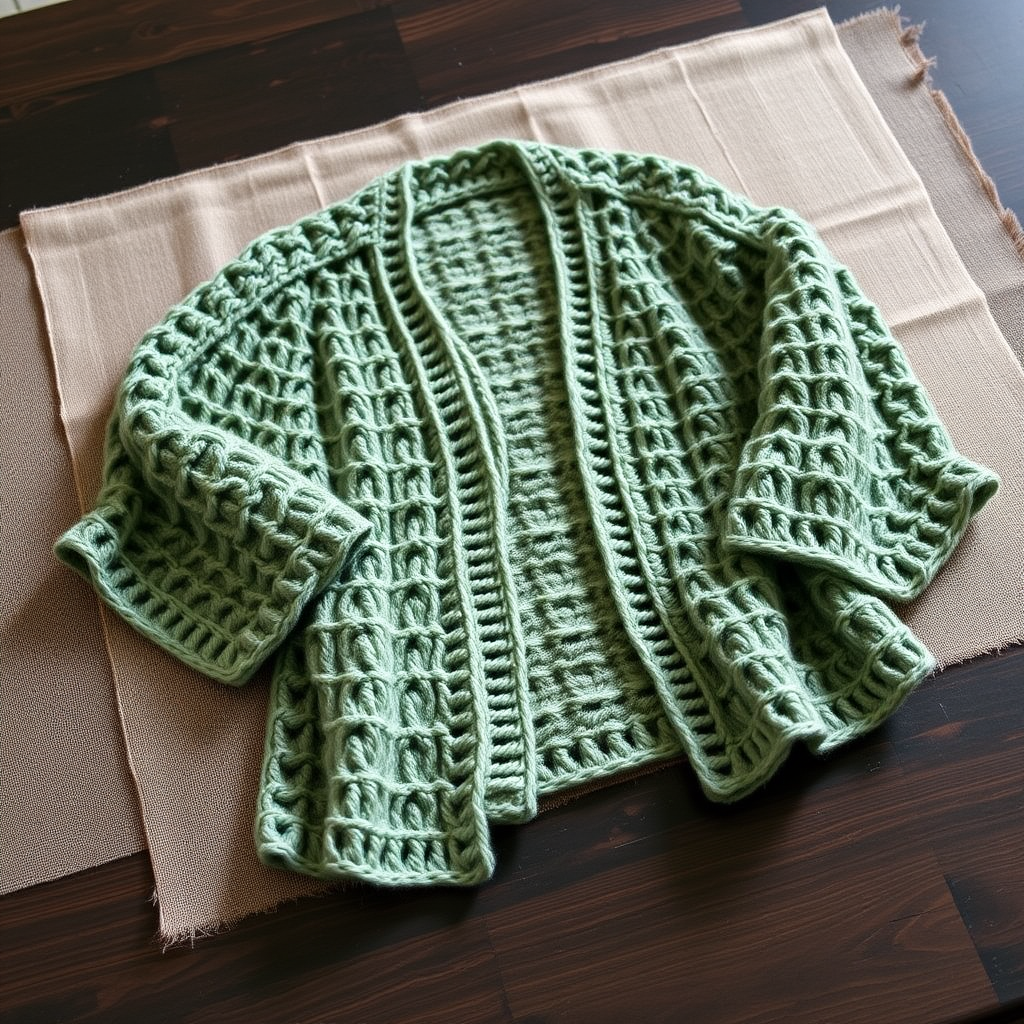
Wagon Wheel Twisted Motif Blanket Cardi Free Pattern

Wagon Wheel Twisted Motif Blanket Cardi — A Free Beginner-Friendly Pattern
Introduction
If you have ever looked at a knitted cardigan and thought, "I could never make that," this is the project that will prove you wrong. The Wagon Wheel Twisted Motif Blanket Cardi is built from nine simple squares — each one a small, manageable rectangle of knitting that you finish in an evening or two — and then joined together like a patchwork quilt. Because you only ever work one 20 cm (8 in) square at a time, you never have to hold a huge, heavy piece of fabric on your needles, and you get a satisfying "done!" moment nine times over.
The finished cardigan is a relaxed, boxy, open-front layer with no buttons or closures. It hangs softly at the center front, with straight sleeves and a ribbed border running all the way around the outer edge. The yarn — a mohair-silk blend held double — gives the whole thing a fuzzy, cloud-like halo over a crisp, gridded patchwork look. Five squares are cherry red and four are pink, arranged in a checkerboard, so the finished piece looks like a cozy, slightly western-inspired blanket you can wear. It is warm, light as air, and genuinely beginner-friendly.
Materials Needed
- Yarn: Mohair-silk blend (approximately 70% mohair, 30% silk; 50 g / 420 m per skein), held double throughout (meaning you knit with two strands of yarn at the same time, as if they were one).
- Color A (cherry red): 3 skeins.
- Color B (pink): 3 skeins.
- Total yarn: approximately 6 skeins / 300 g.
- Main needles: Size 5 mm (US 8) straight or circular needles — used for the motifs and the sleeves.
- Ribbing needles: Size 4 mm (US 6) circular needles (a long cable, at least 80 cm / 32 in, is needed for the body edging) — used for all ribbing and the body border.
- Cable needle (a short, curved needle used to hold stitches temporarily — you will use it only if you choose to work the optional cable variation).
- Stitch markers (small plastic or metal rings that clip onto your needle to mark a spot in your knitting).
- Stitch holders (a large safety-pin-like tool that holds live stitches safely while you work elsewhere).
- Tapestry needle (a big needle with a blunt tip and a large eye, used for sewing seams and weaving in ends).
- Scissors for cutting yarn.
- Finished size: Unisex adult, relaxed fit. Finished chest approximately 60 cm (23.6 in) measured flat and unstretched (the open front and fuzzy halo let it drape wider when worn). Length approximately 60 cm (24 in). Sleeve length from shoulder approximately 50 cm (20 in). Each motif measures approximately 20 x 20 cm (8 x 8 in).
Abbreviations and Beginner Glossary
Every abbreviation used in this pattern is listed here. Read this section once before you begin — you will refer back to it often, and that is completely normal.
- st / sts — stitch / stitches. One "stitch" is one loop of yarn on your needle.
- RS — right side. The "public" side of the fabric, the side that will face outward when worn.
- WS — wrong side. The "inside" side of the fabric that faces your body.
- K (knit) — insert the right needle into the front of the stitch from left to right, wrap the yarn around the needle, and pull the loop through. The old stitch slides off. This creates a smooth, V-shaped stitch.
- P (purl) — insert the right needle into the front of the stitch from right to left, wrap the yarn around, and pull the loop through toward you. This creates a bumpy stitch.
- K1tbl (knit one through the back loop) — instead of inserting your needle into the front of the stitch, insert it into the back of the loop and knit as usual. This twists the stitch and creates a crisp, raised line — the signature texture of this cardigan.
- P1tbl (purl one through the back loop) — the same idea for a purl stitch: insert the needle into the back of the loop and purl as usual. It twists the stitch in the opposite direction.
- * ... * — repeat everything between the two asterisks as many times as the pattern says.
- Rep — repeat.
- Inc 1 (increase one stitch) — add one new stitch. In this pattern, work into the front and then the back of the same stitch (called "knit front and back") to make two stitches where there was one.
- Garter stitch — knitting every row (or, when working in the round, alternating knit and purl rounds). It creates a flat, slightly ridged fabric that does not curl.
- Bind off (cast off) — the way you finish an edge so the stitches do not unravel. Knit two stitches, then lift the first one over the second and off the needle; repeat across.
- Cast on — the way you create your very first row of loops on the needle.
- Pick up and knit — insert your needle into the edge of your finished fabric, wrap the yarn, and pull up a loop, creating a new stitch along that edge.
- Mattress stitch — an invisible seaming technique (explained fully in the Assembly section).
- Work in pattern — continue the stitch pattern you have already established, so the texture stays consistent.
Gauge
Gauge: 18 sts and 24 rows = 10 x 10 cm (4 x 4 in) in the twisted-stitch motif pattern on 5 mm needles with yarn held double. Each finished motif measures approximately 20 x 20 cm (8 x 8 in).
Why gauge matters: Gauge is simply how big your stitches come out. If your stitches are bigger than the pattern expects, your squares will be larger than 20 cm and your cardigan will not fit together as designed. If they are smaller, the squares will shrink. Because this cardigan is built from nine identical squares, gauge is especially important — a small difference multiplied by three squares across becomes a big difference in the finished chest measurement.
How to make a gauge swatch: With your 5 mm needles and two strands of yarn held together, cast on 27 stitches. Work in the twisted-stitch pattern (alternating k1tbl and p1) for about 15 cm (6 in). Lay the swatch flat, do not stretch it, and place a ruler across the middle. Count how many stitches fit in 10 cm (4 in). If you have more than 18, your stitches are too small — try a larger needle. If you have fewer than 18, your stitches are too big — try a smaller needle. Wash and gently block your swatch before measuring, because mohair blooms (fluffs out) after washing.
Beginner Tips Before You Start
- Hold both strands together as one. Pull one strand from the outside of the skein and one from the inside, or use two separate skeins. Treat the doubled strand exactly as if it were a single yarn — do not try to separate them.
- Use stitch markers to track your border. Place a marker after the first 2 stitches and before the last 2 stitches of every motif row. Those 2 stitches on each side are your garter-stitch border, and the marker reminds you where the border ends and the twisted pattern begins.
- Do not pull your yarn too tight. Mohair-silk is slippery and has very little stretch. If you tug each stitch snug, your squares will come out small and stiff. Let the yarn relax and slide easily on the needle.
- Count your stitches at the end of every row. You should always have 37 stitches on a motif row. If you have 36 or 38, you have dropped or added a stitch — fix it now rather than three squares later.
- Make one practice square first. Your very first motif will be your slowest. That is normal. By square three you will be knitting without looking at the pattern.
- Keep your squares the same size. Measure each finished square flat before you join it. If one is noticeably bigger, re-block it to 20 cm while it is still damp.
Step-by-Step Instructions
Part 1: The Motif (make 9 — 5 in Color A cherry red, 4 in Color B pink)
Each motif is a flat square worked back and forth in rows. The center is a twisted-stitch pattern that creates a subtle wagon-wheel spiral, and the outer 2 stitches on each side are a garter-stitch border that keeps the edges flat.
Cast on 37 sts on 5 mm needles with yarn held double.
Row 1 (RS): K1, *p1, k1tbl; rep from * to last 2 sts, p1, k1. (37 sts)
Row 2 (WS): K1, *k1, p1tbl; rep from * to last 2 sts, k1, p1. (37 sts)
Rows 3–4: Repeat Rows 1–2 once more. (37 sts)
Row 5 (RS, begin the wheel): K1, p1, then work k1tbl, p1 alternately across the central 33 sts, then p1, k1. (37 sts)
Row 6 (WS): K1, k1, then work p1tbl, k1 alternately across the central 33 sts, then k1, p1. (37 sts)
Rows 7–48: Continue in the established twisted-stitch pattern — the central 33 sts in alternating k1tbl/p1 (on RS rows) and p1tbl/k1 (on WS rows), with a 2-st garter border at each side — until the piece measures 20 cm from the cast-on edge, ending with a WS row. (37 sts; approximately 48 rows total.)
Bind off all sts in pattern. Do not break the yarn until you are ready to join.
Repeat the motif eight more times — five squares in Color A (cherry red) and four squares in Color B (pink). You now have nine squares, each approximately 20 x 20 cm.
Part 2: Joining the Motifs
Arrange your nine motifs in a 3 x 3 grid, alternating colors in a checkerboard: A–B–A across the top row, B–A–B in the middle row, and A–B–A in the bottom row.
Join the motifs with mattress stitch on the wrong side (see the Assembly section for the full how-to), matching stitch for stitch along each edge.
Step 1 — Vertical seams: Join all vertical seams between the columns, except the center front seam (the vertical seam between the two front panels — that is, the left and right front edges).
Step 2 — Horizontal seams: Join all horizontal seams between the rows to complete the 3 x 3 grid.
Important: Leave the center front opening unjoined — do not join the vertical seam between the two front panels from the bottom edge up to the neck edge. This is what makes the cardigan hang open.
Part 3: Body Edging
With the 4 mm circular needles and Color A held double, pick up and knit 1 st in every bound-off stitch around the entire outer edge of the joined body — approximately 440 sts. Place a stitch marker at each corner. Join to work in the round, being careful not to twist the stitches.
Round 1: Purl. (approx. 440 sts)
Round 2: Knit. (approx. 440 sts)
Rounds 3–8: Repeat Rounds 1–2 three more times, until the edging measures 3 cm (1.25 in). (approx. 440 sts)
Bind off loosely in pattern.
Part 4: Sleeves (make 2, knit flat)
With 5 mm needles and Color B held double, cast on 41 sts.
Row 1 (RS): K1, *p1, k1tbl; rep from * to last 2 sts, p1, k1. (41 sts)
Row 2 (WS): K1, *k1, p1tbl; rep from * to last 2 sts, k1, p1. (41 sts)
Rows 3–20: Repeat Rows 1–2 until the sleeve measures 8 cm from the cast-on edge, ending with a WS row. (41 sts)
Shape the sleeve: Increase 1 st at each end every 8th row 6 times, working the new stitches into the twisted-stitch pattern. (53 sts)
Continue straight (no more increases) until the sleeve measures 50 cm from the cast-on edge, ending with a WS row. (53 sts)
Bind off all sts in pattern.
Repeat for the second sleeve.
Part 5: Sleeve Ribbing
With 4 mm needles and Color A held double, pick up and knit 41 sts evenly along the cast-on edge of one sleeve.
Work k1tbl, p1 rib (knit one through the back loop, purl one, repeat) for 4 cm (1.5 in). (41 sts)
Bind off loosely in rib.
Repeat for the second sleeve.
Assembly and Finishing
Blocking: Before seaming, lightly block all nine motifs and both sleeves to measurements. Fill a basin with cool water and a drop of wool wash, submerge the pieces for 10 minutes, then gently squeeze (never wring) out the water. Roll each piece in a towel to remove excess moisture, lay flat on a towel or blocking mat, and pat each square to exactly 20 x 20 cm. Let dry completely — mohair takes a full day.
Mattress stitch seams: Lay two pieces right side up, side by side. Thread your tapestry needle with a single strand of matching yarn. Bring the needle up through the bar between the first and second stitch on the right-hand piece, then through the corresponding bar on the left-hand piece, and pull gently. Continue up the seam, always picking up the horizontal bar one stitch in from the edge on each side. The seam closes invisibly and lies flat.
Seaming the sleeves: Seam the sleeve cast-on edges to the armholes with mattress stitch, matching the center of the sleeve to the shoulder seam. Pin first, then sew.
Weaving in ends: Thread each loose end onto the tapestry needle and weave it back and forth through the wrong side of the fabric for about 5 cm, then trim close to the fabric. Never tie a knot — knots work loose and create bumps.
Final steam: Hold a steam iron 2–3 cm above the seams (never press down on mohair) to relax the seams and blend them into the fabric.
Pro Tips and Variations
- Change the color story: Swap cherry red and pink for cream and camel, or navy and pale blue, for a completely different look. Keep the checkerboard alternation so the patchwork grid stays crisp.
- Adjust the size: To make the cardigan larger or smaller, add or remove whole motifs — a 4 x 3 grid gives a longer body, a 3 x 4 grid gives a wider one. Each motif adds approximately 20 cm (8 in) to that dimension, so plan your grid before you cast on.
- Substitute the yarn: Any lace-weight yarn held double will work, as long as you match the gauge. A smooth wool-silk blend will give a crisper, less fuzzy surface; a brushed alpaca will be even softer and fluffier.
- Add a cable twist: For a more pronounced wagon-wheel center, use your cable needle to cross two stitches every 8th row in the middle of each motif — this adds a raised spiral but does not change the stitch count.