Enchanted Meadow Mosaic Blanket Free Pattern – Knit a Wildflower Dreamscape
Enchanted Meadow Mosaic Blanket Free Pattern – Knit a Wildflower Dreamscape
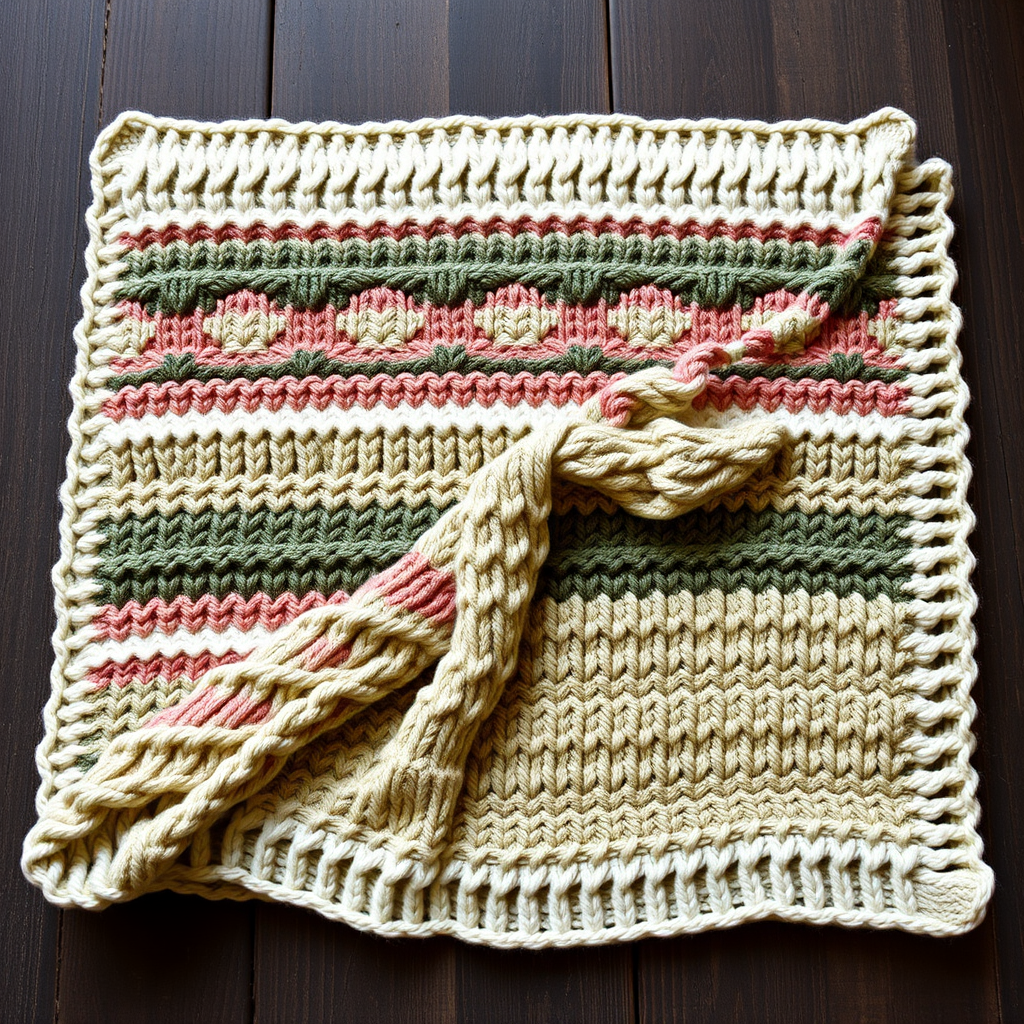
Wrap yourself in a lush, textured meadow with this mosaic-inspired knitted blanket. Featuring a symphony of earthy greens, soft pinks, and creamy whites, this pattern blends simple slipped stitches with bold color blocks to create a modern, heirloom-quality piece that feels like a walk through a wildflower field. The geometric diamond and zigzag motifs shift gracefully across horizontal bands, giving the finished blanket a rich, tapestry-like dimension that will become a cherished staple in your home for years to come.
This free pattern is perfect for adventurous beginners and seasoned knitters alike—if you can knit, purl, and slip a stitch, you can create this stunning 50" x 60" throw. The mosaic technique is surprisingly simple: you work with two colors per section, slipping stitches from the previous row to build intricate-looking patterns without complex colorwork. Let's dive in and start knitting your own wildflower dreamscape!
Materials Needed
Before you begin, gather the following supplies. All yarn amounts are based on worsted weight yarn with a standard gauge—adjust if your tension differs significantly.
Yarn
- Color A (Cream): 800g / approximately 1,600 yards – for the foundation, borders, and main sections
- Color B (Sage Green): 700g / approximately 1,400 yards – for sections 1, 4, 6, and 7
- Color C (Dusty Rose): 600g / approximately 1,200 yards – for sections 2, 3, and 6
- Color D (Moss Green): 500g / approximately 1,000 yards – for sections 2, 4, and 5
Tip: Choose a soft, machine-washable worsted weight yarn (like a wool-acrylic blend) for durability and easy care. The earthy palette works beautifully with natural fibers, but any worsted weight yarn that meets gauge will work.
Needles & Notions
- US 8 (5mm) circular knitting needle, 32-inch or longer (the long cord is essential to hold all 226 stitches comfortably)
- Stitch markers (optional, but helpful for tracking section boundaries)
- Tapestry needle for weaving in ends
- Blocking mats and pins (for finishing)
Gauge
18 stitches and 24 rows = 4 inches in stockinette stitch (blocked). Always knit a gauge swatch first—your blanket's final dimensions depend on matching this tension. If your gauge is off, change needle size accordingly.
Step-by-Step Instructions
This blanket is worked flat in one piece from the bottom up. The mosaic pattern is created by working with two colors per section, slipping stitches from the previous row to create geometric shapes. Follow the pattern notes carefully, and you'll have a beautiful, professional-looking finish.
Pattern Notes & Abbreviations
- CO: cast on
- K: knit
- P: purl
- Sl: slip stitch purlwise (insert needle as if to purl, slip the stitch to the right needle without working it)
- K2tog: knit two together (not used in this pattern, but listed for reference)
- Yo: yarn over (not used in this pattern)
- St(s): stitch(es)
- Rep: repeat
- RS: right side
- WS: wrong side
Finished Size: Approximately 50 inches wide x 60 inches long (blocked).
Key Techniques:
- Slipped Stitch Selvage: For a neat, professional edge, slip the first stitch of every row purlwise with yarn in front, and knit the last stitch of every row. This creates a clean, braided edge that's perfect for a blanket.
- Carrying Yarn: When switching colors between sections, always carry the unused yarn loosely up the side of the work. This prevents puckering and keeps the edges tidy.
- Mosaic Technique: The slipped stitches from the previous row create the pattern. Always slip stitches purlwise with the yarn held to the wrong side of the work (unless otherwise noted). This keeps the floats on the back, creating a clean front.
Foundation & Bottom Border
Step 1: With Color A (Cream), CO 226 stitches using a long-tail cast on. This gives you a stretchy, sturdy edge.
Step 2: Knit 6 rows in garter stitch (knit every row) for the bottom border. This creates a solid, non-curling foundation for your mosaic pattern. End with a WS row.
Section 1 (Color A & B) – Sage & Cream
This section creates a delicate, staggered diamond pattern. Work the 4-row repeat until the section measures 6 inches from the border.
- Row 1 (RS): With A, K1 (selvage), *K1, Sl1, rep from * to last st, K1 (selvage).
- Row 2 (WS): With A, K1, *P1, Sl1, rep from * to last st, K1.
- Row 3 (RS): With B, K1, *Sl1, K1, rep from * to last st, K1.
- Row 4 (WS): With B, K1, *Sl1, P1, rep from * to last st, K1.
Repeat Rows 1-4 until the section measures 6 inches from the border, ending with a WS row. Cut Color B, leaving a 6-inch tail for weaving in later.
Section 2 (Color C & D) – Rose & Moss
This section introduces a wider repeat, creating bolder geometric shapes. Work the 4-row repeat until this section measures 6 inches.
- Row 1 (RS): With C, K1, *K2, Sl1, rep from * to last 2 sts, K2, K1 (selvage).
- Row 2 (WS): With C, K1, *P2, Sl1, rep from * to last 2 sts, P2, K1.
- Row 3 (RS): With D, K1, *Sl1, K2, rep from * to last 2 sts, Sl1, K1, K1 (selvage).
- Row 4 (WS): With D, K1, *Sl1, P2, rep from * to last 2 sts, Sl1, K1.
Repeat Rows 1-4 until the section measures 6 inches, ending with a WS row. Cut Color D, leaving a tail.
Section 3 (Color A & C) – Cream & Rose
Now we return to a cream base with rose accents, creating a wider, more open pattern.
- Row 1 (RS): With A, K1, *K3, Sl1, rep from * to last 3 sts, K3, K1 (selvage).
- Row 2 (WS): With A, K1, *P3, Sl1, rep from * to last 3 sts, P3, K1.
- Row 3 (RS): With C, K1, *Sl1, K3, rep from * to last 3 sts, Sl1, K2, K1 (selvage).
- Row 4 (WS): With C, K1, *Sl1, P3, rep from * to last 3 sts, Sl1, P2, K1.
Repeat Rows 1-4 until the section measures 6 inches, ending with a WS row. Cut Color C, leaving a tail.
Section 4 (Color B & D) – Sage & Moss
This section uses the two green shades, creating a deep, forest-like band with a wider repeat.
- Row 1 (RS): With B, K1, *K4, Sl1, rep from * to last 4 sts, K4, K1 (selvage).
- Row 2 (WS): With B, K1, *P4, Sl1, rep from * to last 4 sts, P4, K1.
- Row 3 (RS): With D, K1, *Sl1, K4, rep from * to last 4 sts, Sl1, K3, K1 (selvage).
- Row 4 (WS): With D, K1, *Sl1, P4, rep from * to last 4 sts, Sl1, P3, K1.
Repeat Rows 1-4 until the section measures 6 inches, ending with a WS row. Cut Color D, leaving a tail.
Section 5 (Color A & D) – Cream & Moss
This section pairs cream with moss green for a fresh, airy feel with the widest repeat yet.
- Row 1 (RS): With A, K1, *K5, Sl1, rep from * to last 5 sts, K5, K1 (selvage).
- Row 2 (WS): With A, K1, *P5, Sl1, rep from * to last 5 sts, P5, K1.
- Row 3 (RS): With D, K1, *Sl1, K5, rep from * to last 5 sts, Sl1, K4, K1 (selvage).
- Row 4 (WS): With D, K1, *Sl1, P5, rep from * to last 5 sts, Sl1, P4, K1.
Repeat Rows 1-4 until the section measures 6 inches, ending with a WS row. Cut Color D, leaving a tail.
Section 6 (Color B & C) – Sage & Rose
This final patterned section combines sage and rose for a soft, romantic finish before the top border.
- Row 1 (RS): With B, K1, *K6, Sl1, rep from * to last 6 sts, K6, K1 (selvage).
- Row 2 (WS): With B, K1, *P6, Sl1, rep from * to last 6 sts, P6, K1.
- Row 3 (RS): With C, K1, *Sl1, K6, rep from * to last 6 sts, Sl1, K5, K1 (selvage).
- Row 4 (WS): With C, K1, *Sl1, P6, rep from * to last 6 sts, Sl1, P5, K1.
Repeat Rows 1-4 until the section measures 6 inches, ending with a WS row. Cut Color C, leaving a tail.
Section 7 (Color A & B) – Cream & Sage
Repeat the Section 1 pattern exactly (Rows 1-4) for 6 inches, ending with a WS row. This mirrors the bottom of the blanket, creating a balanced, symmetrical design.
Top Border & Bind Off
Step 1: With Color A (Cream), knit 6 rows in garter stitch (knit every row) to match the bottom border.
Step 2: Bind off loosely on the last row. To ensure a stretchy edge that won't pucker, use a larger needle for binding off (US 9/5.5mm) or use a stretchy bind-off method like the "knit two together" bind off.
Finishing & Blocking
Step 1: Weave in all ends using a tapestry needle. Be sure to weave in the tails from color changes securely, following the path of the yarn to hide them completely.
Step 2: Block the blanket to the specified dimensions (50" x 60"). Soak the blanket in lukewarm water with a gentle wool wash for 20-30 minutes, then gently squeeze out excess water (never wring). Lay the blanket flat on blocking mats, pinning out the edges to create a perfect rectangle. Pay special attention to the corners and the selvage edges.
Step 3: Allow the blanket to dry completely before unpinning. This can take 24-48 hours depending on humidity. Once dry, your Enchanted Meadow Mosaic Blanket is ready to snuggle under!
Tips for Success
- Count your stitches regularly. The mosaic pattern is forgiving, but a missed slip stitch can throw off the pattern. Check your stitch count at the end of each row if you're unsure.
- Keep your tension even. When slipping stitches, don't pull the yarn too tight—this can cause puckering. Let the slipped stitches rest loosely on the needle.
- Use stitch markers to mark the beginning of each pattern repeat if you find it helpful. Place a marker every 25 stitches to make counting easier.
- Blocking is non-negotiable. This pattern truly shines after blocking—the stitches even out, the texture becomes more defined, and the edges straighten beautifully.
This Enchanted Meadow Mosaic Blanket is a labor of love that will reward you with a stunning, heirloom-quality piece. The rhythmic repetition of slipped stitches is meditative, and watching the colors build into a wildflower dreamscape is deeply satisfying. Whether you're knitting it for yourself or as a gift, this blanket is sure to be treasured for generations. Happy knitting!


