Free Pattern: The Copper Loop Recycled Pop-Tab Cuff
Free Pattern: The Copper Loop Recycled Pop-Tab Cuff
Introduction
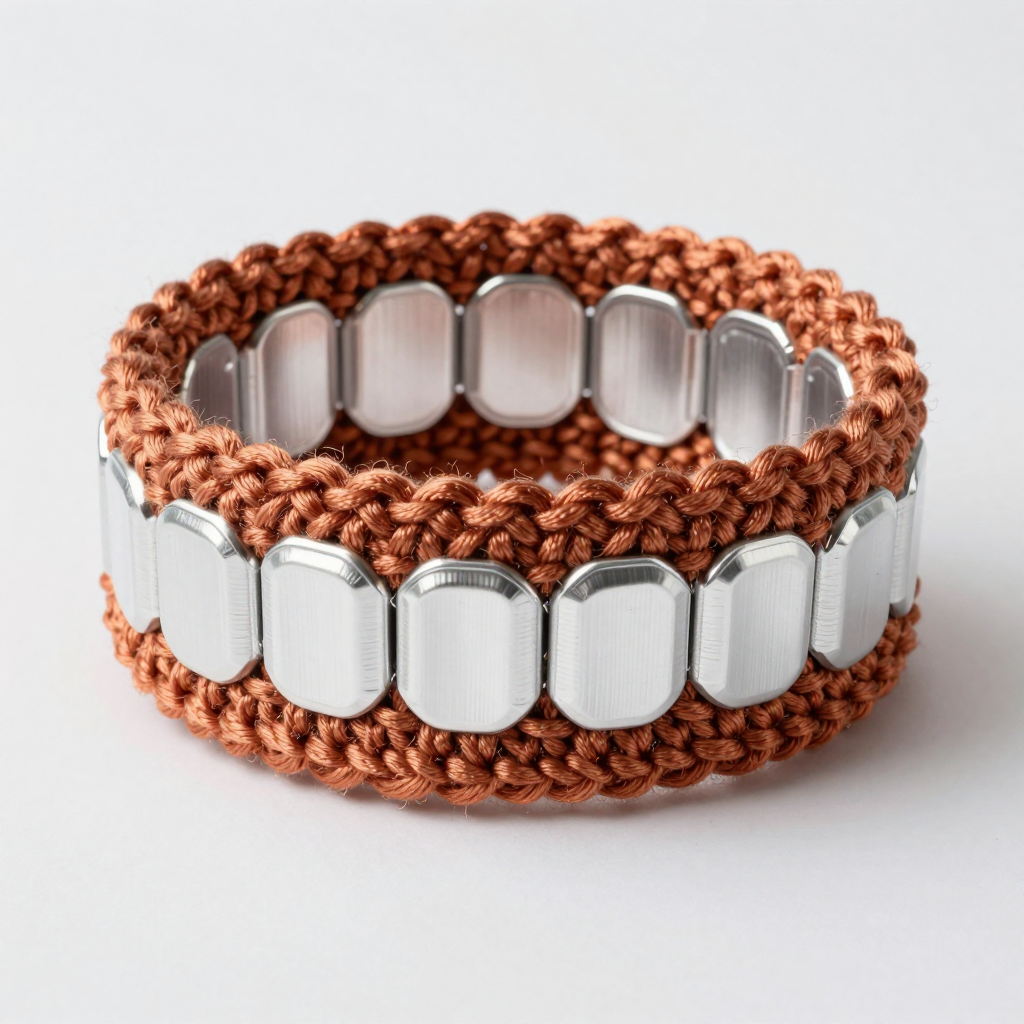
If you have ever wanted to make something beautiful with your own hands but felt sure you needed years of practice first, this is the project for you. The Copper Loop Recycled Pop-Tab Cuff is a beginner-friendly crochet bracelet that turns everyday aluminum can tabs and a scrap of yarn into a bold, eco-chic accessory. It is perfect for absolute beginners, for crafters who love upcycling, and for anyone looking for a quick, satisfying project that can be finished in a single cozy afternoon. The finished cuff is a continuous ring of flat silver tabs, each one joined to the next with chunky, visible single crochet stitches in a warm copper color, with a slightly raised crocheted edge running around the top and bottom. It looks handmade in the best possible way, feels sturdy but flexible on the wrist, and stacks beautifully with other bracelets or shines all on its own.
Materials Needed
- 12–14 clean aluminum pop tabs (the pull tabs from soda cans). Wash them with warm soapy water and dry them completely. If any tab has a sharp burr or rough edge, smooth it with a nail file before you begin.
- Yarn option A: Worsted weight (size 4) cotton yarn, approximately 15–20 yards. The sample is shown in a warm copper/rust color.
- Yarn option B: Plarn (yarn made from plastic bags) — 2–3 plastic grocery bags cut into 1-inch-wide strips, approximately 15 yards total. Plarn gives the cuff a little more natural stretch.
- Crochet hook: G/6 (4.0 mm). The "G/6" is the US size and "4.0 mm" is the metric size — they are the same hook.
- Stitch marker (one is enough; a safety pin or a scrap of contrasting yarn works too).
- Tapestry needle (a large-eyed, blunt-tipped needle used for weaving in yarn ends).
- Scissors for cutting yarn.
- Nail file (optional, for smoothing rough tab edges).
Finished size: Approximately 7 inches (18 cm) in circumference and 1 inch (2.5 cm) wide. This fits most adult wrists comfortably. See the Pro Tips section for how to adjust the size.
Abbreviations and Beginner Glossary
Every abbreviation used in this pattern is listed below and explained in plain English. If you have never crocheted before, read this section twice before you pick up your hook — it is your dictionary.
- ch — chain. Make a loop with the yarn on your hook, then pull the yarn through that loop. That is one chain stitch. Chains are the foundation of many crochet projects.
- sc — single crochet. Insert your hook into the stitch or hole, wrap the yarn over the hook, pull up a loop (you now have 2 loops on your hook), wrap the yarn over again, and pull it through both loops. That is one single crochet.
- sl st — slip stitch. Insert your hook into the stitch, wrap the yarn over the hook, and pull it through both the stitch and the loop on your hook in one motion. It creates an almost invisible join.
- sts — stitches. The little V-shaped bumps you create as you crochet.
- round — one complete trip around the ring of the bracelet. Because this cuff is worked in a circle, we call each pass a "round" instead of a "row."
- fasten off — cut the yarn a few inches from your work, then pull the tail all the way through the last loop on your hook to lock it. This stops the stitches from unraveling.
- weave in ends — use the tapestry needle to thread the loose yarn tails back through the inside of your stitches so they are hidden and secure.
- plarn — "plastic yarn," made by cutting plastic grocery bags into strips and tying them end to end into one long strand.
- tapestry needle — a big needle with a large eye and a rounded tip, used for sewing in yarn ends.
Gauge
Gauge is not critical for this project. Because the pop tabs set the size of the cuff, your stitch tension will not change the finished circumference. The finished cuff measures approximately 7 inches (18 cm) in circumference and 1 inch (2.5 cm) wide.
Why gauge usually matters: In most crochet and knitting patterns, gauge (how many stitches and rows fit into a 4-inch square) tells you whether your finished item will come out the size the designer intended. If your stitches are looser than the designer's, your item will be bigger; if tighter, smaller.
How to make a gauge swatch (for future projects): Crochet a small square about 5 inches across in the stitch the pattern uses. Lay it flat, place a ruler across the middle, and count how many stitches fit in 4 inches. Compare that number to the pattern's gauge. If you have too many stitches, try a larger hook; if too few, try a smaller hook. For this cuff, you can skip the swatch entirely — just make sure your single crochet stitches are snug enough to hold the tabs firmly.
Beginner Tips Before You Start
- Work the joining stitches snugly. The three single crochet stitches that join each pair of tabs are what hold the whole cuff together. Pull them firm so the tabs cannot rattle or slide, but do not pull so hard that the yarn squeaks or the tab bends.
- Keep all tabs facing the same way. Before you join anything, lay all your tabs flat on the table with the flat side down and the raised loop facing up. Consistency here is what makes the finished cuff look even and professional.
- Use a stitch marker. Place a stitch marker in the first stitch of each round so you always know where the round began and where to join. This one habit prevents most beginner mistakes.
- Do not pull the yarn too tight. Beginners often grip the yarn like it might escape. Hold it with gentle, even tension — tight enough to be neat, loose enough that your hook slides easily.
- Count out loud. Counting your stitches as you make them (one, two, three…) is the simplest way to catch a mistake immediately instead of three rounds later.
- Smooth any sharp tab edges first. Run your finger along each tab before you start. If you feel a burr, file it down — this protects both your yarn and your wrist.
Step-by-Step Instructions
Prepare the Tabs and Yarn
Step 1: Wash and dry all 12–14 pop tabs. Remove any sharp burrs with a nail file if needed. Lay them flat on your table, all facing the same direction.
Step 2 (only if using plarn): Flatten each grocery bag, cut off the handles and the bottom seam, then cut the bag into 1-inch-wide continuous strips. Tie the strips end-to-end with a double knot to create one long strand, and wind it into a ball. If you are using cotton yarn, skip this step.
Set Up the Base Strip
Step 3: Hold two pop tabs side by side with their flat sides facing the same direction and their holes aligned. Using your yarn or plarn, work 3 sc through both holes to join them. These 3 stitches secure the pair firmly and create the first link of the cuff. (3 sc)
Step 4: Continue joining tabs into a chain: hold the next tab against the previous one, align the holes, and work 3 sc through both holes. Repeat this joining step until you have joined all 12–14 tabs into a single flexible strip. The strip should measure about 7 inches (18 cm) long when gently stretched. (3 sc per join)
Form the Cuff Ring
Step 5: Bring the two ends of the strip together to form a ring, making sure the tabs are not twisted. Join the first and last tabs by working 3 sc through both aligned holes. Then sl st into the first sc of the round to close the ring. (3 sc for the join, plus 1 sl st to close)
Decorative Edging
Round 1: Ch 1 (this chain does not count as a stitch). Work 1 sc into each sc and into each tab hole around the entire outer edge of the ring. You should have approximately 36–42 sc. Join with a sl st to the first sc of the round. (approx. 36–42 sc)
Round 2: Ch 1. Work 1 sc in each sc around. Join with a sl st to the first sc. Fasten off, leaving a 4-inch tail. (same stitch count as Round 1, approx. 36–42 sc)
Optional contrast round: Join a second color (such as cream or charcoal) with a sl st anywhere on the edge. Ch 1, work 1 sc in each sc around. Join with a sl st and fasten off. (same stitch count as Round 1, approx. 36–42 sc)
Assembly and Finishing
Weaving in ends: Thread each loose tail onto your tapestry needle. Turn the cuff inside out and pass the needle back and forth through the backs of several nearby stitches, following the path of the yarn so the tail disappears into the fabric. Change direction once (go back the way you came for a few stitches) so the tail cannot work its way loose. Trim the yarn close to the stitches. Use the needle to tuck any loose plarn tails under the crochet stitches on the inside of the cuff.
Shaping: Gently shape the cuff with your fingers. The tabs should sit flat and evenly spaced around the ring, and the crocheted edging should sit neatly along the top and bottom edges.
Blocking: This cuff does not need wet blocking. If the edging looks slightly uneven, lightly mist it with clean water, press it flat with your fingers, and let it air-dry completely before wearing.
Care: Spot clean with a damp cloth and mild soap. Do not machine wash or dry, as the aluminum tabs may bend.
Pro Tips and Variations
- Make it wider: Join two rows of tabs side by side before forming the ring. This creates a bold, double-wide cuff with a completely different look.
- Adjust the fit: For a looser fit, add 1–2 extra tabs to the strip before joining the ring. For a snugger fit, remove 1–2 tabs. Always test the strip around your wrist before you close the ring.
- Change colors: Work the joining stitches in one color and the edging rounds in a contrasting color, or add the optional contrast round in cream or charcoal for a two-tone finish. You can also switch yarn colors every few tabs for a striped effect.
- Substitute yarn: For a stretchier cuff, use plarn instead of cotton yarn — plarn has natural give and makes the cuff hug the wrist. Cotton gives a crisper, more structured finish, while acrylic worsted weight is a soft, affordable alternative.