Free Pattern: Twilight Ember Moss Stitch Cowl
Twilight Ember Moss Stitch Cowl — A Free Beginner Crochet Pattern
Introduction
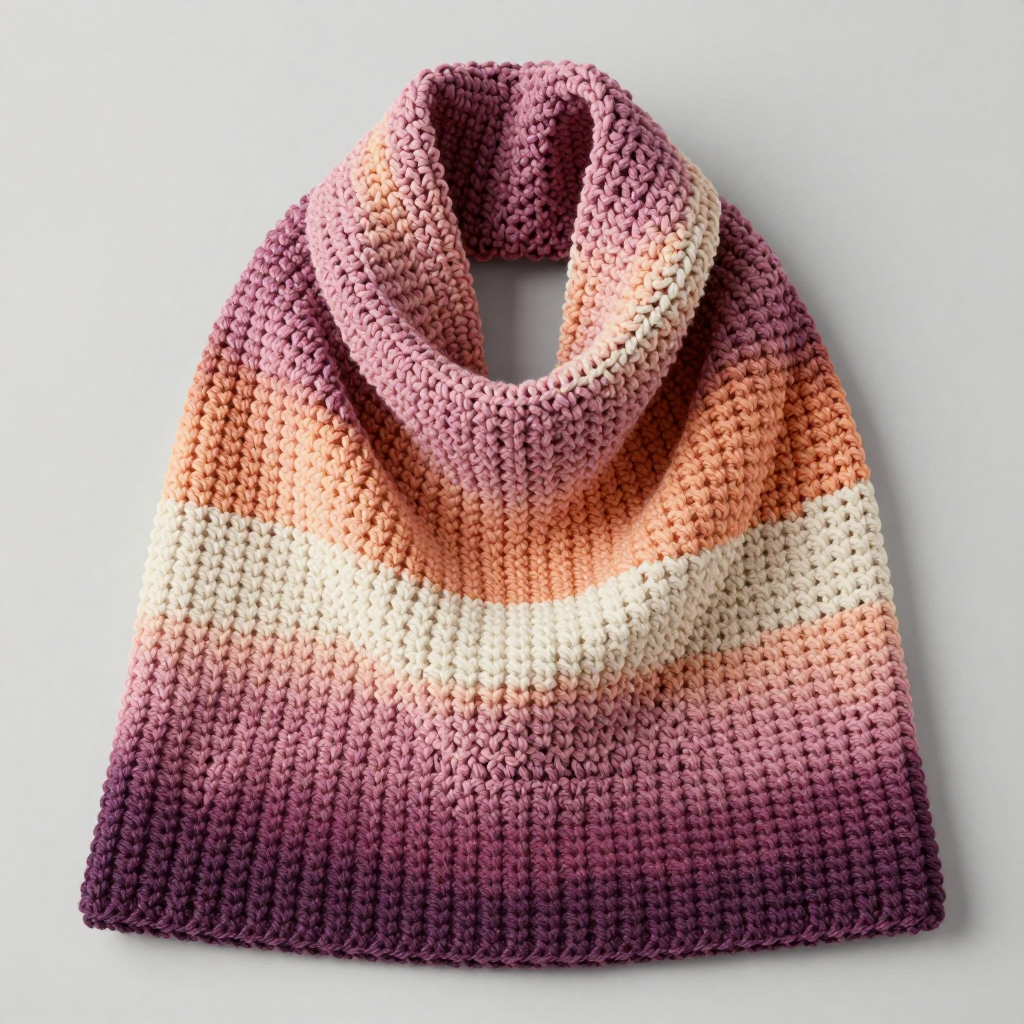
If you have never held a crochet hook before, this is the perfect first project to fall in love with. The Twilight Ember Moss Stitch Cowl is a soft, drapey loop of textured fabric that shifts gently from deep plum through dusty rose and warm apricot to soft cream — like a twilight sky melting into dawn. It is worked in the moss stitch, which is simply single crochet stitches and tiny chain gaps taking turns, so you only ever need to know two basic moves. The finished cowl is light enough to wear indoors but warm enough for crisp evenings, and the nubby, woven texture feels wonderfully squishy against your neck. Best of all, there is no shaping, no complicated counting tricks, and no need to work in a circle — you crochet a simple rectangle and seam the ends together at the very end.
Materials Needed
- Yarn: Fine (2) weight yarn, approximately 350–400 yards total, in an ombre gradient of deep plum, dusty rose, warm apricot, and soft cream. You can use one self-striping ombre cake, or four separate solid skeins (roughly 90–100 yards of each color).
- Crochet hook: Size E/4 (3.5 mm). (The "E/4" is the US size and "3.5 mm" is the metric size — they are the same hook.)
- Stitch markers: At least 4. These are small clips or loops you slide onto your work to mark a spot so you do not lose your place.
- Tapestry needle: A large, blunt-tipped sewing needle with an eye big enough for yarn. Used for seaming and weaving in ends.
- Scissors: Any sharp pair for cutting yarn.
- Measuring tape or ruler: For checking your gauge (explained below).
Finished size: Approximately 27 cm (about 10.5 inches) wide and 34 cm (about 13.5 inches) long when laid flat as a rectangle, forming a loop with a circumference of roughly 68 cm (about 27 inches) once seamed. It slips easily over the head and sits softly around the neck.
Abbreviations and Beginner Glossary
Every abbreviation used in this pattern is listed here. Read through this list once before you begin — you will be surprised how quickly it all makes sense.
- ch — chain. Make a loop of yarn on your hook, then pull a new loop of yarn through that loop. Each new loop you pull through counts as one chain stitch. Chains look like a little braid or a row of tiny "V" shapes.
- sc — single crochet. Insert your hook into the next stitch, wrap the yarn over the hook (called a "yarn over"), pull the hook back through the stitch so you have two loops on your hook, yarn over again, and pull through both loops at once. You are left with one loop on your hook. That is one single crochet.
- ch-1 sp — chain-one space. This is the little gap or hole created underneath a single chain stitch from the previous row. When the pattern says "sc in next ch-1 sp," you insert your hook into that gap (not into a stitch), and work your single crochet there.
- st / sts — stitch / stitches. One completed unit of crochet work.
- sps — spaces. The gaps described above.
- sl st — slip stitch. Insert your hook into the stitch, yarn over, and pull the hook straight back through both the stitch and the loop on your hook in one motion. It creates a nearly invisible joining stitch.
- turn — flip your work over (like turning a page) so you can work back along the row you just finished.
- rep from * — repeat the instructions that follow the asterisk (*) as many times as the pattern tells you.
- fasten off — cut the yarn a few inches from your work, then pull the tail all the way through the last loop on your hook to lock it. This secures your work so it will not unravel.
- weave in ends — thread a yarn tail onto your tapestry needle and sew it back and forth through the fabric so it is hidden and secure.
- RS / WS — right side / wrong side. The right side is the "pretty" front face of your fabric; the wrong side is the back.
- moss stitch — also called granite stitch. A pattern that alternates one single crochet with one chain-one space, row after row. It makes a dense, nubby, woven-looking fabric.
- gauge — how many stitches and rows fit into a set measurement (here, 4 inches / 10 cm). It tells you whether your fabric will come out the right size.
- blocking — gently wetting and shaping your finished piece, then letting it dry flat so the stitches relax and even out.
Gauge
Gauge: 25 stitches and 30 rows = 10 cm x 10 cm (4 x 4 inches) in moss stitch.
Why gauge matters: Gauge is simply how tightly or loosely you crochet. If your stitches are bigger than the pattern's, your cowl will come out larger than planned; if they are smaller, it will come out tighter and shorter. Checking gauge first saves you from disappointment at the end.
How to make a gauge swatch: With your chosen yarn and your E/4 (3.5 mm) hook, chain 30. Work in moss stitch (the same pattern as Row 2 below) for about 15 rows. Lay the swatch flat without stretching it. Place a ruler across the middle and count how many single crochet stitches fit in 10 cm (4 inches) — you want about 25. Then measure 10 cm (4 inches) vertically and count the rows — you want about 30. If you have more stitches than 25, your tension is tight: try a hook one size larger. If you have fewer than 25, your tension is loose: try a hook one size smaller. The finished cowl is forgiving, so being within a stitch or two is perfectly fine.
Beginner Tips Before You Start
- Count your chains carefully at the very start. The first row of 68 chains sets up everything else. Count them twice, and place a stitch marker in every 10th chain so you do not lose track.
- Use stitch markers to track your color changes. Place a marker in the first stitch of the row where you change colors, so you can easily see where each color band begins and ends.
- Do not pull your yarn too tight. Beginners often grip the yarn hard, which makes stiff, tiny stitches. Keep a relaxed, even tension — the moss stitch should feel soft and slightly open, not tight and board-like.
- Always work your single crochet into the chain-1 space, not into the chain itself. This is the single most important rule of the moss stitch. Inserting your hook into the gap keeps the pattern neat and even.
- Check your stitch count at the end of every row. You should always have 34 single crochet stitches and 33 chain-1 spaces. If you are off, it is much easier to fix one row now than ten rows later.
- Keep your turning chain loose. The "ch 1" at the start of each row is a turning chain — it lifts your yarn up to the next row. Make it a little relaxed so the edge of your cowl stays stretchy and does not pucker.
Step-by-Step Instructions
Important note before you begin: This cowl is worked flat in rows (back and forth like a scarf), then the two short ends are seamed together at the end to make a loop. The moss stitch alternates single crochet stitches with chain-1 spaces. Always work each single crochet into the chain-1 space of the previous row — never into the chain itself.
Section 1: The Foundation Chain
With deep plum yarn, ch 68. (68 chains)
This is your starting braid. Count the "V" shapes along the front of the chain to confirm you have 68.
Section 2: The Body (Rows 1–31)
Row 1: Sc in the 2nd ch from hook, *ch 1, skip the next ch, sc in the next ch; repeat from * across, ending with sc in the last ch. Turn. (34 sc, 33 ch-1 sps)
In plain words: skip one chain, make a single crochet in the next, make one chain, skip one chain, single crochet in the next — and keep going that way to the end of the row. You are creating a rhythm of "stitch, gap, stitch, gap."
Row 2: Ch 1, sc in the first sc, *ch 1, sc in the next ch-1 sp; repeat from * across, ending with sc in the last sc. Turn. (34 sc, 33 ch-1 sps)
In plain words: make one chain to lift up to the new row, then single crochet into the very first stitch. Then chain one, and single crochet into the first little gap. Chain one, single crochet into the next gap — all the way across, finishing with a single crochet into the final stitch of the row.
Rows 3–10 (8 rows total, deep plum): Repeat Row 2 exactly — ch 1, sc in first sc, *ch 1, sc in next ch-1 sp, repeat from * across, ending with sc in last sc. Turn. (34 sc, 33 ch-1 sps each row)
Rows 11–18 (8 rows total, dusty rose): Change to dusty rose yarn at the start of Row 11, then repeat Row 2 exactly for all 8 rows — ch 1, sc in first sc, *ch 1, sc in next ch-1 sp, repeat from * across, ending with sc in last sc. Turn. (34 sc, 33 ch-1 sps each row)
Rows 19–25 (7 rows total, warm apricot): Change to warm apricot yarn at the start of Row 19, then repeat Row 2 exactly for all 7 rows — ch 1, sc in first sc, *ch 1, sc in next ch-1 sp, repeat from * across, ending with sc in last sc. Turn. (34 sc, 33 ch-1 sps each row)
Rows 26–31 (6 rows total, soft cream): Change to soft cream yarn at the start of Row 26, then repeat Row 2 exactly for all 6 rows — ch 1, sc in first sc, *ch 1, sc in next ch-1 sp, repeat from * across, ending with sc in last sc. Turn. (34 sc, 33 ch-1 sps each row)
Row 31 (final row, soft cream): Repeat Row 2 once more — ch 1, sc in first sc, *ch 1, sc in next ch-1 sp, repeat from * across, ending with sc in last sc. Do not turn and do not fasten off yet. (34 sc, 33 ch-1 sps)
Color-change note: When you switch colors, simply drop the old color and pick up the new one, leaving a short tail. You can either carry the unused colors loosely up the side edge (letting them travel along the edge until you need them again) or cut the yarn and rejoin the new color fresh. Either method works — carrying is faster, cutting gives cleaner edges.
Section 3: Seaming the Cowl
Step 1: Fold the cowl in half lengthwise with the right sides (the pretty front faces) together, matching the two short ends.
Step 2: Using soft cream yarn and your hook, single crochet the two short ends together: insert your hook through both layers at the corner, yarn over, pull through, and work one single crochet through both layers at a time across the entire short edge. (Approximately 34 sc joining the two ends)
Step 3: Fasten off by cutting the yarn a few inches from your work and pulling the tail through the last loop.
Alternative: If you prefer, you can whipstitch the seam instead — thread soft cream yarn onto your tapestry needle and sew small, even stitches through both layers along the short edge.
Section 4: Optional Ribbed Edging
This step is entirely optional but gives a tidy, finished look to the top and bottom openings.
Round 1: With soft cream yarn, join at the seam. Ch 1, then work single crochet evenly around the entire outer edge — approximately 1 sc per row along the sides and 1 sc per stitch along the top and bottom edges. Join with a sl st to the first sc. (Approximately 130 sc)
Round 2: Ch 1, sc in each sc around. Join with a sl st to the first sc. (Approximately 130 sc) Fasten off.
Repeat Rounds 1–2 for the inner edge if you would like both openings finished.
Assembly and Finishing
Seaming: If you have not already seamed the short ends in Section 3, do so now. Fold the rectangle in half with right sides together, line up the two short edges, and join them with single crochet or whipstitch as described above. Work your stitches evenly so the seam lies flat and does not pucker. When you are done, turn the cowl right side out so the seam is hidden inside.
Weaving in ends: Thread each yarn tail onto your tapestry needle. Working on the wrong side (the inside of the cowl), sew the tail back and forth through the fabric for about 5 cm (2 inches), changing direction once or twice so it cannot work loose. Trim the excess yarn close to the fabric. Do this for every tail — the color-change tails and the starting and finishing tails.
Blocking: Fill a basin with cool water and submerge the cowl for about 15 minutes. Gently squeeze out the water — do not wring or twist, which can stretch the stitches out of shape. Roll the cowl in a clean towel and press to remove more water. Lay it flat on a towel or blocking mat, gently pat it into shape so the rectangle measures about 27 cm x 34 cm, and let it dry completely. Blocking opens up the moss stitch texture beautifully and makes the fabric drape softly.
Pro Tips and Variations
- Play with color: Use a single self-striping ombre cake for a seamless gradient, or choose four solid colors that speak to you — try sage green into dusty blue into pale grey for a cool, misty version. You can also reverse the order (cream to plum) for a dawn-to-dusk effect.
- Adjust the size: To make the cowl wider or narrower, add or remove chains in multiples of 2 (the moss stitch needs an even number of chains). To make it longer or shorter, simply work more or fewer rows. Just remember that each extra 2 chains adds roughly 1 cm of width.
- Substitute yarn: This pattern works beautifully in any fine (2) weight yarn. A soft merino or alpaca blend gives extra warmth and drape; a cotton blend gives a crisper, more defined stitch texture. Always check your gauge with the new yarn before beginning.
- Add a twist: Before seaming the short ends, give one end a half-turn so the cowl forms a twisted loop (like an infinity scarf). This adds a stylish, modern touch and is just as easy to seam.