Meadow Breeze Market Tote Free Pattern – Textured Crochet Carryall
Meadow Breeze Market Tote Free Pattern – Textured Crochet Carryall
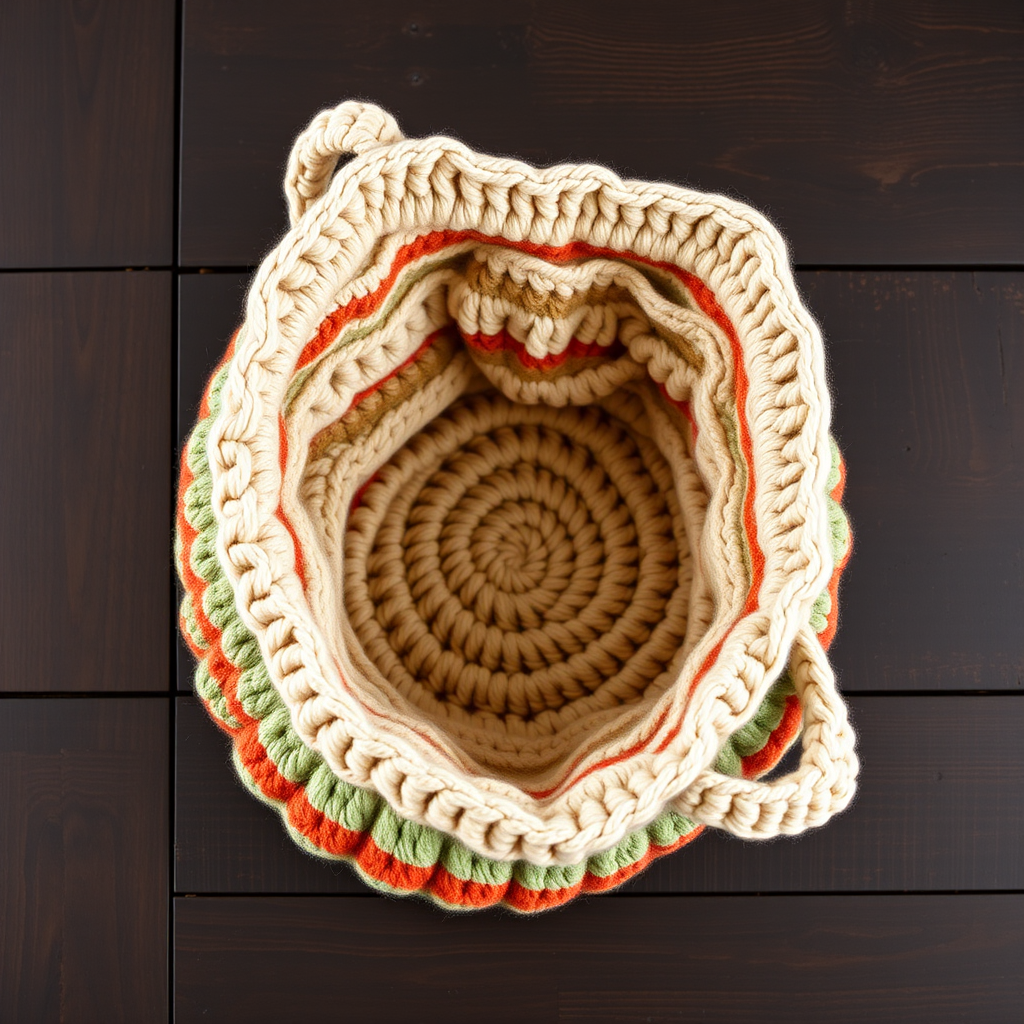
Imagine strolling through a sun-drenched farmers' market, your arm looped through a beautifully textured, handcrafted tote that's as practical as it is stylish. The Meadow Breeze Market Tote is exactly that—an airy, boho-chic carryall designed for everyday adventures. With its earthy stripes of sand, sage, and terracotta, and a delicate shell stitch border, this bag is a joy to create and even better to use. Whether you're hauling fresh produce, beach essentials, or your latest library haul, this crochet pattern is your ticket to a handmade staple you'll reach for all season long.
This free pattern is perfect for confident beginners and intermediate crocheters alike. The construction is straightforward—a simple round base that grows into a roomy, cylindrical body—with clear instructions to guide you from the very first magic ring to the final woven end. Let's dive in and create something beautiful together!
Materials Needed
Before you begin, gather your supplies. This project is wonderfully portable and requires just a few essentials:
- Yarn: Lion Brand 24/7 Cotton (or any worsted weight cotton yarn) in three colors:
- Color A (Sand) – approx. 150g
- Color B (Sage) – approx. 75g
- Color C (Terracotta) – approx. 75g
- Crochet Hook: 5.0 mm (US H-8) hook
- Stitch Markers (to track rounds)
- Yarn Needle (for weaving in ends and sewing the base)
- Scissors
Gauge: 16 dc x 9 rows = 4 x 4 inches (10 x 10 cm) in double crochet. Matching gauge ensures your bag turns out the right size, but slight variations are okay for a relaxed tote.
Step-by-Step Instructions
Important Notes: This pattern is worked in continuous rounds unless otherwise stated. The chain 3 at the beginning of each round counts as your first double crochet. Use stitch markers to mark the first stitch of each round—this will save you from counting headaches later!
Part 1: The Base (Worked in Color A – Sand)
We'll start with a flat, circular base. This gives your tote a sturdy bottom that stands up on its own.
Round 1: Make a magic ring. Chain 3 (counts as your first dc), then work 11 double crochet (dc) into the ring. Slip stitch (sl st) to the top of the starting chain-3 to join. You should have 12 dc total.
Round 2: Chain 3 (counts as dc), then work 1 dc into the same stitch (this is your increase). Work 2 dc into each stitch around. Slip stitch to join. You now have 24 dc.
Round 3: Chain 3, dc in the same stitch (increase). Dc in the next stitch. *Work 2 dc in the next stitch, dc in the next stitch.* Repeat from * to * around. Slip stitch to join. You now have 36 dc.
Round 4: Chain 3, dc in the same stitch. Dc in the next 2 stitches. *Work 2 dc in the next stitch, dc in the next 2 stitches.* Repeat from * to * around. Slip stitch to join. You now have 48 dc.
Round 5: Chain 3, dc in the same stitch. Dc in the next 3 stitches. *Work 2 dc in the next stitch, dc in the next 3 stitches.* Repeat from * to * around. Slip stitch to join. You now have 60 dc.
Round 6: Chain 3, dc in the same stitch. Dc in the next 4 stitches. *Work 2 dc in the next stitch, dc in the next 4 stitches.* Repeat from * to * around. Slip stitch to join. You now have 72 dc.
Round 7: Chain 3, dc in the same stitch. Dc in the next 5 stitches. *Work 2 dc in the next stitch, dc in the next 5 stitches.* Repeat from * to * around. Slip stitch to join. You now have 84 dc.
Round 8: Chain 3, dc in the same stitch. Dc in the next 6 stitches. *Work 2 dc in the next stitch, dc in the next 6 stitches.* Repeat from * to * around. Slip stitch to join. You now have 96 dc. Your base is complete!
Part 2: The Body (Creating the Stripes)
Now we'll build the walls of the bag. You'll work in continuous rounds, switching colors to create the beautiful striped pattern. Remember, chain 3 counts as your first dc in each round.
Rounds 9-10: With Color A (Sand), chain 3, then dc in each stitch around. Slip stitch to join. (96 dc each round)
Round 11: Switch to Color B (Sage). Chain 3, dc in each stitch around. Slip stitch to join.
Round 12: With Color B, chain 3, dc in each stitch around. Slip stitch to join.
Round 13: Switch to Color C (Terracotta). Chain 3, dc in each stitch around. Slip stitch to join.
Round 14: With Color C, chain 3, dc in each stitch around. Slip stitch to join.
Round 15: Switch to Color A (Sand). Chain 3, dc in each stitch around. Slip stitch to join.
Round 16: With Color A, chain 3, dc in each stitch around. Slip stitch to join.
Round 17: Switch to Color B (Sage). Chain 3, dc in each stitch around. Slip stitch to join.
Round 18: With Color B, chain 3, dc in each stitch around. Slip stitch to join.
Round 19: Switch to Color C (Terracotta). Chain 3, dc in each stitch around. Slip stitch to join.
Round 20: With Color C, chain 3, dc in each stitch around. Slip stitch to join.
Round 21: Switch to Color A (Sand). Chain 3, dc in each stitch around. Slip stitch to join.
Round 22: With Color A, chain 3, dc in each stitch around. Slip stitch to join.
Your bag body is now a beautiful striped cylinder. Take a moment to admire your work!
Part 3: Creating the Handle Openings
This is where we shape the handles. We'll create two gaps in the crochet work that will become comfortable, sturdy handles.
Round 23: With Color A, chain 3 (counts as dc). Dc in the next 20 stitches. Now, chain 25 and skip the next 25 stitches (this creates the first handle opening). Dc in the next 26 stitches. Chain 25 and skip the next 25 stitches (this creates the second handle opening). Dc in the next 5 stitches. Slip stitch to join. You'll have 96 dc and 2 chain-25 spaces.
Round 24: Chain 3. Now, dc in each stitch AND in each chain around. This means you'll work 25 dc into the chain spaces. Slip stitch to join. You now have 146 dc total (96 original + 50 from the chains).
Round 25: Chain 3, dc in each stitch around. Slip stitch to join. (146 dc)
Part 4: The Shell Stitch Border
Time for the finishing touch—a delicate, scalloped edge that gives the tote its boho charm.
Round 26: Chain 1 (does not count as a stitch). Single crochet (sc) in the same stitch. *Skip 2 stitches, work 5 double crochet (dc) into the next stitch, skip 2 stitches, sc in the next stitch.* Repeat from * to * all the way around. Slip stitch to the first sc to join.
Fasten off and weave in all your ends securely with your yarn needle.
Part 5: Finishing Touches
Your bag is almost ready! The final step creates a flat, sturdy base.
- Lay your bag flat on a table. The handle openings should align on top of each other.
- Using your yarn needle and a length of Color A yarn, sew the bottom corners together. This means you'll stitch through both layers of the base at each corner to close the gap and create a flat, rectangular bottom.
- Weave in any remaining ends securely.
Give your new tote a gentle steam block if desired (optional, but helps even out the stitches). Flip it right side out, and your Meadow Breeze Market Tote is ready for its first adventure!
This pattern is a wonderful way to practice color changes and create a functional piece you'll be proud to carry. Happy crocheting!


