Mystic Moonlight Gift Card Cozy Free Pattern – A Celestial Knit Pouch
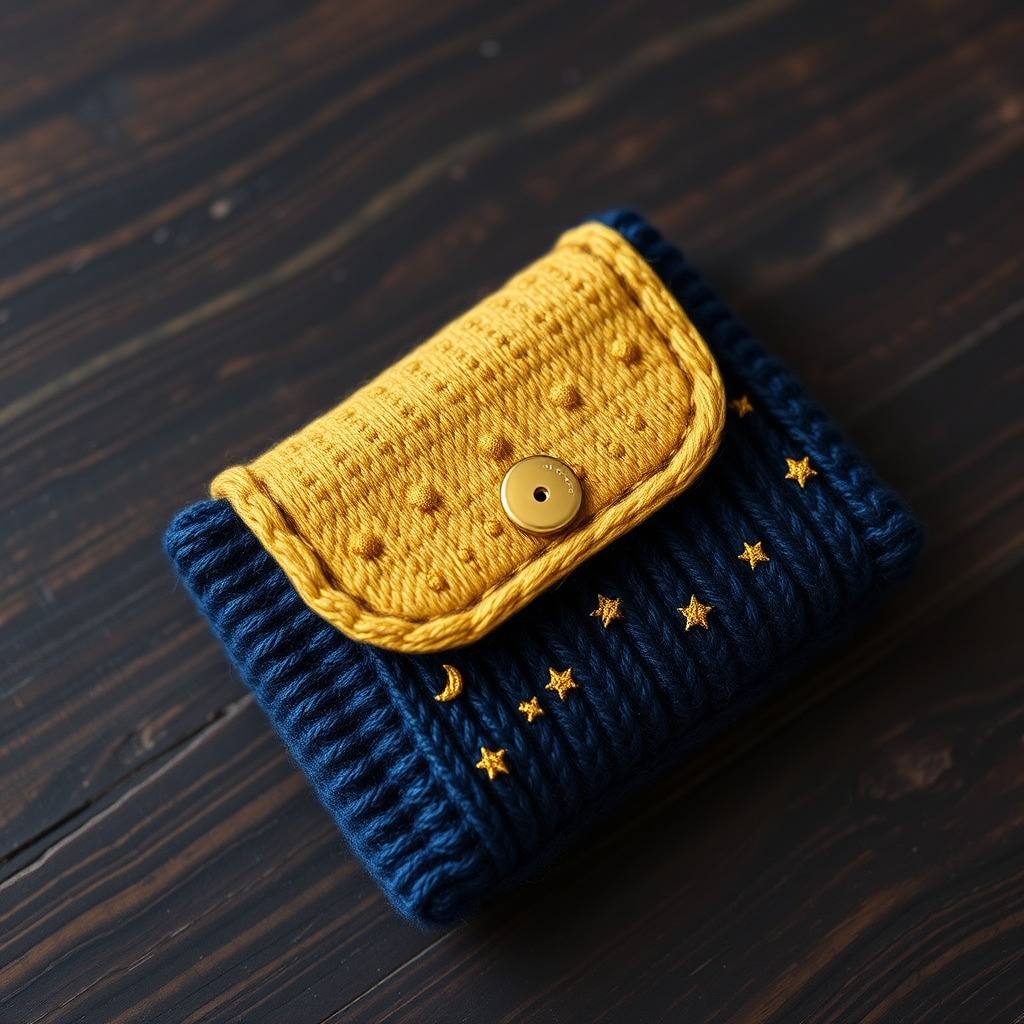
Mystic Moonlight Gift Card Cozy Free Pattern – A Celestial Knit Pouch
Wrap your gift cards in the enchanting glow of a knitted crescent moon pouch, complete with a sprinkle of starry beads. This quick, textured knit is the perfect handmade touch for any celebration. Whether you're gifting a birthday card, a holiday bonus, or a simple "thank you," this celestial cozy transforms a plain gift card into a keepsake that feels as magical as the night sky. Best of all, it's beginner-friendly, works up in an evening, and uses just a few basic stitches.
In this free pattern, you'll learn how to knit a flat two-piece pouch with a decorative flap, add a button closure, and embroider tiny stars and a moon for that extra mystical charm. Let's dive in and create something truly out of this world!
Materials Needed
Before you begin, gather the following supplies. All items are readily available at craft stores or online.
- Yarn: Worsted weight yarn in deep midnight blue (MC) and gold or silver (CC), approximately 50g each. A soft acrylic or wool blend works beautifully.
- Knitting Needles: US 6 (4.0mm) knitting needles – straight or circular, whichever you prefer.
- Gauge: 20 stitches and 28 rows = 4 inches in stockinette stitch. (Don't worry if your gauge is slightly off – this is a forgiving project, but matching gauge ensures the perfect fit for a standard gift card.)
- Extras: Tapestry needle for seaming and embroidery, one decorative button (gold or silver), scissors, and a tape measure.
Step-by-Step Instructions
This cozy is knitted flat in two pieces and seamed, creating a soft pouch with a flap. Follow along carefully, and you'll have a beautiful finished piece in no time.
Finished Size & Abbreviations
Finished Size: Approximately 4.5 inches wide by 3.5 inches tall (fits a standard gift card).
Abbreviations:
- CO: Cast on
- K: Knit
- P: Purl
- K2tog: Knit two together (right-leaning decrease)
- SSK: Slip, slip, knit (left-leaning decrease)
- YO: Yarn over (creates an eyelet hole)
- BO: Bind off
- St st: Stockinette stitch (knit one row, purl one row)
Back Panel (MC – Midnight Blue)
- Cast On: CO 22 stitches.
- Stockinette: Work in St st for 20 rows, ending with a purl row. (Your last row should be a wrong-side row.)
- Decrease Row (RS): K2tog, knit to last 2 stitches, SSK. (You now have 20 stitches.)
- Purl Row: Purl across all 20 stitches.
- Repeat Decreases: Repeat steps 3 and 4 twice more. (After the second repeat, you'll have 16 stitches.)
- Bind Off: BO all 16 stitches loosely. Weave in ends with your tapestry needle.
Front Panel (MC – Midnight Blue)
- Cast On: CO 22 stitches.
- Stockinette: Work in St st for 16 rows, ending with a purl row.
- Decrease Row (RS): K2tog, knit to last 2 stitches, SSK. (20 stitches remain.)
- Purl Row: Purl across all 20 stitches.
- Repeat Decreases: Repeat steps 3 and 4 once more. (You'll have 18 stitches.)
- Bind Off: BO all 18 stitches loosely. Weave in ends.
Flap (CC – Gold or Silver)
- Cast On: CO 18 stitches.
- Stockinette: Work in St st for 8 rows, ending with a purl row.
- Decrease Row (RS): K2tog, knit to last 2 stitches, SSK. (16 stitches remain.)
- Purl Row: Purl across all 16 stitches.
- Repeat Decreases: Repeat steps 3 and 4 once more. (14 stitches remain.)
- Eyelet Row (RS): This row creates the buttonhole. Work as follows: K2tog, YO, K2tog, YO, K2tog, YO, K2tog, YO, K2tog, YO, K2tog, YO, K2tog, YO, K2tog. (You'll end with 14 stitches, and the YOs create 7 small holes.)
- Purl Row: Purl across all 14 stitches.
- Bind Off: BO all stitches. Weave in ends.
Assembly – Bringing It All Together
- Seam the Pouch: Place the back panel and front panel with right sides together. Using your tapestry needle and MC yarn, sew along the bottom and side seams, leaving the top open. Turn the pouch right side out.
- Attach the Flap: Position the flap (CC) on the top edge of the back panel, aligning the cast-on edge of the flap with the top edge of the back panel. Sew securely using CC yarn, making sure the flap is centered.
- Add the Button: Sew a button onto the front panel, centered, about 1 inch from the top edge. Use the eyelet row on the flap as the buttonhole – simply fold the flap over and button it through one of the YO holes.
- Embroider the Stars & Moon (Optional): Using CC yarn and a tapestry needle, embroider small stars and a crescent moon onto the front panel. For stars, make small straight stitches in a cross or asterisk shape. For the moon, use a series of short backstitches in a crescent curve. Let your creativity shine!
- Finish: Insert a gift card into the pouch, fold the flap over the button, and admire your celestial creation. It's ready to gift!
Tips for a Perfect Finish
- Keep Tension Even: When working the eyelet row, don't pull the YOs too tight – they need to be loose enough for the button to pass through.
- Blocking: If your pieces curl at the edges (common with stockinette), gently steam block them before seaming. Lay them flat, cover with a damp cloth, and press with a warm iron.
- Customize: Swap the midnight blue for a deep burgundy or forest green, and use a contrasting metallic yarn for the flap. The pattern is endlessly adaptable!
This Mystic Moonlight Gift Card Cozy is more than just a holder – it's a tiny piece of art that shows you care. Whether you're a seasoned knitter or picking up needles for the first time, this pattern is a joy to make. So grab your yarn, settle in, and let the stars guide your needles. Happy knitting!



