Retro Granny Square Vest Free Pattern
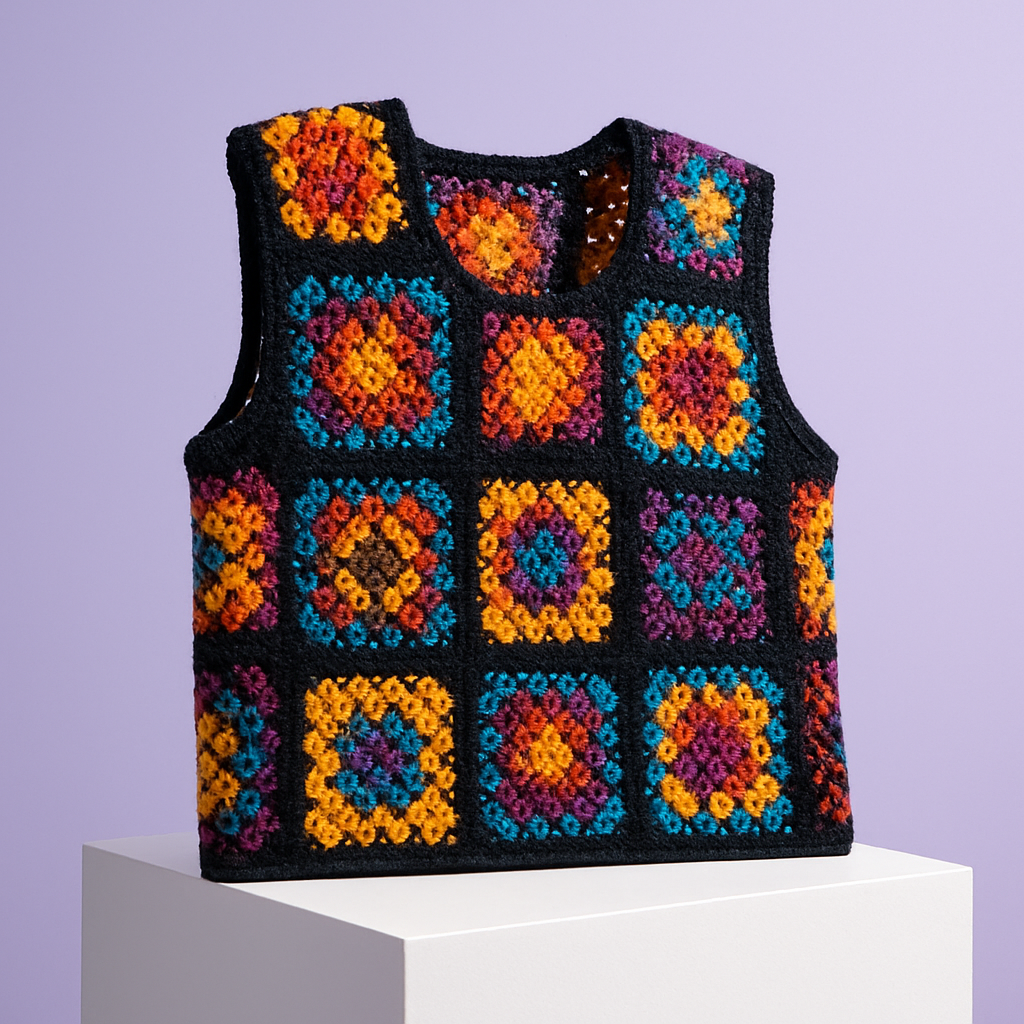
Retro Granny Square Vest Free Pattern
Introduction
Dive into the nostalgia of the 70s with this vibrant Retro Granny Square Vest. Perfect for adding a pop of color and vintage flair to your wardrobe, this vest is a delightful project for crochet enthusiasts. Whether you're a beginner or looking to refresh your skills, this pattern will guide you step-by-step to create a stunning piece that showcases your creativity.
Materials Needed
- Yarn: Worsted weight cotton yarn in multiple colors (suggested colors: mustard yellow, burnt orange, teal, deep purple, and black for edging)
- Hook: 5.0 mm crochet hook
- Gauge: 4 granny squares = 10 cm x 10 cm
Step-by-Step Instructions
1. Granny Square (Make 24)
Each granny square is made in rounds. Follow these instructions carefully:
- Round 1:
- Start with a magic ring.
- Chain 3 (this counts as your first double crochet).
- Make 2 double crochets (dc) into the ring.
- Chain 2.
- Repeat the sequence: *3 dc into the ring, chain 2* a total of 3 times.
- Slip stitch (sl st) to the top of the initial chain 3 to join the round. You should have 12 dc and 4 chain-2 spaces.
- Round 2:
- Slip stitch to the first chain-2 space.
- Chain 3, then make 2 dc in the same space.
- Chain 2, then make 3 dc in the same space (corner made).
- Repeat the sequence: *3 dc in the next chain-2 space, chain 2, 3 dc in the same space* around the square.
- Slip stitch to the top of the initial chain 3 to join. You should have 24 dc and 4 chain-2 spaces.
- Round 3:
- Slip stitch to the first chain-2 space.
- Chain 3, then make 2 dc in the same space.
- Chain 2, then make 3 dc in the same space (corner made).
- Repeat the sequence: *3 dc in the next space, 3 dc in the next chain-2 space, chain 2, 3 dc in the same space* around the square.
- Slip stitch to the top of the initial chain 3 to join.
- Fasten off and weave in any loose ends.
2. Assembly
Now that you have your squares, it's time to assemble them:
- Arrange the 24 granny squares in a 4x3 grid for the front and back panels of the vest.
- Using a whip stitch or slip stitch, join the squares together, ensuring the seams are neat and secure.
3. Vest Construction
Once the panels are joined, construct the vest:
- Join the front and back panels at the shoulders using slip stitch or sewing. Make sure the seams are aligned properly.
- Leave enough space for armholes on both sides of the vest.
- Join the sides of the vest using slip stitch or sewing, ensuring a comfortable fit.
4. Edging
To finish your vest, add an edging:
- With the vest right side out, attach your yarn to any corner of the vest.
- Chain 1, then single crochet (sc) evenly around the entire vest.
- When you reach the starting point, slip stitch to the first sc to join the edging.
- Fasten off and weave in all ends for a polished look.
Conclusion
Your Retro Granny Square Vest is now complete! This vibrant piece not only showcases your crochet skills but also adds a unique touch to your wardrobe. Pair it with a turtleneck or a simple tee for a stylish, layered look. Happy crocheting!


