Rust Pointe Shoe Appliqué Mask Free Crochet Pattern
Rust Pointe Shoe Appliqué Mask: A Ballet-Core Accessory for Absolute Beginners
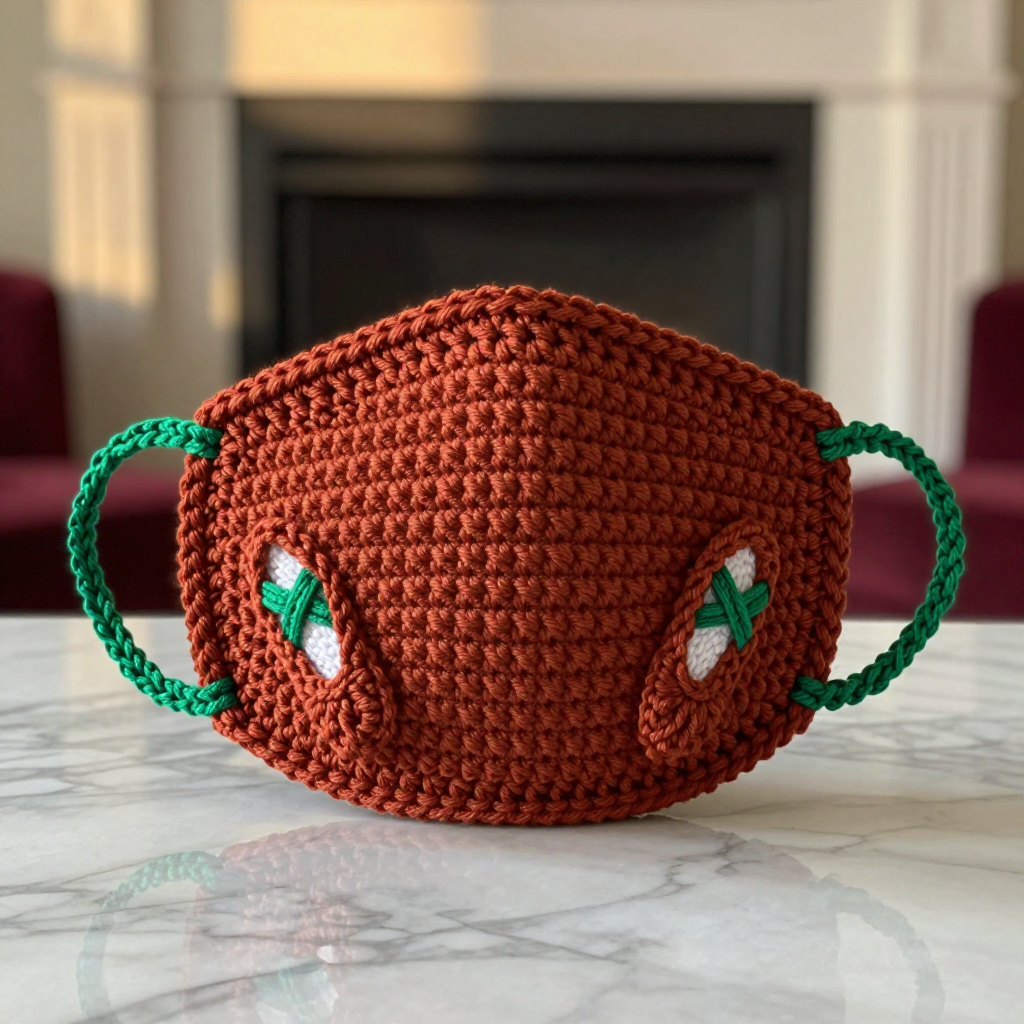
If you have never held a crochet hook before, this is the perfect first project for you. The Rust Pointe Shoe Appliqué Mask is worked entirely in single crochet — the simplest, most beginner-friendly stitch there is — so you only ever need to learn one stitch to make the whole thing. It is a soft, rounded rust-colored face mask with two tiny crocheted ballet slipper appliqués tucked at the cheek corners and long forest green ties you can knot behind your head for a custom fit. The finished fabric is dense, even, and slightly ridged, with a gentle curve at the top and bottom that hugs the face comfortably. It looks like a sweet little ballet-core keepsake, and it feels like something you made with your own two hands.
Materials Needed
- Yarn: Worsted weight (category 4) acrylic or cotton-blend yarn.
- About 60 yards rust for the mask body and edging
- About 15 yards forest green for the two ties
- About 10 yards rust plus 5 yards forest green for the two pointe shoe appliqués
- Crochet hook: Size H/8 (5.0 mm)
- Stitch markers (at least 2 — helpful for marking corners and tie placement)
- Tapestry needle (also called a yarn needle — a big blunt needle with a large eye for sewing yarn)
- Scissors
- Rust-proof pins and a spray bottle of water (for blocking at the end)
- Finished size: Mask body approximately 6 inches wide x 6.5 inches tall, with adjustable ties long enough to fit most adult head sizes.
Abbreviations and Beginner Glossary
Every term below is explained as if you have never crocheted before. Read this list once before you start, and keep it beside you as you work.
- ch – chain. Make a loop with your yarn, put the hook through it, wrap yarn over the hook, and pull it through the loop. That is one chain. Chains form your starting foundation.
- sc – single crochet. Insert your hook into the next stitch, wrap yarn over the hook, pull up a loop (you now have 2 loops on the hook), wrap yarn over again, and pull through both loops. One single crochet made.
- sc2tog – single crochet 2 stitches together (a decrease). Insert hook into the next stitch, pull up a loop (2 loops on hook), insert hook into the following stitch, pull up a loop (3 loops on hook), wrap yarn over, pull through all 3 loops. This turns 2 stitches into 1 and makes the piece narrower.
- sl st – slip stitch. Insert hook into the stitch, wrap yarn over, and pull straight through both the stitch and the loop on your hook in one motion. It makes a nearly invisible joining stitch.
- st(s) – stitch(es). One completed loop in your fabric.
- turn – flip your work over so you can work back across the row you just made.
- right side – the front, prettier face of your fabric that will show when worn.
- fasten off – cut the yarn a few inches from your work, then pull the tail all the way through the last loop to lock it.
- weave in ends – thread a yarn tail onto a tapestry needle and sew it back and forth through the fabric so it disappears and cannot unravel.
- block – dampen the finished piece and pin it into shape while it dries so it holds a neat, even form.
Gauge
Gauge: 8 sc = 2 inches; 8 rows = 2 inches in single crochet.
Gauge means how big your stitches turn out. If your stitches are bigger than this, your mask will be too large; if smaller, it will be too tight. Always make a gauge swatch first. Chain 14, then single crochet in every row until your swatch is about 3 inches tall. Lay a ruler across the middle and count how many single crochet stitches fit in 2 inches and how many rows fit in 2 inches. If you have more than 8 stitches, try a larger hook; if fewer, try a smaller hook. This five-minute check saves you from re-making the whole mask.
Beginner Tips Before You Start
- Count every row. Single crochet rows are easy to lose track of. Write each row number down as you finish it, or use a row counter app on your phone.
- Do not pull your yarn too tight. Tension should feel relaxed. If your hook squeaks or fights you, you are pulling too hard — loosen your grip on the yarn.
- Use stitch markers at the corners. Place a marker in the corner stitches of the edging round so you remember to work 3 sc there for a smooth turn.
- Keep your turning chain short. The "ch 1, turn" at the start of each row is just a small step-up; it does not count as a stitch, so your first sc goes into the very first stitch.
- Work in good light. Seeing your stitches clearly is half the battle for a beginner.
- Do not worry about perfection. Slightly uneven first rows are normal and will even out after blocking.
Step-by-Step Instructions
Mask Body (worked flat in rows, rust yarn)
Row 1: Ch 25. Sc in 2nd ch from hook and in each ch across. (24 sc)
Row 2: Ch 1, turn. Sc in each st across. (24 sc)
Rows 3–6: Repeat Row 2 four times. (24 sc per row; piece measures about 1.5 inches tall)
Row 7 (shaping begins): Ch 1, turn. Sc2tog, sc in each st across to last 2 sts, sc2tog. (22 sc)
Row 8: Ch 1, turn. Sc in each st across. (22 sc)
Row 9: Ch 1, turn. Sc2tog, sc in each st across to last 2 sts, sc2tog. (20 sc)
Row 10: Ch 1, turn. Sc in each st across. (20 sc)
Row 11: Ch 1, turn. Sc2tog, sc in each st across to last 2 sts, sc2tog. (18 sc)
Row 12: Ch 1, turn. Sc in each st across. (18 sc)
Row 13: Ch 1, turn. Sc2tog, sc in each st across to last 2 sts, sc2tog. (16 sc)
Row 14: Ch 1, turn. Sc in each st across. (16 sc)
Row 15: Ch 1, turn. Sc2tog, sc in each st across to last 2 sts, sc2tog. (14 sc)
Row 16: Ch 1, turn. Sc in each st across. (14 sc)
Row 17: Ch 1, turn. Sc2tog, sc in each st across to last 2 sts, sc2tog. (12 sc)
Row 18: Ch 1, turn. Sc in each st across. (12 sc)
Row 19: Ch 1, turn. Sc2tog, sc in each st across to last 2 sts, sc2tog. (10 sc)
Row 20: Ch 1, turn. Sc in each st across. (10 sc)
Row 21: Ch 1, turn. Sc2tog, sc in each st across to last 2 sts, sc2tog. (8 sc)
Row 22: Ch 1, turn. Sc in each st across. (8 sc)
Row 23: Ch 1, turn. Sc2tog, sc in each st across to last 2 sts, sc2tog. (6 sc)
Row 24: Ch 1, turn. Sc in each st across. (6 sc)
Row 25: Ch 1, turn. Sc2tog, sc in each st across to last 2 sts, sc2tog. (4 sc)
Row 26: Ch 1, turn. Sc in each st across. (4 sc)
Row 27: Ch 1, turn. Sc2tog twice. (2 sc)
Row 28: Ch 1, turn. Sc2tog. (1 sc) Fasten off, leaving a 6-inch tail. Weave in end.
The mask body now measures approximately 6 inches wide at the base and 6.5 inches tall at the center, with gently rounded top and bottom edges.
Mask Edging (rust yarn)
With right side facing, join rust yarn with a sl st at the bottom right corner of the mask. Work 1 round of sc evenly around the entire outer edge, placing 1 sc in each row-end along the sides and 1 sc in each st along the top and bottom edges, working 3 sc in each corner to turn smoothly. Join with a sl st to the first sc. Fasten off and weave in ends.
Pointe Shoe Appliqué (make 2, rust yarn with forest green accents)
Shoe body:
Row 1: Ch 7. Sc in 2nd ch from hook and in each ch across. (6 sc)
Row 2: Ch 1, turn. Sc in each st across. (6 sc)
Row 3: Ch 1, turn. Sc2tog, sc in next 2 sts, sc2tog. (4 sc)
Row 4: Ch 1, turn. Sc2tog twice. (2 sc)
Row 5: Ch 1, turn. Sc2tog. (1 sc) Fasten off, leaving a 6-inch tail for sewing.
Ribbon accent (forest green): With forest green yarn, ch 12. Sl st in 2nd ch from hook and in each ch across. Fasten off, leaving a 4-inch tail. Sew this narrow green strip across the top edge of the shoe body to resemble the ribbon ties of a ballet slipper. Repeat for the second shoe.
Adjustable Ties (make 2, forest green yarn)
Tie 1: Ch 40. Sc in 2nd ch from hook and in each ch across. (39 sc) Fasten off, leaving a 6-inch tail.
Tie 2: Repeat as for Tie 1.
Assembly and Finishing
Attach the appliqués: Thread a rust tail onto your tapestry needle. Sew one pointe shoe appliqué to each cheek corner of the mask, positioning them about 1 inch in from the side edges and about 1.5 inches up from the bottom edge, angled slightly toward the center. Use several small, firm stitches around the shoe outline so it lies flat and cannot lift. Weave in all ends on the back side.
Attach the ties: Sew one end of each forest green tie securely to the side edges of the mask at the midpoint (about 3 inches up from the bottom edge). Stitch back and forth a few times through the tie end and the mask edge for strength, then weave in the ends. The ties can be crossed behind the head and knotted to adjust the fit.
Weave in every remaining end: Thread each tail on the tapestry needle and run it back and forth through the inside of the fabric for about an inch, then trim close.
Block: Lightly spritz the mask with water, lay it flat on a towel, and pin the edges into shape. Allow it to dry completely. Check all appliqués and ties for secure attachment before wearing.
Pro Tips and Variations
- Change the colors: Swap rust for dusty rose or blush pink and forest green for ivory for a softer ballet palette — the pattern works exactly the same.
- Adjust the size: For a smaller mask, start with a shorter foundation chain (ch 21 gives about 5 inches wide); for a larger mask, add chains in pairs and add one extra plain row between each decrease row.
- Substitute yarn: Cotton yarn gives a crisper, washable mask; acrylic is softer and stretchier. Just re-check your gauge swatch, since different fibers behave differently.
- Make the ties longer or shorter: Add or remove chains from the ties in any amount — just keep both ties the same length so the mask sits evenly.