The Gilded Thistle Bolero Free Pattern – A Knitted Lace Embrace of Diamond Motifs

The Gilded Thistle Bolero: A Knitted Lace Embrace of Diamond Motifs
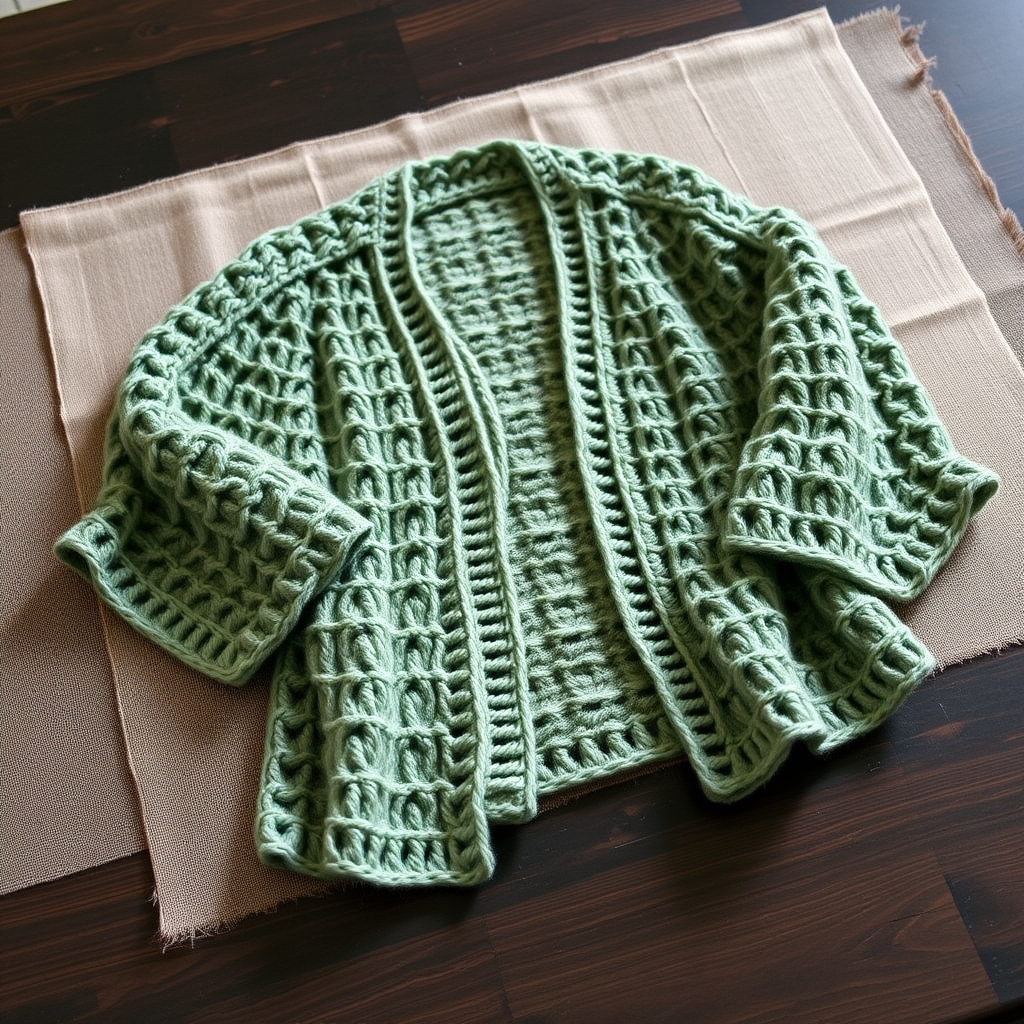
Wrap yourself in the opulent texture of diamond lace and twisted stitches with this regal bolero, designed to drape like a whispered secret over any ensemble. This pattern weaves a story of aristocratic gardens and twilight soirees into every loop. The Gilded Thistle Bolero is a statement piece that combines vintage luxury with modern wearability, featuring an intricate all-over diamond lace pattern with twisted cables running through the center of each diamond. The deep burgundy body is accented with shimmering antique gold edging, creating a play of light and shadow that catches the eye with every movement.
Whether you're dressing up a simple slip dress for a wedding or adding a touch of elegance to your everyday jeans and tee, this bolero elevates any outfit. The fitted back flares slightly at the shoulders, and the three-quarter length sleeves end in a delicate gold picot trim. The fabric is soft and draped, with a subtle sheen from the yarn blend that evokes a sense of vintage luxury. Best of all, this pattern is free and accessible to knitters who are ready to take their skills to the next level with lace and cable techniques.
Materials Needed
Before you begin your journey into this luxurious knit, gather the following materials:
Yarn
- Main Color (MC): Worsted weight yarn in deep burgundy – approximately 600 yards
- Contrast Color (CC): Worsted weight yarn in antique gold – approximately 150 yards
Pro tip: Choose a yarn with good stitch definition to showcase the diamond lace pattern. A wool or wool-blend yarn with a slight sheen will enhance the regal feel of this piece.
Needles & Notions
- US 7 (4.5 mm) circular needles, 32-inch length
- US 7 (4.5 mm) double-pointed needles for sleeves
- Stitch markers
- Tapestry needle for weaving in ends
- Cable needle (or use a spare DPN)
- Crochet hook (any size) for picot edging
Gauge
- Stockinette stitch: 18 stitches and 24 rows = 4 inches
- Diamond Lace pattern: 20 stitches and 28 rows = 4 inches
Important: Always knit a gauge swatch before beginning. The Diamond Lace pattern gauge is slightly different from stockinette, so be sure to check your gauge in the pattern stitch to ensure proper fit.
Step-by-Step Instructions
This bolero is worked from the center back outwards in one piece, then sleeves are picked up and knit in the round. The diamond lace pattern is charted but also written out for clarity. Take your time with the lace rows, and use stitch markers between pattern repeats to help you keep track of your place.
Special Stitches
Familiarize yourself with these stitches before beginning:
- K2tog – Knit two stitches together (decrease)
- Ssk – Slip, slip, knit (left-leaning decrease)
- Yo – Yarn over (increase, creates lace hole)
- C4B – Cable 4 back: Slip 2 stitches to cable needle, hold in back, knit next 2 stitches, then knit 2 stitches from cable needle
- C4F – Cable 4 front: Slip 2 stitches to cable needle, hold in front, knit next 2 stitches, then knit 2 stitches from cable needle
- M1R – Make one right: Pick up bar between stitches from back, knit through front
- M1L – Make one left: Pick up bar between stitches from front, knit through back
Diamond Lace Pattern (Multiple of 10 + 2 stitches)
Work the following 32-row pattern. The pattern is written for flat knitting (back and forth).
Row 1 (RS): K1, *yo, ssk, k6, k2tog, yo, k1; repeat from * to last stitch, k1.
Row 2 and all WS rows: Purl all stitches.
Row 3: K1, *k1, yo, ssk, k4, k2tog, yo, k2; repeat from * to last stitch, k1.
Row 5: K1, *k2, yo, ssk, k2, k2tog, yo, k3; repeat from * to last stitch, k1.
Row 7: K1, *k3, yo, ssk, k2tog, yo, k4; repeat from * to last stitch, k1.
Row 9: K1, *k4, yo, ssk, k2, k2tog, yo, k3; repeat from * to last stitch, k1.
Row 11: K1, *k3, k2tog, yo, k1, yo, ssk, k4; repeat from * to last stitch, k1.
Row 13: K1, *k2, k2tog, yo, k3, yo, ssk, k3; repeat from * to last stitch, k1.
Row 15: K1, *k1, k2tog, yo, k5, yo, ssk, k2; repeat from * to last stitch, k1.
Row 17: K1, *k2tog, yo, k7, yo, ssk, k1; repeat from * to last stitch, k1.
Row 19: K1, *k1, yo, ssk, k5, k2tog, yo, k2; repeat from * to last stitch, k1.
Row 21: K1, *k2, yo, ssk, k3, k2tog, yo, k3; repeat from * to last stitch, k1.
Row 23: K1, *k3, yo, ssk, k1, k2tog, yo, k4; repeat from * to last stitch, k1.
Row 25: K1, *k4, yo, ssk, k2tog, yo, k4; repeat from * to last stitch, k1.
Row 27: K1, *k3, k2tog, yo, k1, yo, ssk, k4; repeat from * to last stitch, k1.
Row 29: K1, *k2, k2tog, yo, k3, yo, ssk, k3; repeat from * to last stitch, k1.
Row 31: K1, *k1, k2tog, yo, k5, yo, ssk, k2; repeat from * to last stitch, k1.
Row 32: Purl all stitches.
Note: The twisted cable stitches (C4B and C4F) are not included in the written lace pattern above. To incorporate the cables as shown in the sample, work a C4B or C4F at the center of each diamond motif on the appropriate right-side rows. For a simpler version, you can omit the cables and work the lace pattern as written – the diamonds will still form beautifully.
Body (Worked Flat from Center Back)
Step 1: With MC, cast on 102 stitches loosely. Use a stretchy cast-on method such as the long-tail or knitted cast-on to ensure the neck edge has plenty of give.
Step 2: Knit 4 rows in garter stitch (knit every row) for the neck edge. This creates a neat, non-curling edge.
Step 3: Begin the Diamond Lace pattern. Work rows 1-32 once, then repeat rows 1-32 until the piece measures 12 inches from the cast-on edge, ending with a wrong-side row (Row 2, 4, 6, etc.).
Step 4: Shape the shoulders. On the next right-side row, work 30 stitches in pattern, bind off 42 stitches (center back), then work the remaining 30 stitches. You will now have two separate sections for the shoulders.
Step 5: Continue on one shoulder at a time. Work even on the 30 stitches for 6 inches. Then, increase 1 stitch at each edge every 4 rows, 3 times total. You should now have 36 stitches.
Step 6: Work even until the piece measures 18 inches from the cast-on edge. Bind off all stitches loosely. Repeat for the other shoulder.
Sleeves
Step 1: With double-pointed needles and MC, pick up and knit 60 stitches around the armhole edge. Aim for approximately 15 stitches per 4 inches. Place a stitch marker at the beginning of the round and join in the round, being careful not to twist the stitches.
Step 2: Work in stockinette stitch (knit every round) for 2 inches.
Step 3: Decrease round: K2tog at the beginning and end of the marker (knit 2 together, knit to 2 stitches before marker, k2tog). This decreases 2 stitches per round. Repeat this decrease every 6 rounds until 40 stitches remain.
Step 4: Work even until the sleeve measures 12 inches from the pick-up round.
Step 5: Switch to CC and knit 4 rounds of garter stitch in the round (knit one round, purl one round, knit one round, purl one round) for a delicate cuff. Bind off loosely.
Finishing
Step 1: Weave in all ends using a tapestry needle. Be sure to weave in securely on the wrong side of the work.
Step 2: Block the bolero to shape. Wet block or steam block according to your yarn's care instructions. Gently stretch the lace pattern to open up the diamonds and even out the stitches. Pin to measurements and allow to dry completely.
Step 3: With CC, crochet a picot edging around the entire outer edge of the bolero: *single crochet in first stitch, chain 3, single crochet in same stitch, skip 1 stitch; repeat from * around. This adds a gilded, refined finish that echoes the antique gold accents.
Tips for Success
- Use stitch markers between each pattern repeat to help you keep your place in the lace pattern. This is especially helpful on the longer rows.
- Count your stitches after each lace row to catch any mistakes early. Each row should maintain the same stitch count.
- Block generously – lace truly comes alive after blocking. Don't be afraid to stretch the diamonds open.
- Choose your yarn wisely – a yarn with good stitch definition will make the cables and lace pop.
The Gilded Thistle Bolero is a labor of love that rewards patience with a stunning, heirloom-quality garment. The combination of diamond lace and twisted cables creates a textured masterpiece that will be admired wherever you wear it. Whether you're knitting this for yourself or as a gift for someone special, the result is sure to be treasured for years to come.
Happy knitting, and may your stitches always be even and your diamonds always shine!