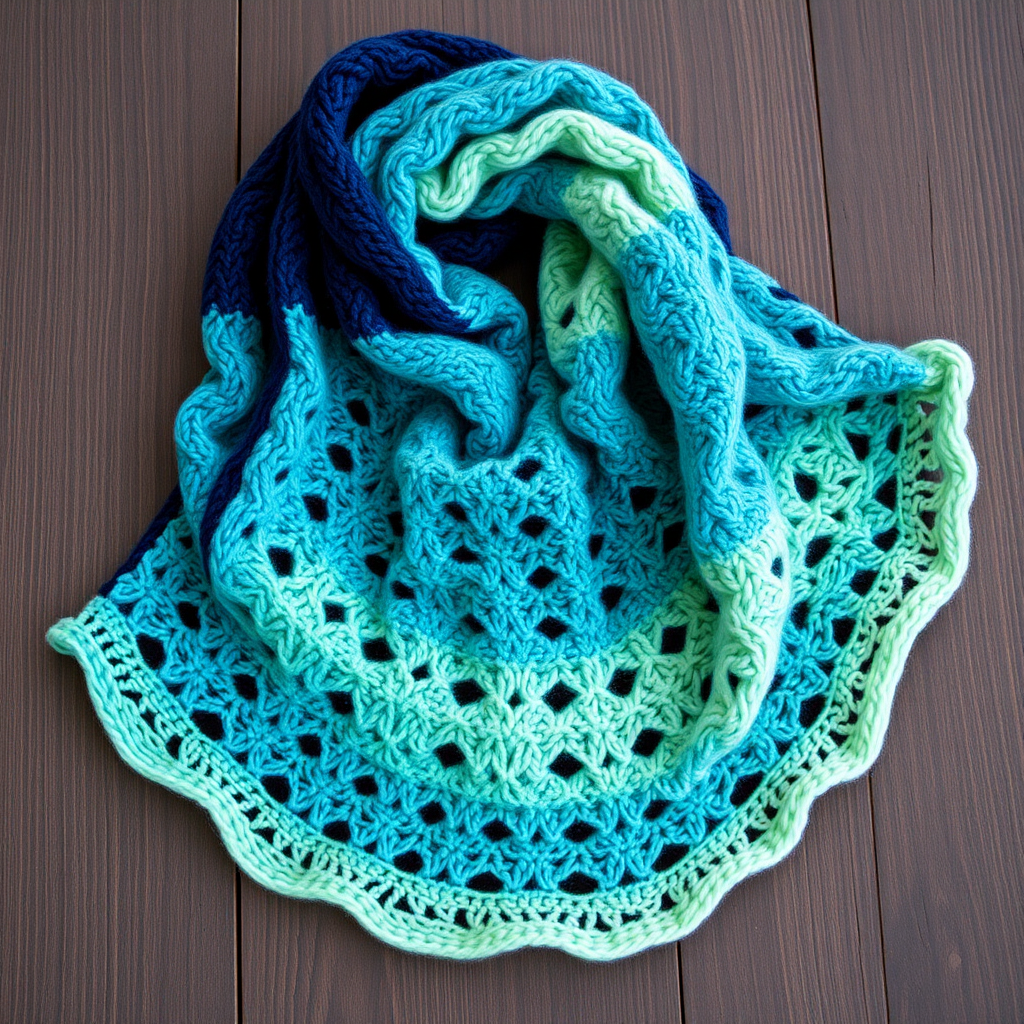
The Whispering Willow Wrap Free Pattern – A Knitted Oasis of Leaf Lace and Forest Shadows

The Whispering Willow Wrap: A Knitted Oasis of Leaf Lace and Forest Shadows
Wrap yourself in the quiet magic of a woodland stroll with this ethereal knitted shawl. The Whispering Willow Wrap is a meditative project where cascading leaf motifs dance across a canvas of deep emerald and soft sage. This triangular shawl, worked from the top down, rewards you with a drapey, breathable layer perfect for cool evenings. Whether you are an intermediate knitter looking for a rhythmic, botanical project or a beginner eager to stretch your skills, this pattern offers a beautiful balance of simple garter stitch and an accessible lace repeat. Let's cast on and bring this forest-inspired accessory to life.
Materials Needed
Before you begin your knitting journey, gather the following supplies. The quality of your yarn will greatly affect the drape and sheen of your finished shawl, so choose a soft, worsted weight yarn that you love to touch.
- Yarn: Worsted weight yarn in two colors:
- Color A (Deep Forest Green): 600 yards (e.g., Malabrigo Rios in 'Lettuce')
- Color B (Misty Sage): 400 yards (e.g., Malabrigo Rios in 'Sage')
- Needle: US 7 (4.5 mm) circular knitting needle, 32-inch (80 cm) or longer to accommodate the growing number of stitches.
- Notions: Stitch markers (at least 2), a tapestry needle for weaving in ends, and blocking pins for the final finish.
- Gauge: 18 stitches and 24 rows = 4 inches in stockinette stitch (blocked). While gauge is important for size, the shawl is forgiving; a slightly different gauge will simply alter the final dimensions.
Step-by-Step Instructions
This shawl is worked from the top down in a triangular shape, with a lace leaf pattern that increases along the edges and center spine. The pattern is divided into clear sections: Setup, Increase Section, Leaf Lace Pattern, Color Transition, and Edging. Follow along carefully, and you'll be amazed at the intricate fabric you create.
Abbreviations
- k = knit
- p = purl
- yo = yarn over
- k2tog = knit two together (right-leaning decrease)
- ssk = slip, slip, knit (left-leaning decrease)
- pm = place marker
- sm = slip marker
- st(s) = stitch(es)
- RS = right side
- WS = wrong side
Setup
Let's begin with a simple cast-on and the initial increases that form the top of the shawl.
- With Color A, cast on 3 stitches.
- Row 1 (WS): k3.
- Row 2 (RS): k1, yo, k1, yo, k1. (You now have 5 stitches.)
- Row 3: k2, p1, k2.
- Row 4 (RS): k1, yo, k1, yo, pm (center marker), yo, k1, yo, k1. (You now have 9 stitches.)
- Row 5: k2, p5, k2.
Increase Section (Rows 6-25)
This section builds the base of the shawl in garter stitch (knitting every row) while establishing the four increase points that create the triangle shape.
- All RS rows: k1, yo, knit to 1 stitch before marker, yo, k1, sm, yo, knit to last stitch, yo, k1. This adds 4 stitches each RS row (one at each edge and one on each side of the center marker).
- All WS rows: Knit all stitches (garter stitch).
- Repeat these two rows until you have 45 stitches on each side of the center marker (91 stitches total). This will take approximately 20 rows from the setup, but trust the stitch count over the row count.
Leaf Lace Pattern (Worked on RS rows)
Now the magic begins. The lace pattern is a 12-row repeat that is worked across each half of the shawl, with the center marker separating the two halves. The edge increases (k1, yo at the beginning and end, and yo before/after the center marker) continue on every RS row throughout the lace section.
Important: On every RS row, you will always start with k1, yo and end with yo, k1. You will also always work yo, k1, sm, yo at the center marker. The instructions below show the pattern for the stitches between these edge increases.
- Row 1 (RS): k1, yo, *k2, yo, ssk, k3, k2tog, yo, k2*; repeat from * to * until 1 stitch before marker, yo, k1, sm, yo, repeat from * to * across second half, ending with yo, k1.
- Row 2 and all WS rows: k2, purl to last 2 stitches, k2. (This creates a neat garter stitch border on the edges.)
- Row 3 (RS): k1, yo, *k3, yo, ssk, k1, k2tog, yo, k3*; repeat to marker, yo, k1, sm, yo, repeat second half, yo, k1.
- Row 5 (RS): k1, yo, *k4, yo, ssk, k2tog, yo, k4*; repeat to marker, yo, k1, sm, yo, repeat second half, yo, k1.
- Row 7 (RS): k1, yo, *k2, k2tog, yo, k1, yo, ssk, k3*; repeat to marker, yo, k1, sm, yo, repeat second half, yo, k1.
- Row 9 (RS): k1, yo, *k1, k2tog, yo, k3, yo, ssk, k2*; repeat to marker, yo, k1, sm, yo, repeat second half, yo, k1.
- Row 11 (RS): k1, yo, *k2tog, yo, k5, yo, ssk, k1*; repeat to marker, yo, k1, sm, yo, repeat second half, yo, k1.
- Row 12: Work as a WS row (k2, purl to last 2 sts, k2).
Repeat these 12 rows, continuing the edge increases on every RS row. Work until the shawl measures approximately 28 inches from the cast-on edge, ending with a WS row (Row 2, 4, 6, 8, 10, or 12).
Color Transition
Now we introduce the second color for a beautiful gradient effect.
- Switch to Color B (Misty Sage).
- Continue in the established Leaf Lace Pattern (Rows 1-12) for another 12 rows, or until you have used approximately 350 yards of Color B. This will create a lovely sage border that frames the deep green body.
Edging
A simple garter stitch border finishes the shawl and helps it lay flat.
- Work 6 rows of garter stitch (knit every row) in Color B, maintaining the edge increases on RS rows (k1, yo at beginning and end, and yo before/after center marker).
- Bind off loosely on the next RS row. A loose bind-off is crucial to prevent the edge from pulling. You can use a larger needle or a yarn-over bind-off method if needed.
Finishing
The final steps are what truly transform your knitting into a work of art.
- Weave in all ends with a tapestry needle, being careful not to pull too tightly.
- Block the shawl gently to open up the lace pattern. Soak the shawl in lukewarm water with a mild wool wash, then gently squeeze out excess water (do not wring).
- Lay the shawl on a blocking mat and pin the edges to create a beautiful scalloped shape. Stretch the lace points gently to open up the leaf motifs. The garter stitch border will naturally scallop when pinned.
- Allow to dry completely before unpinning and wearing. This step is essential for the lace to look its best.
Your Whispering Willow Wrap is now complete. Enjoy the soft, drapey texture and the beautiful gradient of greens from dark to light. This shawl is perfect for cool evenings, a thoughtful handmade gift, or a personal treasure to be worn and loved for years to come.