Vintage Velvet Christmas Bauble Chain Free Pattern
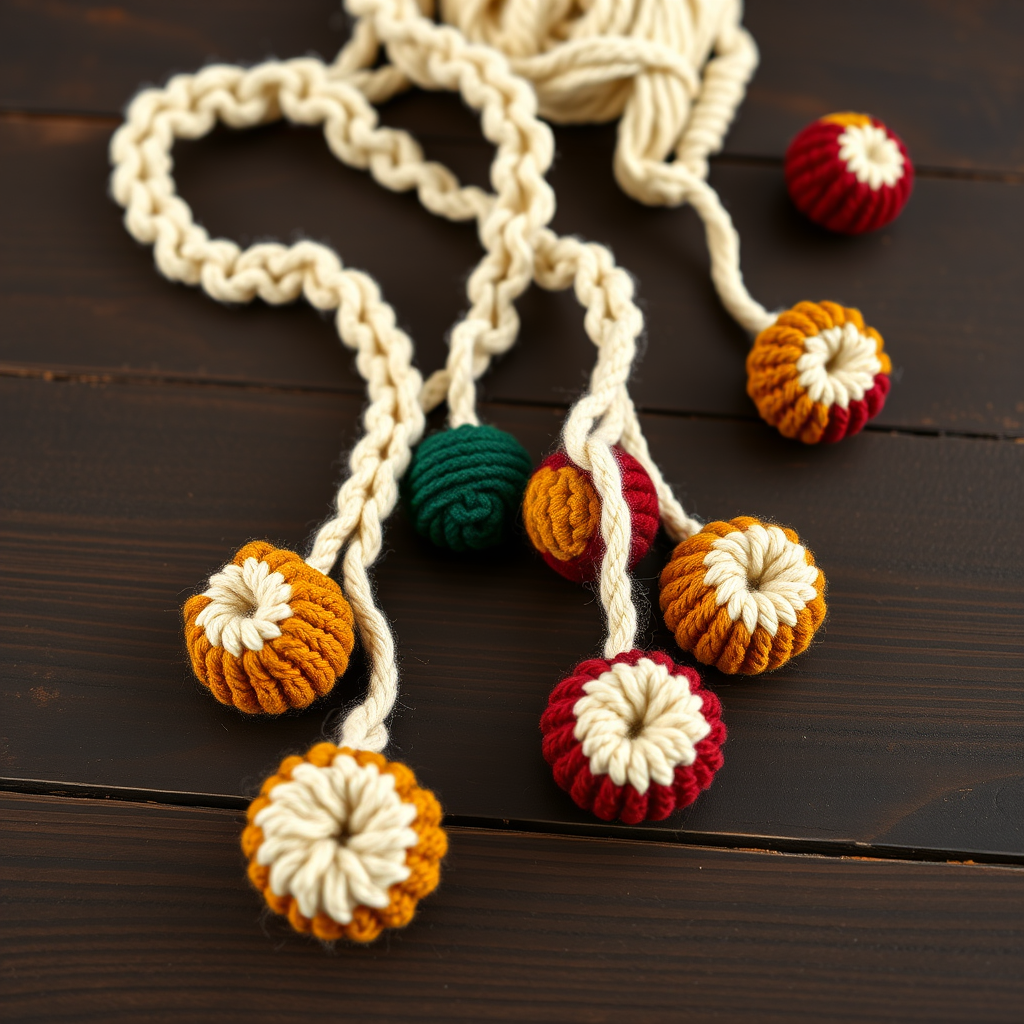
Vintage Velvet Christmas Bauble Chain: A Free Crochet Pattern
There's something undeniably magical about vintage Christmas decorations—the way they evoke memories of cozy mid-century living rooms, twinkling tree lights, and the warm scent of baking cookies. If you're looking to add a touch of nostalgic charm to your holiday decor this year, this Vintage Velvet Christmas Bauble Chain is the perfect project. This free crochet pattern creates a plush, textured garland of round ornaments in rich, retro colors, connected by a smooth cream chain. The combination of soft velvet yarn and classic single crochet stitches produces a heirloom-quality strand that will look stunning draped over a mantel, across a doorway, or woven through your Christmas tree branches. Whether you're a seasoned crocheter or a curious beginner, this pattern is designed to be accessible, rewarding, and utterly delightful to make.
This garland features a palette of deep burgundy, forest green, mustard yellow, cream, and rust—colors that instantly transport you to a simpler, more elegant holiday era. The ornaments are worked in the round, creating a beautiful spiral of stitches that gives each bauble a subtle, ribbed texture. When made with velvet or chenille yarn, they take on a soft, fuzzy halo and a gentle sheen that catches the light beautifully. Let's dive into this wonderful project and create a piece that will become a treasured part of your holiday traditions for years to come.
Materials Needed
Before you begin, gather the following materials. This list is designed to ensure you have everything you need for a smooth and enjoyable crocheting experience.
Yarn
- Worsted weight (4) yarn in assorted colors: You will need small amounts of burgundy, forest green, mustard yellow, cream, and rust. For the ornaments, a velvet or chenille yarn is highly recommended to achieve that plush, luxurious look. For the connecting chain, use a smooth worsted-weight yarn in cream. A smooth yarn for the chain ensures it remains flexible and doesn't add unnecessary bulk.
- Yardage estimate: For 10-12 ornaments, you'll need approximately 20-25 yards of each ornament color. For the chain, plan on about 50-60 yards of cream yarn for a 150-chain length. Adjust based on your desired garland length.
Hook and Notions
- 5.5 mm (I/9) crochet hook: This hook size is perfect for worsted weight yarn, creating a tight enough gauge to keep the stuffing contained while still maintaining a soft drape.
- Tapestry needle: For weaving in ends and sewing the ornaments to the chain.
- Fiberfill stuffing: Polyester fiberfill is ideal for giving the ornaments their round, plump shape.
- Stitch marker (optional): Helpful for keeping track of your rounds, especially if you're a beginner.
- Scissors: For cutting yarn.
Gauge
4 inches = 14 sc and 16 rows in single crochet. While gauge is not critical for this project, maintaining a consistent tension will ensure your ornaments are uniform in size and your chain is even. If your ornaments turn out too loose or too tight, adjust your hook size accordingly.
Step-by-Step Instructions
This pattern is broken down into three main parts: creating the ornament motifs, crocheting the connecting chain, and assembling the garland. Follow each step carefully, and you'll have a beautiful garland in no time.
Part 1: Ornament Motif (Make 10-12, Mix Colors)
Each ornament is worked in a continuous spiral, but we will join with a slip stitch at the end of each round for clarity and structure. This method creates a neat, defined edge. You will make 10-12 ornaments, mixing your chosen colors to create a balanced, festive look.
Round 1: With your chosen color A, make a magic ring. Chain 1 (this does not count as a stitch). Work 6 single crochet (sc) into the ring. Pull the tail to tighten the ring closed. Join with a slip stitch (sl st) to the first sc. (6 sc)
Round 2: Chain 1. Work 2 sc into each stitch around. Join with a sl st to the first sc. (12 sc)
Round 3: Chain 1. *Sc in the next stitch, work 2 sc in the next stitch.* Repeat from * to * around. Join with a sl st to the first sc. (18 sc)
Round 4: Chain 1. *Sc in the next 2 stitches, work 2 sc in the next stitch.* Repeat from * to * around. Join with a sl st to the first sc. (24 sc)
Round 5: Chain 1. This round is worked in the back loops only. Sc in each stitch around. Join with a sl st to the first sc. (24 sc) Working in the back loops creates a subtle ridge that will define the top of the ornament, giving it a more structured, bauble-like shape.
Rounds 6-8: Chain 1. Sc in each stitch around (working through both loops now). Join with a sl st to the first sc at the end of each round. (24 sc) These three rounds form the straight sides of the ornament.
Round 9: Chain 1. This round is also worked in the back loops only. Sc in each stitch around. Join with a sl st to the first sc. (24 sc) This second back-loop round creates a matching ridge at the bottom of the ornament, mirroring the top for a symmetrical, professional finish.
Round 10: Chain 1. *Sc in the next 2 stitches, then single crochet 2 together (sc2tog).* Repeat from * to * around. Join with a sl st to the first sc. (18 sc) The sc2tog decrease begins to shape the bottom of the ornament.
Round 11: Chain 1. *Sc in the next stitch, then sc2tog.* Repeat from * to * around. Join with a sl st to the first sc. (12 sc)
Stuff the ornament: Now is the time to firmly stuff the ornament with fiberfill. Use small amounts at a time to ensure it is packed evenly and holds its round shape. Don't be shy—a firmly stuffed ornament will look much more polished and professional than a floppy one.
Round 12: Chain 1. *Sc2tog.* Repeat from * to * around. Join with a sl st to the first sc. (6 sc)
Finishing the ornament: Fasten off, leaving a long tail (at least 12 inches). Thread the tail onto a tapestry needle. Weave the needle through the front loops of the remaining 6 stitches. Pull the tail tight to cinch the opening closed. Secure the tail with a small knot and weave it into the body of the ornament to hide it. Repeat this process for all 10-12 ornaments, mixing your colors as desired.
Part 2: Connecting Chain (Make 1 Long Strand)
The connecting chain is simple but crucial—it's the backbone of your garland. Using your smooth cream yarn, you'll create a sturdy, flexible base for the ornaments.
Foundation Chain: With your cream yarn, make a slip knot and chain (ch) 150. If you want a longer garland, you can chain more; if you prefer a shorter one, chain fewer. Just remember that the ornaments will add visual weight, so a chain of 150 is a good starting point for a standard mantel or doorway.
Row 1: Work 1 sc into the 2nd chain from your hook. Work 1 sc into each chain across the entire row. (149 sc)
Fasten off: Cut the yarn, leaving a tail, and pull it through the last loop to secure. Weave in this tail and the starting tail using your tapestry needle. Your base chain is now complete.
Part 3: Assembly
This is where your garland comes to life. Laying the chain flat, you'll attach each ornament securely, ensuring they hang straight and are evenly spaced.
Step 1: Layout. Lay the cream chain flat on a clean, even surface. Arrange your 10-12 ornaments along the chain, spacing them evenly. A good rule of thumb is to place one ornament every 12-15 chains. Visualize the final look and adjust the placement until you're happy with the balance of colors and spacing.
Step 2: Attach the Ornaments. There are two excellent methods for attaching the ornaments. Choose the one you're most comfortable with:
- Method 1 (Sewing): Thread a tapestry needle with a length of matching yarn or strong thread. Position the first ornament so its top sits against the chain. Sew the top of the ornament securely to the chain, making several passes through both the ornament's fabric and the chain's stitches. Ensure the ornament hangs straight down and is firmly attached. Repeat for each ornament.
- Method 2 (Crocheting On): This method creates an invisible, very secure join. Insert your crochet hook through the top of the ornament (where you cinched it closed) and then through a stitch on the chain. Yarn over and pull through both loops, then yarn over and pull through the loop on your hook to make a slip stitch. Work 2-3 more slip stitches in the same area to reinforce the attachment. Repeat for each ornament.
Step 3: Check Alignment. After attaching all ornaments, gently lift the garland and check that each bauble hangs straight down. If any are crooked, gently twist them or re-sew them to correct the alignment.
Part 4: Finishing Touches
Your garland is almost complete. A few final details will make it perfect for hanging.
Weave in all ends: Using your tapestry needle, carefully weave in any remaining yarn tails from the ornaments and the chain. Make sure they are hidden securely within the stitches so they don't unravel or show.
Add Hanging Loops (Optional): To make the garland easy to hang, create a small loop at each end. Cut a 6-inch piece of cream yarn. Fold it in half to form a loop. Thread the folded end through the last stitch at one end of the chain. Pull the two loose ends through the loop and tighten to create a secure loop. Repeat on the other end. These loops are perfect for draping over hooks or nails.
Final Display: Your Vintage Velvet Christmas Bauble Chain is now ready to be displayed! Drape it elegantly over a mantel, let it cascade down a staircase railing, or weave it through the branches of your Christmas tree. The plush velvet ornaments and smooth cream chain will add a touch of nostalgic, handmade warmth to any space.
We hope you enjoy creating this beautiful garland. It's a wonderful project for using up small amounts of luxury yarn and makes a thoughtful, handmade gift for friends and family. Happy holidays and happy crocheting!


