Whispering Willow Ghostly Boo Garden Stake Free Pattern – A Knitted Autumn Sentinel
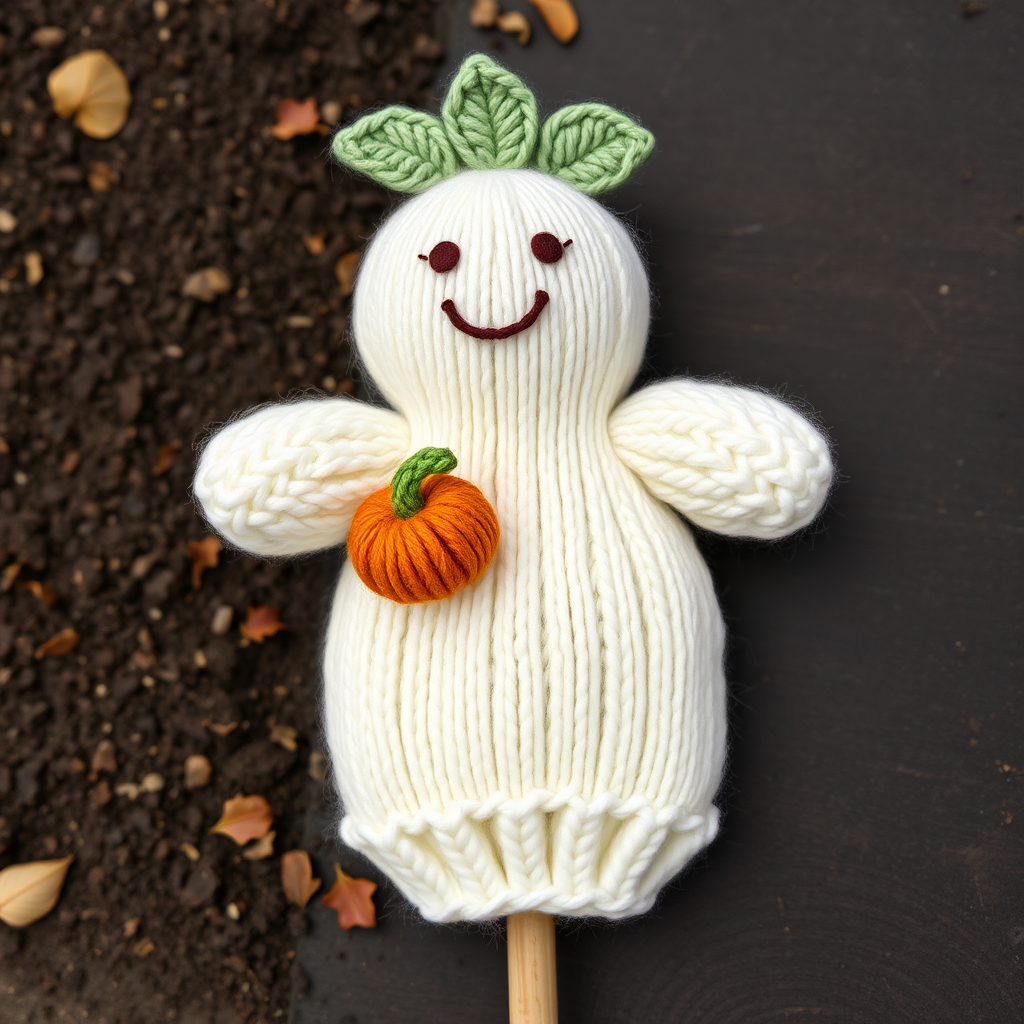
Whispering Willow Ghostly Boo Garden Stake – A Knitted Autumn Sentinel
Bring a touch of whimsical charm to your autumn garden with this adorable knitted ghost garden stake. This pattern creates a soft, plump spirit peeking out from beneath a leafy crown, perfect for Halloween decor or as a cozy seasonal accent. Crafted in warm worsted weight yarn, this handmade piece adds a gentle, handmade tribute to the season's quiet magic. Whether nestled among mums or standing sentinel in a potted plant, this ghostly friend is sure to bring smiles all season long.
Materials Needed
Before you begin, gather the following supplies to ensure a smooth knitting experience:
- Yarn: Worsted weight yarn in three colors:
- Ivory (MC) – approximately 100g (for the ghost body)
- Sage green (CC1) – approximately 50g (for the leafy crown and stem)
- Burnt orange (CC2) – approximately 20g (for the pumpkin accent)
- Needles: US 7 (4.5mm) knitting needles
- Notions: Tapestry needle for seaming, stitch markers (optional), scissors
- Other: Fiberfill stuffing, wooden dowel (about 18 inches long), dark brown embroidery floss or safety eyes for the face
Gauge: 20 stitches and 26 rows = 4 inches in stockinette stitch. Be sure to check your gauge to ensure your ghost comes out the right size.
Step-by-Step Instructions
This pattern is knitted flat in pieces and then seamed together. The finished ghost is attached to a wooden dowel for staking in your garden. Take your time and enjoy the process – each piece is simple and comes together beautifully.
Ghost Body (Make 2 Identical Pieces)
Using your main color (MC) ivory yarn, cast on 30 stitches.
- Row 1 (RS): Knit all stitches.
- Row 2 (WS): Purl all stitches.
Repeat Rows 1-2 until the piece measures 8 inches from the cast-on edge, ending with a wrong-side row. This forms the main body of the ghost.
Shape the Top of the Ghost Head
Now we'll shape the gently pointed head of the ghost:
- Row 1 (RS): K2tog (knit two together), knit to the last 2 stitches, k2tog. (28 stitches remain)
- Row 2 (WS): Purl all stitches.
Repeat these 2 rows until 10 stitches remain, ending with a wrong-side row. The decreases will create a nice taper toward the top.
- Next Row (RS): K2tog across the row. (5 stitches remain)
- Next Row (WS): Purl all stitches.
Cut the yarn, leaving a long tail (about 12 inches). Thread the tail through a tapestry needle, slide it through the remaining 5 stitches, pull tight to gather, and secure. Leave this tail attached – you'll use it later for seaming the two body pieces together.
Leafy Crown (Make 5 Leaves, Joined Together)
Using your sage green yarn (CC1), cast on 12 stitches. This forms the first leaf.
- Row 1 (RS): Knit all stitches.
- Row 2 (WS): Purl all stitches.
- Row 3: K1, k2tog, knit to the last 3 stitches, k2tog, k1. (10 stitches)
- Row 4: Purl all stitches.
- Row 5: K1, k2tog, knit to the last 3 stitches, k2tog, k1. (8 stitches)
- Row 6: Purl all stitches.
- Row 7: K1, k2tog, knit to the last 3 stitches, k2tog, k1. (6 stitches)
- Row 8: Purl all stitches.
- Row 9: K1, k2tog, k2tog, k1. (4 stitches)
- Row 10: Purl all stitches.
- Row 11: K2tog twice. (2 stitches)
- Row 12: K2tog. (1 stitch)
Cut the yarn and pull through the last stitch. This completes one leaf. Make 4 more leaves in the same way, but do not cut the yarn on the 5th leaf – you'll use it to join them all together.
Joining the Leaves into a Crown
With the last leaf still on your needle (the one with the yarn still attached), pick up and knit 1 stitch from the base of the previous leaf. Then knit the next leaf pattern (starting from Row 1 of the leaf instructions). Repeat this process until all 5 leaves are joined in a circular crown shape. Bind off loosely, leaving a long tail for sewing the crown to the ghost's head.
Pumpkin Accent (Make 1)
Using your burnt orange yarn (CC2), cast on 6 stitches.
- Row 1 (RS): Knit all stitches.
- Row 2 (WS): Purl all stitches.
- Row 3: K1, kfb (knit front and back – increase), knit to the last 2 stitches, kfb, k1. (8 stitches)
- Row 4: Purl all stitches.
- Row 5: K1, kfb, knit to the last 2 stitches, kfb, k1. (10 stitches)
- Row 6: Purl all stitches.
- Row 7: K1, kfb, knit to the last 2 stitches, kfb, k1. (12 stitches)
- Row 8: Purl all stitches.
- Row 9: Knit all stitches.
- Row 10: Purl all stitches.
- Row 11: K1, k2tog, knit to the last 3 stitches, k2tog, k1. (10 stitches)
- Row 12: Purl all stitches.
- Row 13: K1, k2tog, knit to the last 3 stitches, k2tog, k1. (8 stitches)
- Row 14: Purl all stitches.
- Row 15: K1, k2tog, knit to the last 3 stitches, k2tog, k1. (6 stitches)
- Row 16: Purl all stitches.
- Row 17: K1, k2tog, k2tog, k1. (4 stitches)
- Row 18: Purl all stitches.
- Row 19: K2tog twice. (2 stitches)
- Row 20: K2tog. (1 stitch)
Cut the yarn and pull through the last stitch. This creates a small, rounded pumpkin shape. Using your sage green yarn (CC1), sew a short stem onto the top of the pumpkin. Set aside – you'll attach it to the ghost body later.
Assembly
Now it's time to bring your ghost to life! Follow these steps carefully:
- Seam the body: Place the two ghost body pieces together with right sides facing. Using the long tail from the top of the head, sew around the edges using a whip stitch or mattress stitch, leaving the bottom edge open. Turn the piece right side out.
- Stuff the ghost: Lightly stuff the ghost with fiberfill to give it a soft, plump shape. Don't overstuff – you want it to feel cozy and squishy, not firm.
- Attach the crown: Sew the leafy crown to the top of the ghost's head, covering the gathered stitches where you pulled the top together. Position it so the leaves fan out naturally around the head.
- Add the pumpkin: Attach the pumpkin accent to the front of the ghost's belly, about 2 inches below the crown. Sew it securely using the tail from the pumpkin.
- Embroider the face: Using dark brown embroidery floss (or safety eyes if you prefer), embroider two simple oval eyes and a small smiling mouth using backstitch. Place the eyes about 1.5 inches apart, and the mouth just below them. Keep it simple – the charm is in the gentle expression.
- Insert the dowel: Take your wooden dowel (about 18 inches long) and insert it into the bottom opening of the ghost, pushing it up into the stuffing. Position it so it's centered and secure. Sew the bottom edge closed around the dowel, making sure the fabric is snug against the wood. This will keep your ghost standing tall in the garden.
- Optional grass detail: Using your sage green yarn (CC1), add a few loose stitches around the base of the ghost to suggest grass or leaves peeking out.
Finishing Touches
Weave in all loose ends using your tapestry needle. Block the ghost gently to shape – you can lightly steam it or simply pat it into place. Once dry, your Whispering Willow Ghostly Boo is ready for the garden! Press the dowel firmly into the soil of a flower bed or potted plant, and enjoy your handmade autumn sentinel.
This pattern is perfect for beginners and experienced knitters alike. The pieces are simple, the assembly is straightforward, and the result is a charming, one-of-a-kind decoration that celebrates the cozy spirit of autumn. Happy knitting!



