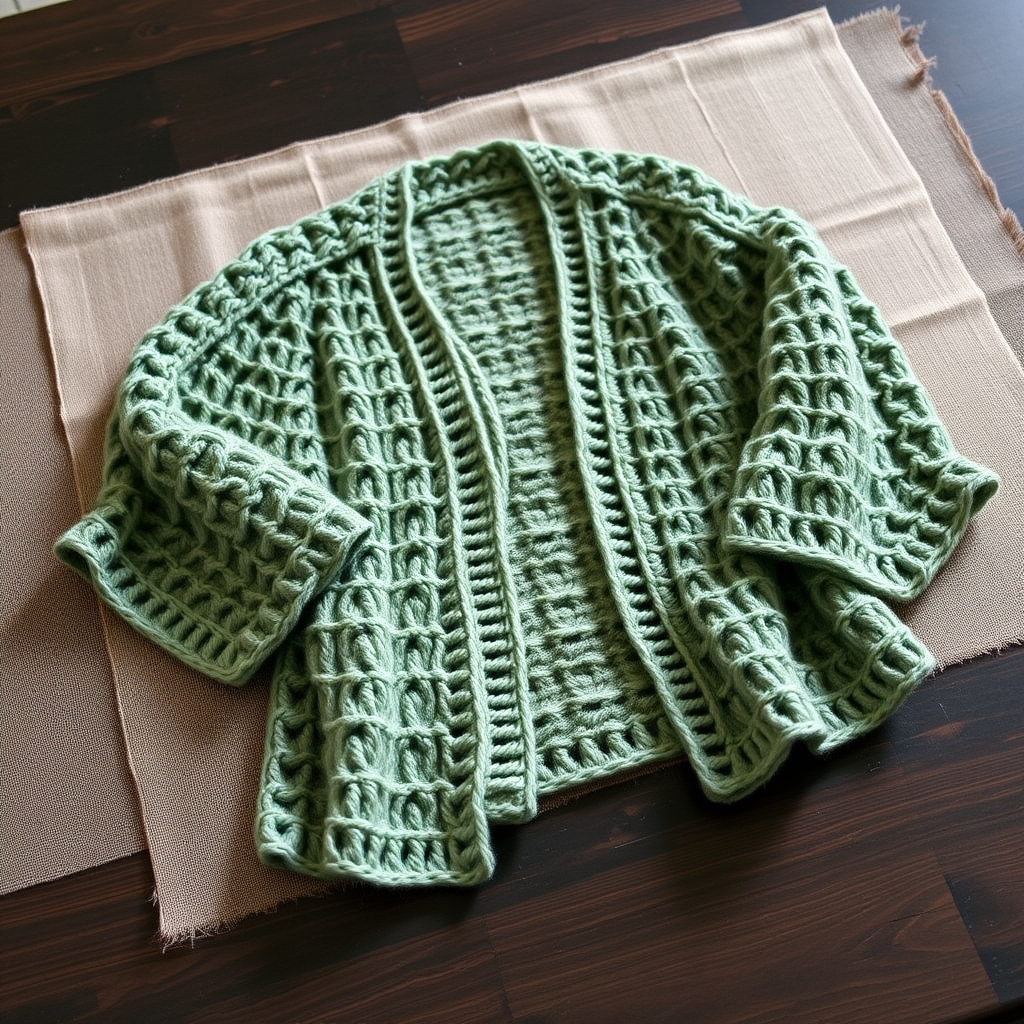
Whispering Willow Lace Cardigan Free Pattern – Knit a Breezy Botanical Wrap

Whispering Willow Lace Cardigan Free Pattern – Knit a Breezy Botanical Wrap
Imagine wrapping yourself in a garment that feels like a soft spring breeze—delicate leaf motifs cascading down the sleeves and hem, worked in a misty sage green that whispers of garden strolls and cool evening air. The Whispering Willow Lace Cardigan is exactly that: an airy, romantic layering piece that drapes beautifully and showcases intricate botanical lacework. This free knitting pattern is perfect for intermediate knitters ready to explore lace techniques while creating a stunning, wearable heirloom piece. Whether you're a seasoned lace knitter or ready to take your skills to the next level, this cardigan will become a treasured addition to your handmade wardrobe.
Materials Needed
Before you begin, gather these supplies to ensure a smooth knitting experience:
- Yarn: Fingering weight yarn (approx. 1200–1400 yards) in sage green. Recommended: Malabrigo Sock or similar soft, springy fingering weight yarn with good stitch definition.
- Needles: US 5 (3.75 mm) circular needles (32-inch or longer) for the body and sleeves; US 4 (3.5 mm) needles for ribbing.
- Notions: Stitch markers (including one unique marker for beginning of round), waste yarn or stitch holders for sleeves, tapestry needle for weaving in ends, blocking pins and mats.
- Gauge: 22 stitches and 30 rows = 4 inches in stockinette stitch (blocked). Always swatch and block before measuring gauge—lace opens up dramatically after blocking!
Step-by-Step Instructions
Sizes & Measurements
This pattern is written for sizes S (M, L, XL) with finished bust measurements of 36 (40, 44, 48) inches. The cardigan is worked top-down in one piece, which means minimal seaming and easy fitting. Choose your size based on your actual bust measurement plus 2–4 inches of positive ease for that relaxed, drapey fit.
Abbreviations
Familiarize yourself with these standard knitting abbreviations before starting:
- k = knit
- p = purl
- yo = yarn over
- k2tog = knit two together (right-leaning decrease)
- ssk = slip slip knit (left-leaning decrease)
- pm = place marker
- sm = slip marker
- RS = right side
- WS = wrong side
- BOR = beginning of round
Special Stitch – Leaf Lace Panel
This gorgeous lace pattern is worked over a multiple of 12 stitches + 1. The leaf motifs create a cascading botanical effect that's both elegant and surprisingly simple once you get into the rhythm. Here's the complete chart written out:
Row 1 (RS): k1, *yo, ssk, k7, k2tog, yo, k1; repeat from * to end.
Row 2 and all WS rows: purl all stitches.
Row 3: k2, *yo, ssk, k5, k2tog, yo, k3; repeat from * to last 11 stitches, yo, ssk, k5, k2tog, yo, k2.
Row 5: k3, *yo, ssk, k3, k2tog, yo, k5; repeat from * to last 10 stitches, yo, ssk, k3, k2tog, yo, k3.
Row 7: k4, *yo, ssk, k1, k2tog, yo, k7; repeat from * to last 9 stitches, yo, ssk, k1, k2tog, yo, k4.
Row 9: k5, *yo, ssk, yo, ssk, k5, k2tog, yo, k1; repeat from * to last 8 stitches, yo, ssk, yo, ssk, k4.
Row 11: k6, *yo, ssk, yo, ssk, k3, k2tog, yo, k3; repeat from * to last 7 stitches, yo, ssk, yo, ssk, k3.
Row 13: k7, *yo, ssk, yo, ssk, k1, k2tog, yo, k5; repeat from * to last 6 stitches, yo, ssk, yo, ssk, k2.
Row 15: k8, *yo, ssk, yo, ssk, k2tog, yo, k7; repeat from * to last 5 stitches, yo, ssk, yo, ssk, k1.
Row 16: purl.
Repeat rows 1–16 for pattern.
💡 Pro Tip: Place a stitch marker after each repeat of the 12-stitch pattern. This makes it much easier to spot mistakes early—if a row doesn't end correctly, you'll know exactly where to look!
Yoke
With US 5 needles, cast on 96 (104, 112, 120) stitches. Place a marker at the beginning of round (BOR) and join in the round, being careful not to twist your work.
Knit 4 rounds of garter stitch (knit 1 round, purl 1 round, knit 1 round, purl 1 round) to create a lovely rolled edge that will frame the neckline beautifully.
Increase Round 1: *k1, yo, k11 (12, 13, 14); repeat from * to end – you now have 104 (112, 120, 128) stitches.
Knit 1 round plain (knit all stitches, letting the yarn overs fall naturally).
Increase Round 2: *k1, yo, k12 (13, 14, 15); repeat from * to end – 112 (120, 128, 136) stitches.
Knit 1 round plain.
Continue increasing every 4th round, placing a marker after each increase section, until you have 224 (240, 256, 272) stitches on your needles. The increases should be evenly distributed—each increase round adds 8 stitches (one for each repeat).
Work even in stockinette stitch (knit every round) for 2 inches. This creates the yoke depth needed for comfortable arm movement.
Divide for Sleeves
This is where the magic of top-down construction happens! You'll separate the body from the sleeves:
- Knit 34 (36, 38, 40) stitches for the right front.
- Place the next 48 (52, 56, 60) stitches on waste yarn for the right sleeve.
- Cast on 6 (8, 10, 12) stitches for the underarm.
- Knit 68 (72, 76, 80) stitches for the back.
- Place the next 48 (52, 56, 60) stitches on waste yarn for the left sleeve.
- Cast on 6 (8, 10, 12) stitches for the underarm.
- Knit the remaining 34 (36, 38, 40) stitches for the left front.
Your total body stitch count is now 148 (160, 172, 184) stitches.
Body
Now you'll work back and forth in rows to create the cardigan body. This is where the Leaf Lace Panel comes to life along the front edges!
Begin the Leaf Lace Panel on the first 12 stitches of each front edge. Work the pattern as written, but note that the edge stitch is a selvedge stitch—knit the first and last stitch of every row to create a neat, finished edge.
Work the rest of the body in stockinette stitch (knit on RS, purl on WS). Continue until the body measures 12 (13, 14, 15) inches from the underarm, ending with a WS row.
Ribbing: Switch to US 4 needles and work 2x2 ribbing (k2, p2) for 2 inches. Bind off loosely in pattern—this ensures the hem has the same stretchy quality as the ribbing itself.
Sleeves
Transfer the sleeve stitches from waste yarn to US 5 needles. Pick up and knit 6 (8, 10, 12) stitches from the underarm cast-on edge. Place a marker at the center underarm to mark the beginning of round.
Work in the round in stockinette stitch (knit every round) for 1 inch.
Decrease Round: k1, k2tog, knit to last 3 stitches, ssk, k1. This creates a subtle, centered decrease that tapers the sleeve elegantly.
Repeat the decrease round every 6th round until you have 36 (40, 44, 48) stitches remaining on your needles.
Work even until the sleeve measures 14 (15, 16, 17) inches from the underarm. Switch to US 4 needles and work 2x2 ribbing for 1.5 inches. Bind off loosely.
Finishing
Weave in all ends with your tapestry needle, being careful to secure them on the wrong side of the work.
Blocking is crucial for this pattern! The lace panels will look scrunched and unimpressive before blocking, but they'll bloom into beautiful leaf motifs once stretched. Here's how:
- Soak the cardigan in lukewarm water with a gentle wool wash for 20–30 minutes.
- Gently squeeze out excess water (never wring or twist!).
- Roll in a clean towel to remove additional moisture.
- Lay flat on blocking mats and pin to the finished measurements, paying special attention to the lace panels—stretch them gently to open up the leaf motifs and eyelet holes.
- Allow to dry completely (24–48 hours) before removing pins.
If desired, sew on buttons or add a tie closure for a more fitted look. However, this cardigan is designed to be worn open, letting the lace panels cascade beautifully down the front edges.
🌸 Designer's Note: The Whispering Willow Cardigan is named for the gentle, flowing quality of the lace pattern—each leaf motif seems to whisper in the breeze. The misty sage green yarn enhances this botanical feel, but don't be afraid to experiment with other colors. A soft blush pink, dusty blue, or even a warm cream would all be stunning!
Care Instructions
To keep your Whispering Willow Cardigan looking beautiful for years to come:
- Hand wash in cool water with a gentle wool wash
- Lay flat to dry, reshaping gently
- Store folded (not hung) to prevent stretching
- Steam block lightly between wearings if needed
This pattern is a joy to knit—the lace panels are engaging without being overwhelming, and the top-down construction means you can try it on as you go. Whether you're knitting for yourself or as a gift for someone special, the Whispering Willow Lace Cardigan is sure to become a beloved piece in any wardrobe. Happy knitting! 🧶