Aurora Borealis Driftwood Wall Hanging Free Pattern – A Crocheted Northern Lights Tapestry
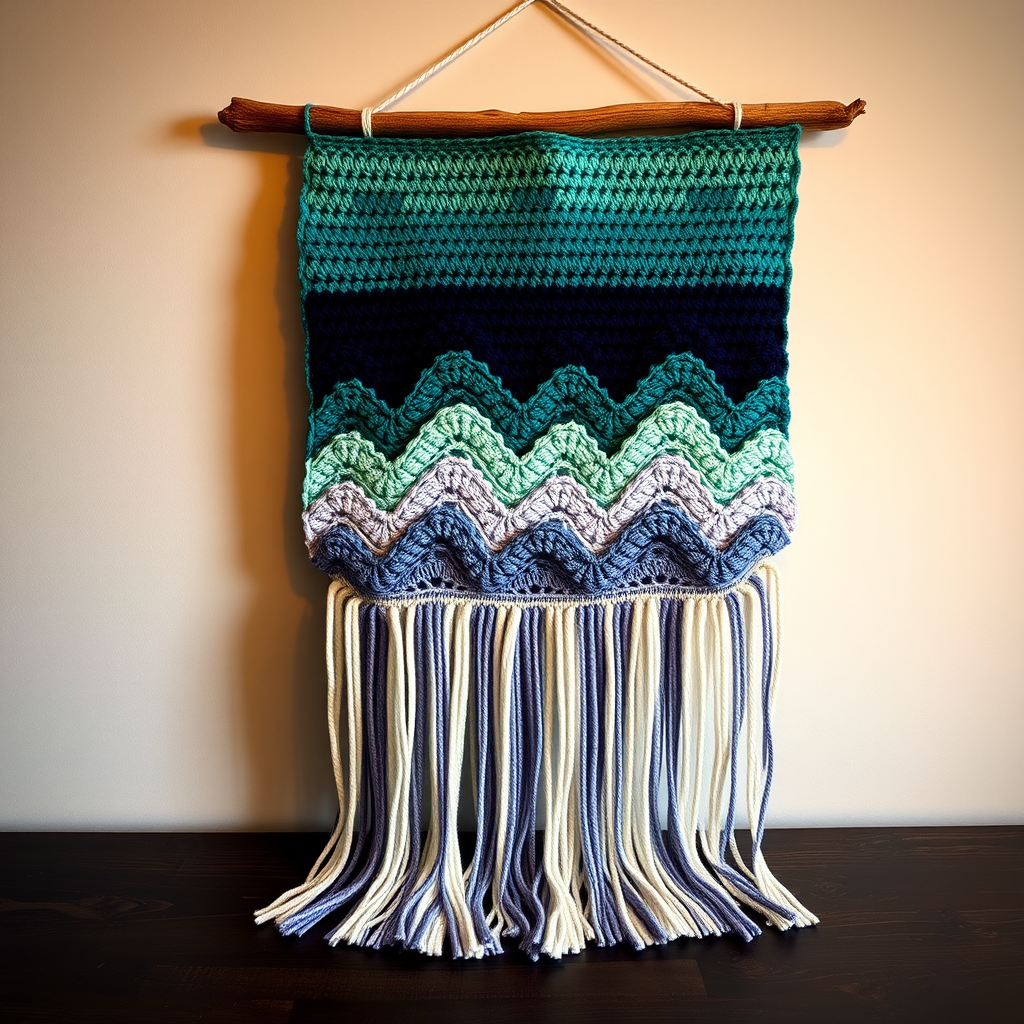
Capture the Magic of the Night Sky: Aurora Borealis Driftwood Wall Hanging
Imagine bringing the ethereal, dancing light of the northern lights into your living room. With this free crochet pattern, you can transform simple yarn into a stunning, textured tapestry that captures the celestial glow of the aurora borealis. This modern piece of fiber art is surprisingly beginner-friendly, using basic single crochet stitches and a simple chain-space technique to create flowing, lacy waves that mimic the movement of the night sky. Whether you're looking to add a boho touch to your decor or searching for a unique handmade gift, this wall hanging is the perfect project to showcase your creativity.
This pattern is designed to be accessible, with no complex shaping or intricate stitch combinations. The magic lies in the color transitions and the open, wave-like texture that you'll create row by row. By the end, you'll have a beautiful, one-of-a-kind tapestry mounted on rustic driftwood, ready to become the focal point of any room.
Materials Needed
Before you begin, gather the following supplies. The gauge is not critical for this project, so you can relax and enjoy the process without worrying about perfect tension.
- Yarn: Worsted weight (#4) in 5 colors:
- Color A: Deep Teal (approx. 40 yards)
- Color B: Midnight Blue (approx. 40 yards)
- Color C: Emerald Green (approx. 40 yards)
- Color D: Soft Lavender (approx. 40 yards)
- Color E: Cream (approx. 40 yards)
- Hook: 5.5 mm (I-9) crochet hook
- Extras: Yarn needle for weaving in ends, scissors, a wooden dowel or driftwood branch for hanging, and a small piece of yarn for the hanging loop.
Note on gauge: For reference, 14 single crochets (sc) x 16 rows = 4 inches. However, since this is a wall hanging, slight variations in size are perfectly fine and add to the handmade charm.
Step-by-Step Instructions
This wall hanging is worked flat from the top down. The fringe is added at the very end. Follow these detailed instructions carefully, and you'll see your aurora come to life.
Getting Started: The Foundation
Foundation Row: With Color A (Deep Teal), make a slip knot and chain (ch) 41.
Rows 1-2: The Base
Row 1: Single crochet (sc) in the 2nd chain from your hook and in each chain across. You should have 40 sc stitches. Chain 1 and turn your work.
Row 2: With Color A, chain 1, then sc in each stitch across. (40 sc) Turn your work.
Rows 3-4: Creating the First Aurora Wave (Color B)
This is where the magic begins! We'll create open spaces that form the flowing waves.
Row 3: Switch to Color B (Midnight Blue). Chain 1, sc in the first 10 stitches. Now, repeat the following sequence: *chain 2, skip 2 stitches, sc in the next 3 stitches*. Repeat from * to * until only 10 stitches remain. Finally, sc in the last 10 stitches. Turn your work. (This creates the first wave of the aurora.)
Row 4: With Color B, chain 1. Now, sc in each stitch AND in each chain-2 space across the row. You should have 40 sc stitches again. Turn your work.
Rows 5-6: The Second Wave (Color C)
We'll now create a slightly different wave pattern for more visual interest.
Row 5: Switch to Color C (Emerald Green). Chain 1, sc in the first 5 stitches. Now, repeat the following sequence: *chain 3, skip 3 stitches, sc in the next 4 stitches*. Repeat from * to * until only 5 stitches remain. Finally, sc in the last 5 stitches. Turn your work.
Row 6: With Color C, chain 1. Sc in each stitch and in each chain-3 space across the row. (40 sc) Turn your work.
Rows 7-8: The Third Wave (Color D)
Let's add another layer of texture with a different spacing.
Row 7: Switch to Color D (Soft Lavender). Chain 1, sc in the first 12 stitches. Now, repeat the following sequence: *chain 2, skip 2 stitches, sc in the next 2 stitches*. Repeat from * to * until only 12 stitches remain. Finally, sc in the last 12 stitches. Turn your work.
Row 8: With Color D, chain 1. Sc in each stitch and in each chain-2 space across the row. (40 sc) Turn your work.
Rows 9-10: The Calm Before the Mirror (Color E)
We'll use the cream color to create a solid, grounding band before we mirror the pattern.
Row 9: Switch to Color E (Cream). Chain 1, sc in each stitch across. (40 sc) Turn your work.
Row 10: With Color E, chain 1, sc in each stitch across. (40 sc) Turn your work.
Rows 11-20: The Mirrored Aurora
Now, we will repeat Rows 3-10, but in reverse color order to create a beautiful, mirrored effect. This makes the aurora look like it's flowing downwards and then reflecting back up.
- Row 11: Repeat Row 3, but use Color E (Cream) instead of Color B.
- Row 12: Repeat Row 4, using Color E.
- Row 13: Repeat Row 5, but use Color D (Soft Lavender) instead of Color C.
- Row 14: Repeat Row 6, using Color D.
- Row 15: Repeat Row 7, but use Color C (Emerald Green) instead of Color D.
- Row 16: Repeat Row 8, using Color C.
- Row 17: Repeat Row 3, but use Color B (Midnight Blue) instead of Color E.
- Row 18: Repeat Row 4, using Color B.
- Row 19: Repeat Row 9, but use Color A (Deep Teal) instead of Color E.
- Row 20: Repeat Row 10, using Color A.
Row 21: The Final Border
Row 21: With Color A (Deep Teal), chain 1, sc in each stitch across. (40 sc) Fasten off and weave in this end.
Finishing Touches: Weaving and Fringe
Now for the fun part—adding the fringe that gives this piece its boho flair!
1. Weave in Ends: Using your yarn needle, carefully weave in all the loose ends from your color changes on the back of your work. This will keep your tapestry looking clean and professional.
2. Cut the Fringe: Cut 12-inch lengths of yarn in colors A, B, C, and D. You will need about 20-25 pieces total, depending on how full you want the fringe to be.
3. Attach the Fringe: Fold one length of yarn in half. Insert your crochet hook from the back to the front through the bottom edge stitch. Grab the folded loop of yarn with your hook and pull it through the stitch to create a small loop. Then, take the two loose ends of the yarn and pull them through this loop. Pull tight to secure the fringe. Repeat this process across the bottom edge, alternating colors (A, B, C, D) for a beautiful gradient effect.
4. Trim the Fringe: Once all the fringe is attached, lay your work flat and trim the bottom of the fringe evenly with scissors to create a clean, polished line.
Hanging Your Masterpiece
To display your wall hanging, attach it to a rustic wooden dowel or a piece of driftwood.
1. Prepare the Dowel: Cut a piece of yarn about 12 inches long. This will be your hanging loop.
2. Attach the Hanging Loop: Tie the ends of this yarn piece securely to both ends of the dowel or branch to create a loop for hanging.
3. Attach the Tapestry: Thread a long piece of yarn (about 24 inches) onto your yarn needle. Weave the needle through the top row of stitches on your tapestry. Then, wrap the yarn around the dowel and tie it securely. Repeat this in a few places across the top to ensure the tapestry hangs evenly and securely.
And there you have it! Your very own Aurora Borealis Driftwood Wall Hanging. This piece is sure to be a conversation starter and a beautiful addition to your home. Enjoy the process and the stunning result of your handiwork!