Desert Bloom Woven Wall Hanging Free Pattern – Crochet a Boho Tapestry
Desert Bloom Woven Wall Hanging Free Pattern – Crochet a Boho Tapestry
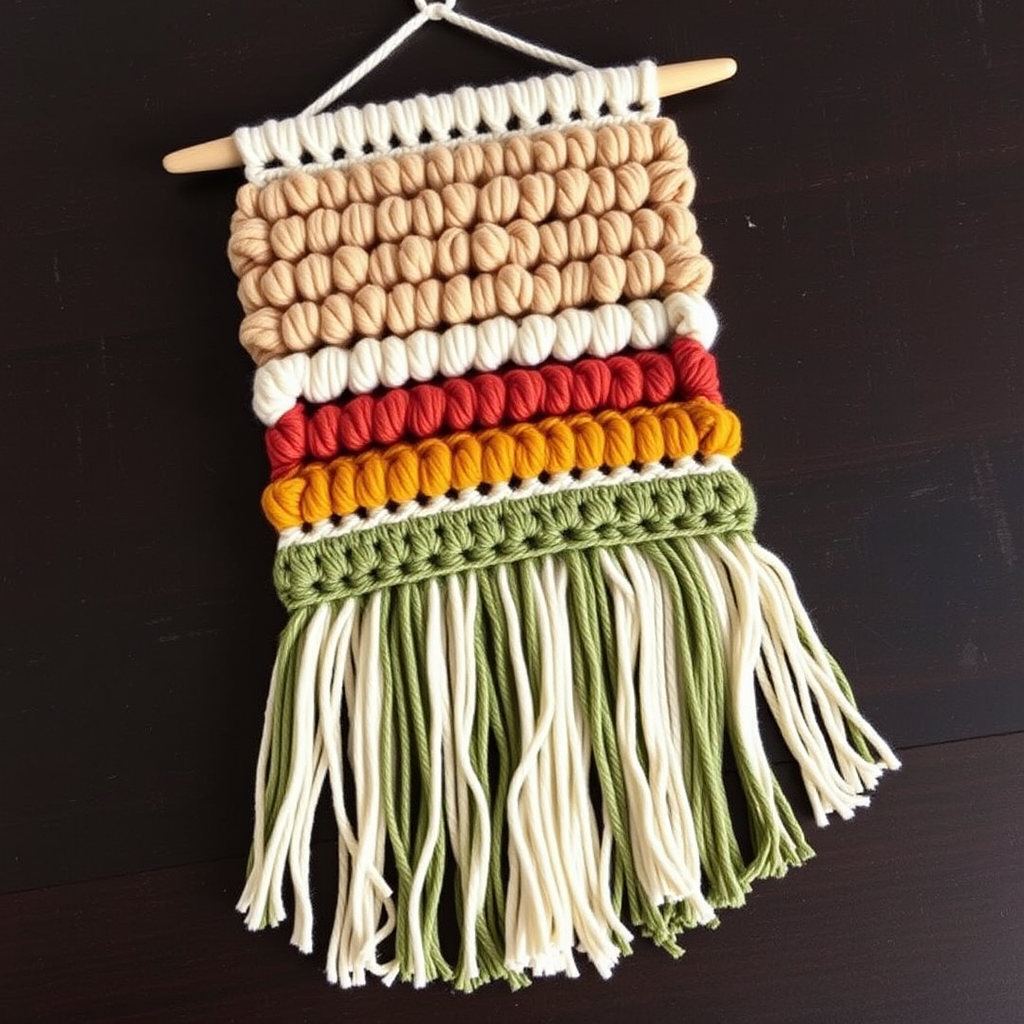
Bring the warmth of the desert into your home with this textured crochet wall hanging, featuring cascading fringe and earthy sunset tones. This stunning boho tapestry is the perfect statement piece for any cozy, bohemian space, adding a handcrafted touch that instantly elevates your decor. Whether you're a seasoned crocheter or a confident beginner, this pattern is designed to be both relaxing and rewarding, resulting in a beautiful piece you'll be proud to display.
This project combines basic crochet stitches with a simple woven texture to create a visually dynamic piece that mimics the look of macrame. The staggered clusters and open spaces give it a rich, organic feel, while the color transitions from warm sand to terracotta, mustard, sage, and cream create a beautiful sunset gradient. Let's get started on creating your very own Desert Bloom wall hanging!
Materials Needed
Before you begin, gather the following materials to ensure a smooth and enjoyable crochet experience:
- Yarn: Worsted weight cotton yarn in 5 colors:
- Sand (A) – for the top band
- Terracotta (B) – for the second band
- Mustard (C) – for the third band
- Sage (D) – for the fourth band
- Cream (E) – for the bottom band
- Hook or Needle: 5.5 mm (I-9) crochet hook, tapestry needle for weaving in ends
- Dowel: Wooden dowel or branch, 12-14 inches long (for hanging)
- Scissors: For cutting yarn and trimming fringe
Gauge: 4 dc x 2 rows = 2 inches in pattern stitch. Gauge is not critical for this project, but aim for a firm fabric so the wall hanging holds its shape nicely.
Step-by-Step Instructions
This wall hanging is worked from the top down in rows, using a combination of basic stitches and a simple woven texture. The fringe is added at the end. Follow along carefully, and you'll have a beautiful boho tapestry in no time!
Foundation Row
With color A (Sand), chain 31. Double crochet (dc) in the 4th chain from the hook and in each chain across. You should have 28 dc stitches total. (The first 3 chains count as your first dc.)
Rows 1-4: Creating the Sand Band
Row 1 (Right Side): Chain 3 (counts as dc), turn. Dc in the next 2 stitches. *Skip the next stitch, dc in the next 3 stitches.* Repeat from * to * across, ending with a dc in the last stitch. (28 dc)
Row 2: Chain 3, turn. Dc in each stitch across. (28 dc)
Row 3: Chain 3, turn. Dc in the next stitch. *Skip the next stitch, dc in the next 3 stitches.* Repeat from * to * across, ending with dc in the last 2 stitches. (28 dc)
Row 4: Repeat Row 2 (dc in each stitch across). (28 dc)
Row 5: Color Change to Terracotta (B)
Chain 3, turn. Dc in each stitch across, but in the last yarn over of the final dc, change to color B (Terracotta). Cut color A, leaving a tail to weave in later. (28 dc)
Rows 6-8: Creating the Terracotta Band
With color B, you'll repeat the staggered pattern but start with the offset pattern (Row 3 pattern) to create a beautiful, woven texture.
Row 6: Chain 3, turn. Dc in the next stitch. *Skip the next stitch, dc in the next 3 stitches.* Repeat from * to * across, ending with dc in the last 2 stitches. (28 dc)
Row 7: Chain 3, turn. Dc in each stitch across. (28 dc)
Row 8: Chain 3, turn. Dc in the next 2 stitches. *Skip the next stitch, dc in the next 3 stitches.* Repeat from * to * across, ending with dc in the last stitch. (28 dc)
Row 9: Color Change to Mustard (C)
Chain 3, turn. Dc in each stitch across, changing to color C (Mustard) in the last yarn over of the final dc. Cut color B. (28 dc)
Rows 10-12: Creating the Mustard Band
With color C, repeat the same staggered pattern as Rows 6-8.
Row 10: Chain 3, turn. Dc in the next stitch. *Skip the next stitch, dc in the next 3 stitches.* Repeat from * to * across, ending with dc in the last 2 stitches. (28 dc)
Row 11: Chain 3, turn. Dc in each stitch across. (28 dc)
Row 12: Chain 3, turn. Dc in the next 2 stitches. *Skip the next stitch, dc in the next 3 stitches.* Repeat from * to * across, ending with dc in the last stitch. (28 dc)
Row 13: Color Change to Sage (D)
Chain 3, turn. Dc in each stitch across, changing to color D (Sage) in the last yarn over. Cut color C. (28 dc)
Rows 14-16: Creating the Sage Band
With color D, repeat the staggered pattern.
Row 14: Chain 3, turn. Dc in the next stitch. *Skip the next stitch, dc in the next 3 stitches.* Repeat from * to * across, ending with dc in the last 2 stitches. (28 dc)
Row 15: Chain 3, turn. Dc in each stitch across. (28 dc)
Row 16: Chain 3, turn. Dc in the next 2 stitches. *Skip the next stitch, dc in the next 3 stitches.* Repeat from * to * across, ending with dc in the last stitch. (28 dc)
Row 17: Color Change to Cream (E)
Chain 3, turn. Dc in each stitch across, changing to color E (Cream) in the last yarn over. Cut color D. (28 dc)
Rows 18-20: Creating the Cream Band
With color E, repeat the staggered pattern.
Row 18: Chain 3, turn. Dc in the next stitch. *Skip the next stitch, dc in the next 3 stitches.* Repeat from * to * across, ending with dc in the last 2 stitches. (28 dc)
Row 19: Chain 3, turn. Dc in each stitch across. (28 dc)
Row 20: Chain 3, turn. Dc in the next 2 stitches. *Skip the next stitch, dc in the next 3 stitches.* Repeat from * to * across, ending with dc in the last stitch. (28 dc)
Row 21: Finishing Row
Chain 1, turn. Single crochet (sc) in each stitch across. Cut yarn and weave in all ends with your tapestry needle. (28 sc)
Finishing Touches
Mounting on the Dowel
Fold the top edge of your crocheted piece over the wooden dowel. Use your tapestry needle and a length of yarn (color A works well) to whipstitch the top edge in place, securing it firmly to the dowel. Alternatively, you can use a row of slip stitches to attach it. Make sure it's centered and secure.
Adding the Fringe
Cut strands of yarn in colors A, B, C, D, and E, each 12 inches long. For each fringe, hold 2 strands together, fold them in half, and use a crochet hook to pull the folded loop through the bottom edge of the hanging. Pull the ends through the loop and tighten gently. Space the fringes evenly across the bottom edge, alternating colors for a vibrant, boho look. Continue until the entire bottom edge is fringed.
Final Trimming
Once all the fringe is attached, trim the ends to even them out. You can leave them straight or cut them at an angle for a more dynamic look.
Finally, add a simple loop of yarn to the top of the dowel for hanging. Your Desert Bloom Woven Wall Hanging is now complete! Hang it in your living room, bedroom, or entryway to add a touch of desert warmth and boho charm to your space.
Happy crocheting! We'd love to see your finished creation—share your Desert Bloom wall hanging with us on social media using #DesertBloomWallHanging.


