Ember & Ash Fade Triangle Shawl Free Pattern – Knit a Gradient Ombre Wrap
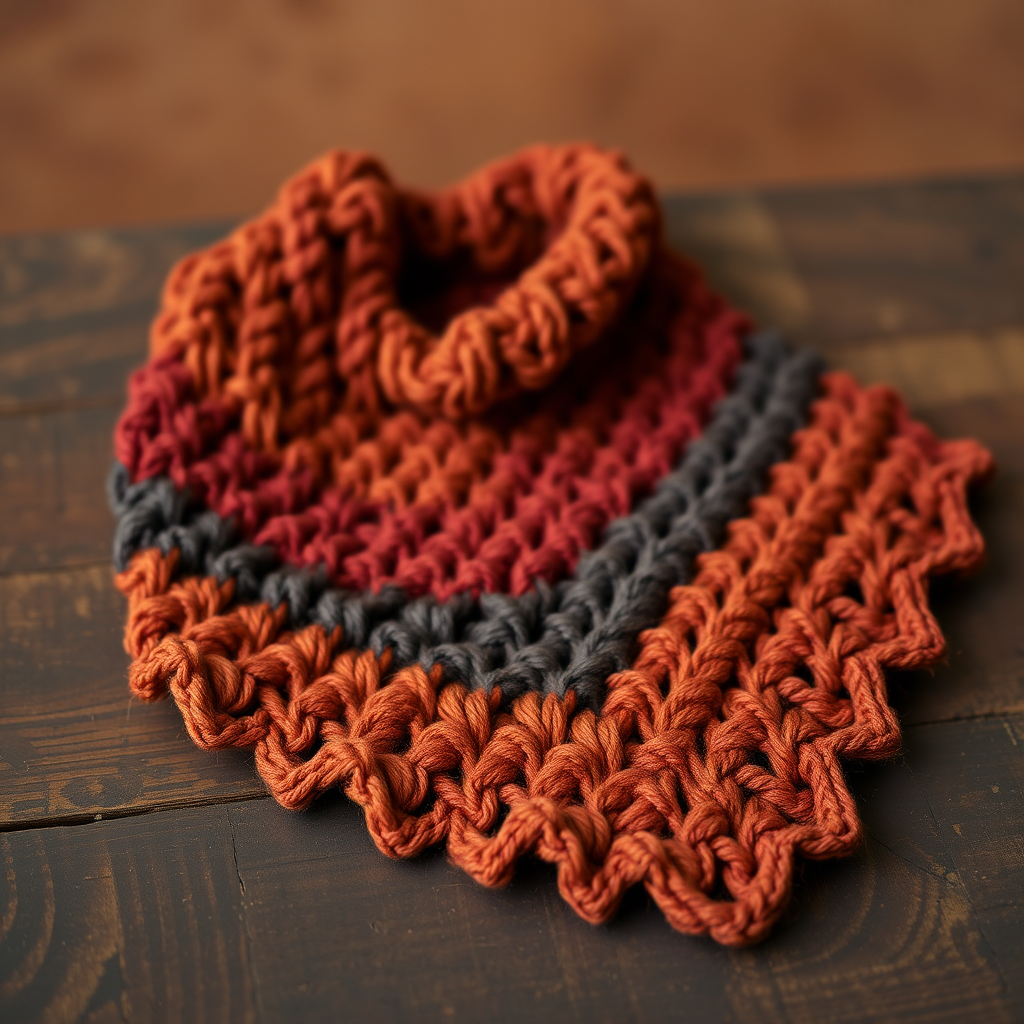
Ember & Ash Fade Triangle Shawl: A Beginner-Friendly Knitting Pattern
There's something magical about watching yarn transform under your fingers—especially when it shifts through a spectrum of warm, earthy tones. The Ember & Ash Fade Triangle Shawl captures the essence of a crackling autumn fire: burnt sienna melting into deep rust, then smoky charcoal, and back again. This free knitting pattern is designed with beginners in mind, using only knit stitches, simple increases, and a rhythmic stripe sequence that creates a stunning gradient ombre effect. The result is a cozy, sculptural wrap that drapes beautifully over your shoulders on cool evenings.
What makes this pattern so approachable? It's knit entirely in garter stitch—every row is a knit row. The triangle shape emerges naturally from increases placed at the edges and center, so you never need to count complicated stitch patterns. The fade effect is achieved by simply switching colors every six rows, creating bold, seamless bands of color that blend into one another. Whether you're a new knitter looking for your first shawl or an experienced maker seeking a meditative project, this pattern delivers both beauty and simplicity.
Why You'll Love This Pattern
- Beginner-friendly: Only knit stitches, yarn overs, and simple increases
- Mindful rhythm: The repeating stripe sequence is easy to memorize
- Customizable: Adjust the size by working more or fewer repeats
- Quick to knit: Worsted weight yarn means your shawl grows fast
- Stunning result: The gradient fade looks far more complex than it is
Materials Needed
Before you begin, gather these supplies. All are readily available at your local yarn shop or online.
Yarn
You'll need worsted weight yarn in three colors, approximately 350 yards (320 meters) of each:
- Color A: Burnt Sienna (a warm, reddish-orange)
- Color B: Deep Rust (a rich, brownish-orange)
- Color C: Smoky Charcoal (a soft, dark gray)
Tip: Choose yarns with similar fiber content and weight for consistent drape. A wool or wool-blend yarn will block beautifully and hold its shape.
Needle
- US 9 (5.5 mm) circular knitting needle, 32 inches (80 cm) or longer. The long cable is essential to accommodate the growing number of stitches as the shawl expands.
Gauge
- 16 stitches and 28 rows = 4 inches (10 cm) in garter stitch (blocked). Gauge isn't critical for this shawl, but matching it will help you achieve the intended size and drape.
Other Supplies
- Stitch markers (optional, but helpful for marking the center stitch)
- Tapestry needle for weaving in ends
- Blocking mats and pins (for finishing)
- Steam iron or spray bottle (for blocking)
Step-by-Step Instructions
This shawl is knit from the top center down, increasing at both edges and at the center stitch to form a triangle. The fade effect is created by alternating stripe sequences of the three colors. Follow along carefully, and you'll have a beautiful shawl in no time.
Abbreviations
- k = knit
- kfb = knit front and back (increase 1 stitch)
- yo = yarn over (increase 1 stitch)
- k2tog = knit two together (decrease 1 stitch)
- sl1 = slip one stitch purlwise
- RS = right side
- WS = wrong side
Setup Rows
With Color A, cast on 3 stitches using your preferred method (long-tail cast on works well).
- Row 1 (RS): kfb, k1, kfb — you now have 5 stitches.
- Row 2 (WS): Knit all stitches.
- Row 3 (RS): kfb, k1, yo, k1, yo, k1, kfb — you now have 9 stitches.
- Row 4 (WS): Knit all stitches.
Your foundation is complete. The center stitch is the 5th stitch (the one between the two yarn overs). You'll use this as your guide for the center increase throughout the pattern.
Main Pattern
Now you'll work the main body of the shawl in garter stitch (knit every row) with increases on right-side rows. The pattern is simple and repetitive:
- Row 1 (RS): kfb, knit to the center stitch, yo, k1 (center stitch), yo, knit to the last stitch, kfb.
- Row 2 (WS): Knit all stitches.
Repeat these two rows, following the stripe sequence below. Each "6 rows" means 6 rows total (3 RS rows and 3 WS rows), which creates a bold, 1.5-inch color band.
Stripe Sequence
Follow this color order to create the fade effect. The sequence repeats, creating a symmetrical gradient:
- Work 6 rows of Color A (3 RS rows)
- Work 6 rows of Color B (3 RS rows)
- Work 6 rows of Color C (3 RS rows)
- Work 6 rows of Color B (3 RS rows)
- Work 6 rows of Color A (3 RS rows)
- Work 6 rows of Color B (3 RS rows)
- Work 6 rows of Color C (3 RS rows)
- Work 6 rows of Color B (3 RS rows)
- Work 6 rows of Color A (3 RS rows)
Continue alternating colors in this pattern (A, B, C, B, A, B, C, B, A...) until the shawl reaches your desired size. For a 60-inch wide and 30-inch deep shawl, you'll work approximately 60-70 repeats of the two-row pattern. Don't worry about counting exact repeats—just measure occasionally and stop when you're happy with the size.
Pro tip: When changing colors, do so at the beginning of a right-side row for the cleanest color transition. Leave a 6-inch tail when cutting the old color, and weave it in later.
Edging
Once your shawl reaches the desired size, it's time to bind off. With Color C (or any color you prefer for the edge), bind off loosely on the right side. A loose bind-off is crucial to prevent the edge from pulling and to maintain the shawl's drape.
For a decorative picot edge, use this bind-off method:
- Bind off 2 stitches normally.
- *Slip the remaining stitch back to the left needle.
- Cast on 2 stitches using the knitted cast-on method.
- Bind off 4 stitches (the 2 new stitches plus the next 2 stitches on the left needle).
- Repeat from * to the end of the row.
This creates a delicate, scalloped edge that adds a touch of elegance to the finished shawl.
Finishing
Now for the final steps that will transform your knitting into a beautiful, professional-looking shawl:
- Weave in all ends using a tapestry needle. Be sure to weave in the color-change tails securely, but avoid pulling too tightly, which can pucker the fabric.
- Block the shawl to open up the stitches and enhance the drape. Soak the shawl in lukewarm water with a drop of mild wool wash for 15-20 minutes. Gently squeeze out excess water (never wring or twist).
- Lay the shawl on blocking mats and pin it to shape. Stretch it gently to the desired dimensions—about 60 inches wide across the top and 30 inches deep from the center point to the top edge. The garter stitch will relax and open up beautifully.
- Allow it to dry completely, which may take 24-48 hours depending on humidity.
- Once dry, unpin and enjoy your handcrafted Ember & Ash Fade Triangle Shawl!
Tips for Success
- Mark your center stitch: Place a locking stitch marker on the center stitch so you always know where to place your yarn overs.
- Count your stitches occasionally: After each RS row, you should have 4 more stitches than before (2 increases at the edges and 2 at the center).
- Keep your tension even: Garter stitch is forgiving, but consistent tension will make your color bands look crisp and uniform.
- Don't stress about perfection: This is a relaxing, meditative project. Enjoy the process!
Your Ember & Ash Fade Triangle Shawl is now complete. This versatile piece can be worn draped over your shoulders, wrapped around your neck like a scarf, or displayed as a cozy throw. The warm, autumnal palette pairs beautifully with neutral outfits and adds a handmade touch to any space. Happy knitting!


