Field Row Chevron Henley Tee Free Pattern: A Knit Mohair-Silk Farmhouse Top
Field Row Chevron Henley Tee: A Farmhouse Knit for Absolute Beginners
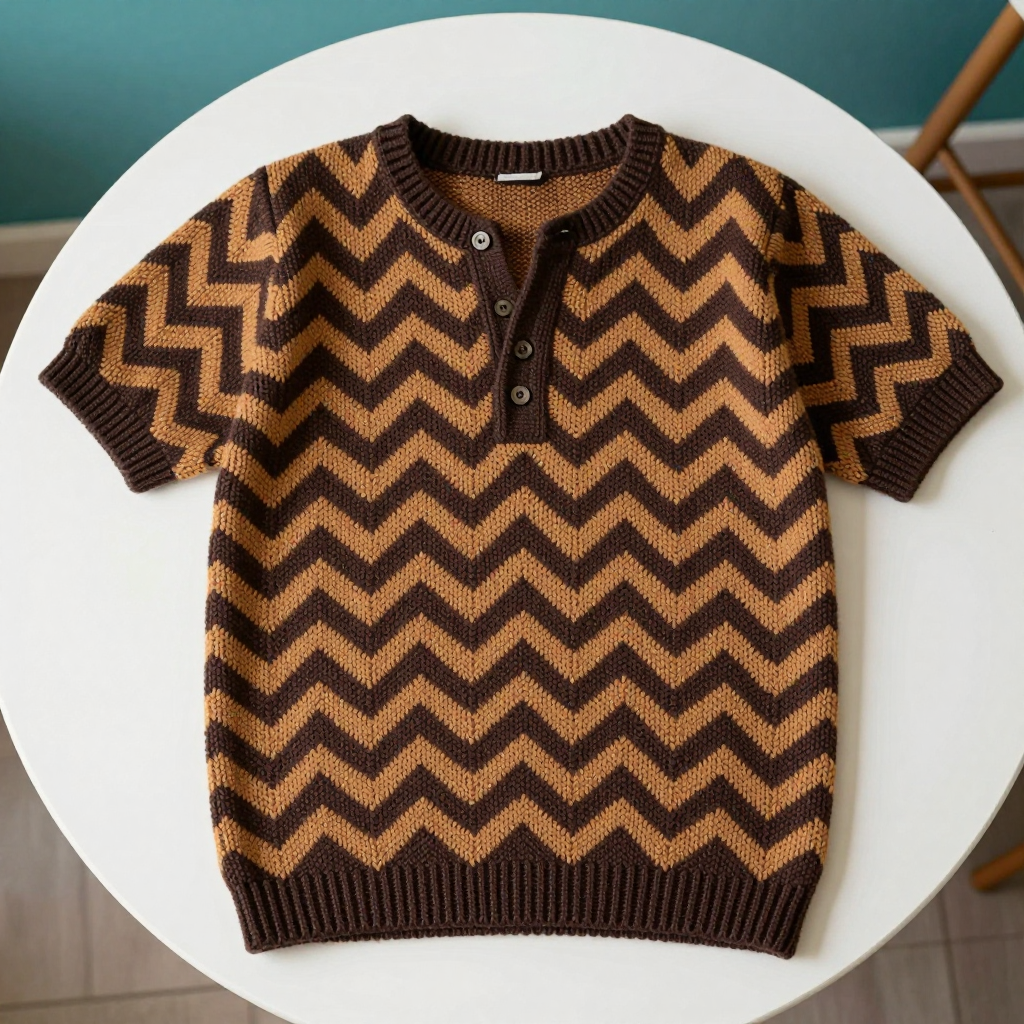
If you have ever wanted to knit a real, wearable top but felt intimidated by shaping, buttonholes, and complicated charts, this is the project for you. The Field Row Chevron Henley Tee is a straight-sided, boxy short-sleeve top worked flat in rows from the bottom up, so there is no knitting in the round and no confusing circular joins. The allover chevron pattern is just four simple rows repeated over and over, alternating chocolate and caramel every two rows to create fine zigzag stripes. The finished tee is soft, airy, and slightly fuzzy thanks to the mohair-silk yarn held double, with a gentle halo and a rustic farmhouse feel that is perfect for pumpkin season. There are no buttons and no motifs, just a clean button-free placket opening at the neck finished in plain ribbing. If you can knit, purl, and count, you can make this top.
Materials Needed
- Yarn: Lace-weight mohair-silk blend (approximately 70% mohair, 30% silk; approx. 460 yd / 420 m per 50 g skein), held DOUBLE throughout (meaning you work with two strands of yarn at the same time as if they were one). Sample uses 2 skeins chocolate (MC = main color) and 2 skeins caramel (CC = contrast color), approximately 380 yd / 350 m of each color held double for size M.
- Main needles: US 6 (4.0 mm) straight or circular needles, 32 in / 80 cm, for the main fabric.
- Ribbing and placket needles: US 4 (3.5 mm) needles.
- Stitch markers: at least 4 removable markers (a stitch marker is a small clip or ring you place on a stitch to mark a spot).
- Row counter: optional but very helpful for keeping track of your four-row repeat.
- Tapestry needle: a large blunt needle with an eye big enough for yarn, used for sewing seams and weaving in ends.
- Scissors for cutting yarn.
- 2 stitch holders or waste yarn (waste yarn is scrap yarn used to hold live stitches temporarily).
Finished sizes: S (M, L, XL, 2XL). Finished chest circumference: 38 (42, 46, 50, 54) in / 96.5 (106.5, 117, 127, 137) cm. Finished length from shoulder: 25 (25.5, 26, 26.5, 27) in / 63.5 (65, 66, 67.5, 68.5) cm. Sample shown in size M. This tee is designed with 2–4 in / 5–10 cm of positive ease (extra room beyond your body measurement); choose the size closest to your actual chest measurement plus 2–4 in.
Abbreviations and Beginner Glossary
- st / sts – stitch / stitches (one loop on your needle is one stitch).
- RS – right side (the side of the fabric that faces outward when worn).
- WS – wrong side (the inside of the fabric).
- MC – main color (chocolate in the sample).
- CC – contrast color (caramel in the sample).
- K – knit (insert the right needle into the front of the stitch from left to right, wrap yarn around, pull the loop through, and slip the old stitch off).
- P – purl (insert the right needle into the front of the stitch from right to left, wrap yarn around, pull the loop through toward you, and slip the old stitch off).
- k2tog – knit two stitches together (insert your needle through two stitches at once and knit them as one; this decreases by one stitch and leans to the right).
- ssk – slip, slip, knit (slip one stitch knitwise to the right needle, slip a second stitch knitwise, then knit both slipped stitches together through their back loops; this decreases by one stitch and leans to the left).
- yo – yarn over (wrap the yarn around the right needle once to create an extra loop; this increases by one stitch and makes a small eyelet hole).
- rep – repeat (do the section again).
- 1x1 rib – a stretchy pattern of knit 1, purl 1 repeated across the row.
- bind off – the way to finish an edge so stitches do not unravel (knit two stitches, lift the first over the second and off the needle, then continue across).
- pick up and knit – insert your needle into the edge of the fabric, wrap yarn, and pull up a new loop, creating stitches along a finished edge.
- place marker – put a marker on your needle to mark a position.
Gauge
22 sts and 30 rows = 4 in / 10 cm in chevron pattern on US 6 (4.0 mm) needles with yarn held double, after light blocking. Ribbing gauge on US 4 (3.5 mm): 26 sts and 34 rows = 4 in / 10 cm.
Gauge matters because it is how we guarantee the finished top actually fits. If your stitches are bigger than the pattern expects, the tee will come out too large; if they are smaller, it will be too tight. To check, cast on about 30 stitches with your US 6 needles and yarn held double, work the chevron pattern for about 4 inches, then lay it flat without stretching and count how many stitches fit across 4 inches. If you have more than 22, go up a needle size; if fewer, go down. Always swatch before you begin.
Beginner Tips Before You Start
- Use stitch markers to track your repeats. Place a marker after every 12-stitch chevron repeat so you can instantly see if you have lost or added a stitch.
- Do not pull your yarn too tight. Mohair-silk is delicate and fuzzy; a relaxed tension keeps the fabric airy and prevents the yarn from snapping.
- Count your stitches at the end of every row. The chevron uses paired increases (yo) and decreases (k2tog, ssk), so the count should stay the same on every pattern row.
- Keep a row counter or tick marks on paper. You change color every two rows, so it is easy to lose your place in the four-row repeat.
- Work your first row slowly. The set-up row establishes your repeats; getting it right makes every following row simple.
- Change colors at the edge of the row and give the yarn a gentle tug so the color bands stay neat and even.
Step-by-Step Instructions
Stitch Pattern — Chevron (multiple of 12 sts + 1)
Row 1 (RS, MC): K1, *k2tog, k3, yo, k1, yo, k3, ssk; rep from * to last st, k1.
Row 2 (WS, MC): Purl all sts.
Row 3 (RS, CC): K1, *k2tog, k3, yo, k1, yo, k3, ssk; rep from * to last st, k1.
Row 4 (WS, CC): Purl all sts.
Repeat Rows 1–4 for the pattern. Each 12-st repeat measures approximately 2.2 in / 5.5 cm wide; each 4-row color band measures approximately 0.5 in / 1.3 cm.
Back
With US 4 (3.5 mm) needles and MC held double, cast on 121 (133, 145, 157, 169) sts.
Rows 1–8: Work in 1x1 rib (k1, p1) across. (121 (133, 145, 157, 169) sts) End with a WS row.
Change to US 6 (4.0 mm) needles.
Set-up row (RS): K1, place marker, work Chevron Row 1 across to last st, place marker, k1. You now have 10 (11, 12, 13, 14) full 12-st chevron repeats between the edge stitches. (121 (133, 145, 157, 169) sts)
Continue in the Chevron pattern, working Rows 1–4 and alternating MC and CC every 2 rows as established, until the piece measures 15.5 (15.5, 16, 16, 16.5) in / 39.5 (39.5, 40.5, 40.5, 42) cm from the cast-on edge, ending with a WS row. Place a removable marker at each side edge to mark the underarm.
Continue straight in pattern until the piece measures 24 (24.5, 25, 25.5, 26) in / 61 (62, 63.5, 65, 66) cm from the cast-on edge, ending with a WS row.
Shape shoulders and neck (next RS row): Work 43 (48, 53, 58, 63) sts in pattern, bind off the center 35 (37, 39, 41, 43) sts for the back neck, work the remaining 43 (48, 53, 58, 63) sts in pattern. Place these sts on a holder. Do not work further on the back.
Front
Work as for the Back until the piece measures 21 (21.5, 22, 22.5, 23) in / 53.5 (54.5, 56, 57, 58.5) cm from the cast-on edge, ending with a WS row. You should have approximately 3 in / 7.5 cm remaining before the shoulder bind-off.
Divide for placket (next RS row): Work 60 (66, 72, 78, 84) sts in pattern, bind off the center 1 st, work the remaining 60 (66, 72, 78, 84) sts in pattern. Place the right front sts on a holder. Work the left front only.
Left front placket edge: Continue in the Chevron pattern on the left front sts, but work the first 5 sts at the center-front edge in 1x1 rib (beginning with k1 on RS rows) for the placket band. Work straight until the placket opening measures 3 in / 7.5 cm, ending with a WS row.
Shape left front neck (next RS row): Bind off the first 5 placket sts, then work in pattern to the end. Continue in pattern, decreasing 1 st at the neck edge every RS row 3 times, then every other RS row 2 times — 50 (56, 62, 68, 74) sts remain. Work straight until the piece measures 24 (24.5, 25, 25.5, 26) in / 61 (62, 63.5, 65, 66) cm from the cast-on edge, ending with a WS row. Bind off all sts.
Right front: Return the held sts to the needles with RS facing. Work the last 5 sts at the center-front edge in 1x1 rib for the placket band, and the remaining sts in the Chevron pattern. Work straight until the placket opening measures 3 in / 7.5 cm, ending with a RS row.
Shape right front neck (next WS row): Bind off the first 5 placket sts, then work in pattern to the end. Continue in pattern, decreasing 1 st at the neck edge every RS row 3 times, then every other RS row 2 times — 50 (56, 62, 68, 74) sts remain. Work straight until the piece measures 24 (24.5, 25, 25.5, 26) in / 61 (62, 63.5, 65, 66) cm from the cast-on edge, ending with a WS row. Bind off all sts.
Sleeves (make 2)
With US 4 (3.5 mm) needles and MC held double, cast on 61 (61, 73, 73, 85) sts.
Rows 1–6: Work in 1x1 rib across. (61 (61, 73, 73, 85) sts) End with a WS row.
Change to US 6 (4.0 mm) needles.
Set-up row (RS): K1, work Chevron Row 1 across to last st, k1. You have 5 (5, 6, 6, 7) full chevron repeats. (61 (61, 73, 73, 85) sts)
Continue in the Chevron pattern, alternating MC and CC every 2 rows, and at the same time increase 1 st at each edge every 8th row 4 times, working the new sts into the chevron pattern as they accumulate — 69 (69, 81, 81, 93) sts. Work straight until the sleeve measures 8 (8, 8.5, 8.5, 9) in / 20.5 (20.5, 21.5, 21.5, 23) cm from the cast-on edge, ending with a WS row. Bind off all sts loosely.
Assembly and Finishing
Block the pieces first. Lay the back, front, and both sleeves flat on a towel, mist them lightly with water, and pin the chevron points straight. Let them dry completely. Do not press firmly with an iron; the mohair-silk should stay airy and soft.
Sew the shoulder seams. Thread your tapestry needle with MC and, with RS facing, join the bound-off shoulder stitches of the front to the held shoulder stitches of the back using a simple whipstitch (small stitches over the edge) or mattress stitch (a seam that hides inside the fabric).
Sew the side seams. Fold the body in half with RS together and sew from the underarm markers down to the hem on both sides, keeping your stitches even and not pulling too tight.
Set in the sleeves. Match the center of each sleeve to the shoulder seam, then ease the sleeve cap into the armhole and sew in place, working from the center outward on both sides.
Placket finish. With US 4 (3.5 mm) needles, MC held double, and RS facing, pick up and knit 1 st in each row along the left placket opening edge (approximately 20 sts), then 1 st in each row along the right placket opening edge (approximately 20 sts), and 1 st in each bound-off neck stitch around the back neck. Work 3 rows in 1x1 rib. Bind off all sts in rib. The placket opening remains open and button-free, finished with a clean ribbed border.
Neckline finish. With US 4 (3.5 mm) needles, MC held double, and RS facing, pick up and knit 1 st in each bound-off neck stitch and 1 st in each row along the shaped front neck edges. Work 3 rows in 1x1 rib. Bind off all sts in rib.
Weave in all ends. Thread each yarn tail onto your tapestry needle and run it through the back of several stitches, then trim. Steam lightly and let the tee dry flat.
Pro Tips and Variations
- Change the colors. Swap chocolate and caramel for any two lace-weight mohair-silk shades you love; a cream and oatmeal pair gives a softer farmhouse look, while deep rust and charcoal feel more autumnal.
- Adjust the length. Because the body is worked straight, you can add or remove rows before the underarm marker to make the tee longer or shorter; just remember each 4-row band adds about 0.5 in / 1.3 cm.
- Try a different yarn. Any lace-weight yarn held double will work, but keep an eye on gauge; a smooth wool-silk will give a crisper chevron, while a fluffy alpaca blend will be even softer and fuzzier.
- Make the sleeves longer. Simply continue the sleeve in pattern past the stated length before binding off, adding increases every 8th row as needed to keep the shape comfortable.