Mulled Cider Hooded Cabin Coat: Free Crochet Moss Stitch Pattern
Introduction
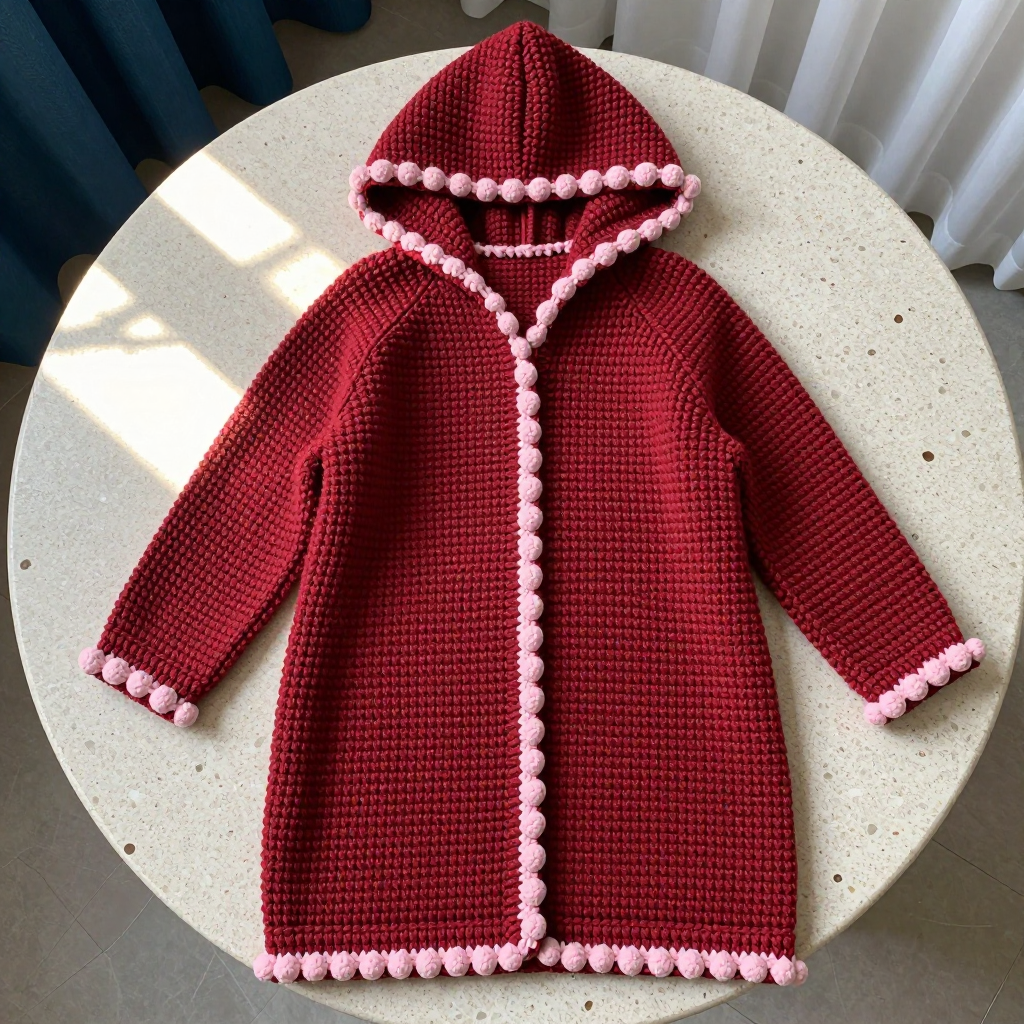
Welcome to the Mulled Cider Hooded Cabin Coat — a cozy, hip-length, unisex coat that looks far more complicated than it actually is. If you have never crocheted before, this is a wonderful first "big" project because it is built entirely from simple flat rectangles (no shaping, no complicated math) that you seam together at the end. Worked in a rich cherry red fingering-weight wool with a playful bubblegum-pink bobble border at the hood and hem, the finished coat feels like a warm hug with a subtle Halloween wink. The moss stitch (also called linen stitch) creates a dense, woven-looking fabric with a soft horizontal texture that drapes beautifully and hides any tiny tension wobbles. By the time you finish, you will have a relaxed, boxy, cabin-style coat with long sleeves and a fold-back hood that you made with your own two hands.
Materials Needed
- Yarn (Main Color, MC): Fingering weight (Category 1) wool, approximately 1,600–1,900 yds (1,460–1,740 m) in Cherry Red. The sample uses a smooth, slightly rustic 100% wool at 400 yds (366 m) per 100 g skein — about 4–5 skeins.
- Yarn (Contrast Color, CC): Fingering weight wool, approximately 150–200 yds (137–183 m) in Bubblegum Pink — about 1 skein.
- Crochet hook: US E/4 (3.5 mm), or the size needed to match gauge.
- Extra hook: One size larger (US F/5 / 3.75 mm) for working foundation chains loosely.
- Stitch markers: At least 8, to mark armholes, shoulder points, and the center of the hood.
- Tapestry needle: A blunt-tipped yarn needle for seaming and weaving in ends.
- Scissors: Sharp craft scissors for cutting yarn.
- Measuring tape and a blocking mat with pins (or a towel and rust-proof pins).
Finished size (Unisex M/L; changes for S and XL in parentheses): Chest circumference 44 (40, 48) in / 112 (102, 122) cm; body length hem to shoulder 24 (23, 25) in / 61 (58, 64) cm; sleeve length from underarm 18 (17, 19) in / 46 (43, 48) cm; hood depth 13 in / 33 cm.
Abbreviations and Beginner Glossary
- ch – chain. Make a loop of yarn on your hook, wrap yarn over the hook, and pull it through the loop. That is one chain.
- sc – single crochet. Insert your hook into the stitch, wrap yarn over the hook, pull up a loop (you now have 2 loops on the hook), wrap yarn over again, and pull through both loops. One single crochet made.
- sl st – slip stitch. Insert hook into the stitch, wrap yarn over, and pull it through both the stitch and the loop on your hook at the same time. Used to join rounds.
- yo – yarn over. Wrap the working yarn over your hook from back to front.
- ch-1 sp – chain-one space. The little gap under a single chain from the previous row. You will work your single crochet into this gap, not into the chain itself.
- st(s) – stitch(es).
- beg – beginning.
- rep – repeat.
- WS – wrong side (the back of the fabric).
- RS – right side (the front of the fabric that shows).
- MC – main color (Cherry Red).
- CC – contrast color (Bubblegum Pink).
- pair – one (sc, ch 1) combination. In this pattern, stitch counts are given in pairs. The total stitch count including chains is double the pair count plus one.
- bobble – a small raised round bump. Worked as: (yo, insert hook in same st, yo, pull up loop, yo, pull through 2 loops) 3 times in the same stitch, yo, pull through all 4 loops on hook, ch 1 to close.
- mattress stitch – a seaming technique that creates an invisible join. You bring the needle under the horizontal bar between stitches on each piece, alternating sides, and pull gently.
Gauge
22 sts and 24 rows = 4 in (10 cm) in moss stitch (sc, ch 1) pattern, blocked. Each (sc, ch 1) pair counts as 2 sts for width math.
Why gauge matters: Gauge is how many stitches and rows fit into a square of fabric. If your stitches are bigger than the pattern's, your coat will come out too large; if smaller, too small. Because this coat is made of rectangles, getting gauge right means the panels will actually fit together when you seam them.
How to make a gauge swatch: With your MC and hook, ch 31. Work moss stitch (Row 1: sc in 2nd ch from hook, *ch 1, skip 1 ch, sc in next ch; rep from * to end. Row 2: ch 1, turn, sc in first ch-1 sp, *ch 1, sc in next ch-1 sp; rep from * across, sc in last sc) until the swatch is about 5 in (13 cm) tall. Block it lightly, let it dry, then measure a 4 in (10 cm) square in the middle. If you have more than 22 sts, go up a hook size; if fewer, go down a hook size.
Beginner Tips Before You Start
- Count your pairs, not your chains. Every row should have the same number of (sc, ch 1) pairs. Count them at the end of each row until you trust your rhythm.
- Use stitch markers to track your armholes and shoulders. Place a marker where each shoulder seam will go and at each armhole edge before you start seaming. It saves a lot of guessing later.
- Do not pull your yarn too tight. Moss stitch needs a little breathing room. If your chains are tight, your fabric will pucker. Keep your tension relaxed and even.
- Work your foundation chain with the larger hook. A too-tight foundation chain is the most common beginner problem. The larger hook makes the first row much easier.
- Make all your panels before you seam. Lay them flat and check that the lengths match before joining anything. It is much easier to fix a panel than a seam.
- Block before seaming. Lightly wet-blocking the panels relaxes the wool and makes the edges lie flat, which makes seaming far easier.
Step-by-Step Instructions
Pattern notes: The coat is built from flat moss-stitch rectangles — Back, two Fronts, two Sleeves, and a Hood — all seamed with mattress stitch or single crochet. The pink bobble border is worked last around the hood opening and hem. Ch 1 at the start of a row does not count as a stitch.
Back Panel
With MC and the larger hook, ch 111 (101, 121).
Row 1: Sc in 2nd ch from hook, *ch 1, skip 1 ch, sc in next ch; rep from * to end. Turn. (55 (50, 60) pairs)
Row 2: Ch 1, sc in first ch-1 sp, *ch 1, sc in next ch-1 sp; rep from * across, sc in last sc. Turn. (55 (50, 60) pairs)
Rows 3–144 (3–138, 3–150): Repeat Row 2. (55 (50, 60) pairs) The piece should measure 24 (23, 25) in / 61 (58, 64) cm from the foundation, ending on a WS row. Fasten off, leaving a 24 in tail.
Right Front Panel
With MC and the larger hook, ch 61 (56, 66).
Row 1: Sc in 2nd ch from hook, *ch 1, skip 1 ch, sc in next ch; rep from * to end. Turn. (30 (28, 33) pairs)
Row 2: Ch 1, sc in first ch-1 sp, *ch 1, sc in next ch-1 sp; rep from * across, sc in last sc. Turn. (30 (28, 33) pairs)
Rows 3–144 (3–138, 3–150): Repeat Row 2. (30 (28, 33) pairs) The piece should measure 24 (23, 25) in / 61 (58, 64) cm, ending on a WS row. Fasten off, leaving a 24 in tail.
Left Front Panel
Work exactly as for the Right Front. (30 (28, 33) pairs) Fasten off, leaving a 24 in tail.
Sleeves (make 2)
With MC and the larger hook, ch 51 (47, 55).
Row 1: Sc in 2nd ch from hook, *ch 1, skip 1 ch, sc in next ch; rep from * to end. Turn. (25 (23, 27) pairs)
Row 2: Ch 1, sc in first ch-1 sp, *ch 1, sc in next ch-1 sp; rep from * across, sc in last sc. Turn. (25 (23, 27) pairs)
Rows 3–7: Repeat Row 2. (25 (23, 27) pairs)
Increase row: Ch 1, work (sc, ch 1) in the first sc, then continue in pattern to the last sc, work (sc, ch 1) in the last sc. Turn. (26 (24, 28) pairs)
Rows 9–14: Repeat Row 2. (26 (24, 28) pairs)
Row 15: Repeat the increase row. (27 (25, 29) pairs)
Rows 16–21: Repeat Row 2. (27 (25, 29) pairs)
Row 22: Repeat the increase row. (28 (26, 30) pairs)
Rows 23–28: Repeat Row 2. (28 (26, 30) pairs)
Row 29: Repeat the increase row. (29 (27, 31) pairs)
Rows 30–35: Repeat Row 2. (29 (27, 31) pairs)
Row 36: Repeat the increase row. (30 (28, 32) pairs)
Rows 37–42: Repeat Row 2. (30 (28, 32) pairs)
Row 43: Repeat the increase row. (31 (29, 33) pairs)
Rows 44–49: Repeat Row 2. (31 (29, 33) pairs)
Row 50: Repeat the increase row. (32 (30, 34) pairs)
Rows 51–108 (51–102, 51–114): Repeat Row 2. (32 (30, 34) pairs) The sleeve should measure 18 (17, 19) in / 46 (43, 48) cm from the foundation. Fasten off, leaving a 20 in tail.
Hood
With MC and the larger hook, ch 91 (91, 101).
Row 1: Sc in 2nd ch from hook, *ch 1, skip 1 ch, sc in next ch; rep from * to end. Turn. (45 (45, 50) pairs)
Row 2: Ch 1, sc in first ch-1 sp, *ch 1, sc in next ch-1 sp; rep from * across, sc in last sc. Turn. (45 (45, 50) pairs)
Rows 3–78: Repeat Row 2. (45 (45, 50) pairs) The hood should measure 13 in / 33 cm from the foundation. Fasten off, leaving a 30 in tail.
Assembly and Finishing
Step 1 — Block all panels. Lightly mist or soak each panel, pin it flat to the measurements above, and let it dry completely. This relaxes the wool and makes the edges lie flat.
Step 2 — Seam the shoulders. Place the Back and both Fronts right sides together. Using mattress stitch (or single crochet seam), join 8 (7, 9) in from each armhole edge toward the center, leaving a 6 in neck opening at center back. To work mattress stitch: thread your tapestry needle, bring it under the horizontal bar between the first two stitches on one piece, then under the matching bar on the other piece, and pull gently. Repeat along the seam, keeping your tension even.
Step 3 — Seam the sides. With right sides together, seam from the hem up to the underarm on each side, matching row counts so the front and back edges line up.
Step 4 — Set in the sleeves. Fold each Sleeve in half lengthwise and mark the center with a stitch marker. Pin the sleeve cap to the armhole, matching the center marker to the shoulder seam. Seam in place, then seam the sleeve underarm from the cuff to the armpit.
Step 5 — Attach the hood. Fold the Hood in half with right sides together and seam the back center edge. Turn it right side out. Pin the hood's lower edge to the neck opening, right sides together, distributing the fullness evenly. Seam all the way around. Turn the hood up.
Step 6 — Pink bobble border (hood edge and hem). With CC and the smaller hook:
Round 1 (hood opening): Join CC at one front corner of the hood opening. Ch 1, sc evenly around the entire hood opening (about 1 sc per row along the sides, 1 sc per stitch along the front edge), join with a sl st to the first sc.
Round 2 (bobble round): Ch 1, *sc in next 2 sc, work a bobble in the next st (yo, insert hook in same st, yo, pull up loop, yo, pull through 2 loops — 3 times, yo, pull through all 4 loops on hook, ch 1 to close); rep from * around, adjusting the final repeat to end with sc. Join with a sl st.
Round 3: Ch 1, sc in each sc and ch-1 sp around. Join. Fasten off.
Repeat Rounds 1–3 along the hem edge in the same manner, working from one front corner around the entire hem to the other front corner.
Step 7 — Weave in all ends. Thread each tail onto the tapestry needle and weave it back and forth through the wrong side of the fabric for about 2 in, then trim. Step 8 — Final block. Block lightly to the finished measurements, pressing the seams flat. If you like, add a simple crocheted chain tie at the neck: with CC, ch 60, fasten off, and thread it through the neck edge.
Pro Tips and Variations
- Change the colors: Swap the cherry red for a deep forest green and the pink for cream for a more traditional cabin look, or use a self-striping yarn for a subtle gradient effect.
- Adjust the length: Add or remove rows before seaming to make the coat shorter or longer — just keep all panels consistent so the seams line up.
- Try a different yarn: A wool-blend or alpaca-blend fingering weight will work beautifully; just check your gauge first, since fiber content affects drape and stretch.
- Add pockets: Work two small moss-stitch squares (about 5 in / 13 cm) and seam them to the front panels at hip height for a practical, cozy touch.