Moonrise Spare Tire Cover Band Crochet Pattern: Free Granny Square Streetwear Car Accessory
Moonrise Spare Tire Cover Band: A Free Streetwear Crochet Pattern
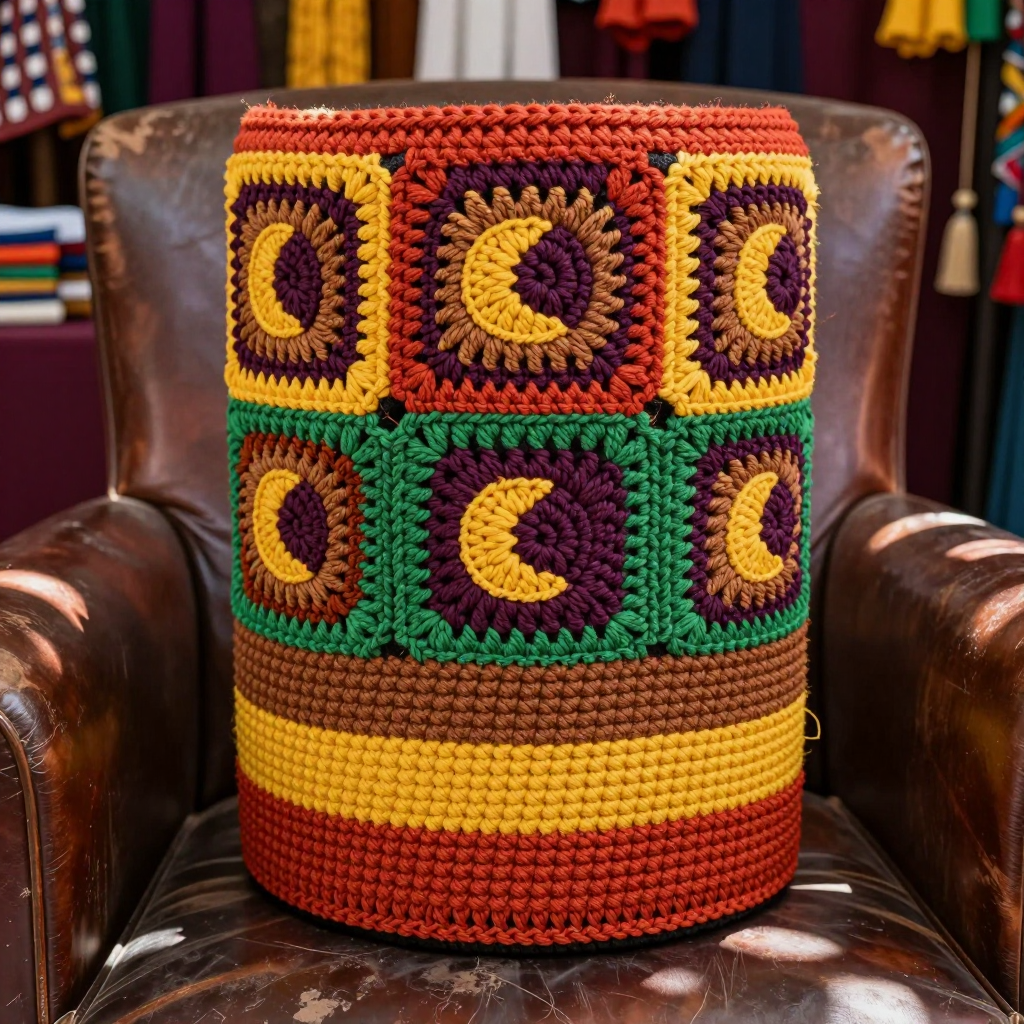
If you have ever wanted to make something that turns heads in a parking lot, this is it. The Moonrise Spare Tire Cover Band is a bold, spice-toned crocheted tube that slips over your spare tire mount and shows off six hand-crocheted moon granny squares. It is perfect for a confident beginner who has already made a few simple projects and wants to try a real accessory, because it uses only the most basic stitches: single crochet, double crochet, and slip stitch. The finished band looks like a piece of streetwear for your car, with matte macrame cord, warm paprika, turmeric, cinnamon, cardamom, and plum stripes, and little crescent moons stitched on top. It feels sturdy and slightly stiff in the best way, like a woven belt, and it will soften a little with wear.
Materials Needed
- Yarn: Macrame cord, 3 mm (about the same thickness as a 4 mm cotton rope or cord), in five colors. Total about 210 yd (192 m): paprika (A) 55 yd, turmeric (B) 45 yd, cinnamon (C) 40 yd, cardamom green (D) 35 yd, deep plum (E) 35 yd.
- Main hook: 5.0 mm (US H-8) crochet hook for the tube.
- Square hook: 4.5 mm (US G-6) crochet hook for the granny squares and moons.
- Stitch markers: at least 8, to mark the first stitch of each spiral round and to space the squares.
- Tapestry needle: a large-eye blunt needle that fits macrame cord, for seaming and weaving in ends.
- Scissors and a measuring tape.
- Finished size: Tube is 27 in (68.5 cm) around and 7 in (18 cm) tall, straight with no shaping. Each moon granny square is 4 x 4 in (10 x 10 cm), and you make 6 of them, spaced evenly around the tube.
Abbreviations and Beginner Glossary
- ch – chain: yarn over the hook and pull it through the loop on your hook to make one chain.
- sc – single crochet: insert hook into stitch, yarn over, pull up a loop (2 loops on hook), yarn over, pull through both loops.
- sl st – slip stitch: insert hook into stitch, yarn over, pull through the stitch and through the loop on your hook at the same time.
- dc – double crochet: yarn over, insert hook into stitch, yarn over, pull up a loop (3 loops on hook), yarn over, pull through 2 loops, yarn over, pull through last 2 loops.
- tr – treble crochet: yarn over twice, insert hook, pull up a loop, then pull through 2 loops three times. (Listed for reference; not used in this pattern.)
- sc2tog – single crochet 2 together (a decrease): insert hook into first stitch, pull up a loop, insert hook into next stitch, pull up a loop, yarn over, pull through all 3 loops. This turns 2 stitches into 1.
- st(s) – stitch or stitches.
- sp – space: the gap between groups of stitches, usually under a chain.
- beg – beginning.
- rep – repeat.
- RS – right side: the outside face of the work that everyone sees.
- Magic ring – an adjustable loop: wrap the cord around your fingers to make a loop, work stitches into the loop, then pull the short tail to close the hole tight.
- Standing sc – a way to start a new color without a chain: make a slip knot on the hook, insert into the first stitch, yarn over, pull up a loop, yarn over, pull through both loops.
Gauge
Main tube: 12 sc x 14 rounds = 4 in (10 cm) in single crochet worked in a spiral with 3 mm macrame cord and the 5.0 mm hook.
Granny square: one moon granny square = 4 x 4 in (10 x 10 cm) after blocking.
Why gauge matters: gauge is how many stitches and rounds fit into 4 inches. If your stitches are bigger than the pattern's, your band will be too loose and may slide off the tire mount. If they are smaller, it will not fit over the mount at all. How to swatch: with the 5.0 mm hook and color A, chain 14, then work 1 sc in the second chain from the hook and in each chain across (13 sc). Work 15 rows of sc. Measure the middle 4 inches. If you have more than 12 stitches in 4 inches, go up one hook size. If you have fewer, go down one hook size. Repeat until you match.
Beginner Tips Before You Start
- Use a stitch marker in the first stitch of every round. The tube is worked in a spiral, so there is no seam to tell you where a round begins. Move the marker up each round.
- Do not pull the cord too tight. Macrame cord has no stretch. Tight stitches make a stiff, small tube that will not fit. Keep your loops relaxed and even.
- Count your stitches at the end of every increase round. The numbers in parentheses are your checkpoints. If you are off by one, fix it right away.
- Change colors in the last yarn-over of the round. Pull the new color through to finish the final stitch, then keep going. This hides the join.
- Block your squares before sewing. Pin each square to 4 x 4 in, mist lightly, and let it dry flat. Blocked squares line up neatly around the tube.
- Work the moon motif before you attach the square. It is much easier to sew a moon onto a flat square than onto a curved tube.
Step-by-Step Instructions
Main Tube (worked in a continuous spiral, no joining)
Use the 5.0 mm hook and color A (paprika). Make a magic ring.
Round 1: 8 sc into the ring. Pull the tail to close the hole. Place a marker in the first st. (8 sc)
Round 2: 2 sc in each st around. (16 sc)
Round 3: [2 sc in next st, 1 sc in next st] rep around. (24 sc)
Round 4: [2 sc in next st, 1 sc in next 2 sts] rep around. (32 sc)
Round 5: [2 sc in next st, 1 sc in next 3 sts] rep around. (40 sc)
Round 6: [2 sc in next st, 1 sc in next 4 sts] rep around. (48 sc)
Round 7: [2 sc in next st, 1 sc in next 5 sts] rep around. (56 sc)
Round 8: [2 sc in next st, 1 sc in next 6 sts] rep around. (64 sc)
Round 9: [2 sc in next st, 1 sc in next 7 sts] rep around. (72 sc)
Round 10: [2 sc in next st, 1 sc in next 8 sts] rep around. (80 sc)
Round 11: 2 sc in next st, 1 sc in each st to end of round. (81 sc)
Round 12: 2 sc in next st, 1 sc in each st to end of round. (82 sc)
Rounds 13–16: Work even in sc, changing to color B (turmeric) at the beginning of Round 13. (82 sc)
Rounds 17–20: Work even in sc with color C (cinnamon). (82 sc)
Rounds 21–24: Work even in sc with color D (cardamom green). (82 sc)
Round 25: Work even in sc with color E (deep plum). Do not fasten off yet. (82 sc)
Color-change note: change color in the last yarn-over of the final sc of the previous round. Insert the hook, pull up the new color, and complete the sc. Carry unused colors loosely inside the tube, or cut and weave in the ends after each stripe. Keep the spiral continuous and do not join rounds.
Top and Bottom Edging
Round 26 (top edge): With color E, sc evenly around the top opening, working 1 sc in each st. Sl st to the first sc. Fasten off. (82 sc)
Bottom edge: Join color A with a standing sc at any st of the foundation round, sc evenly around the bottom opening, sl st to the first sc. Fasten off. Weave in all ends. (82 sc)
Moon Granny Square (make 6, using the 4.5 mm hook)
Color sequence per square: Rounds 1–2 in color E (plum), Round 3 in color B (turmeric), Round 4 in color A (paprika), Round 5 in color C (cinnamon).
With color E, make a magic ring.
Round 1: Ch 3 (counts as first dc), 2 dc into ring, [ch 2, 3 dc into ring] 3 times, ch 2, sl st to top of beg ch-3. (4 groups of 3 dc, 4 ch-2 sps)
Round 2: Sl st into next 2 dc and into first ch-2 sp. Ch 3, 2 dc in same sp, ch 2, 3 dc in same sp (corner made), *ch 1, [3 dc, ch 2, 3 dc] in next ch-2 sp; rep from * around, ch 1, sl st to top of beg ch-3. Fasten off color E. (4 corners, 4 ch-1 sps)
Round 3: Join color B with a standing dc in any ch-2 corner sp. Ch 2, 2 dc in same sp, ch 2, 3 dc in same sp, *ch 1, 3 dc in next ch-1 sp, ch 1, [3 dc, ch 2, 3 dc] in next corner sp; rep from * around, ch 1, 3 dc in last ch-1 sp, ch 1, sl st to top of beg ch-3. Fasten off color B.
Round 4: Join color A with a standing dc in any ch-2 corner sp. Ch 2, 2 dc in same sp, ch 2, 3 dc in same sp, *[ch 1, 3 dc in next ch-1 sp] twice, ch 1, [3 dc, ch 2, 3 dc] in next corner sp; rep from * around, [ch 1, 3 dc in next ch-1 sp] twice, ch 1, sl st to top of beg ch-3. Fasten off color A.
Round 5: Join color C with a standing sc in any ch-2 corner sp. Work 2 sc in same sp, then sc in each dc and in each ch-1 sp around, working 3 sc in each corner ch-2 sp. Sl st to first sc. Fasten off, leaving a 12 in (30 cm) tail for sewing. Block each square to 4 x 4 in (10 x 10 cm).
Moon Motif Appliqué (worked on each square before assembly)
With color B and the 4.5 mm hook, join with a standing sc at the center of one side of the square.
Row 1: Sc in next 3 sts, sc2tog, sc in next 3 sts. Turn. (7 sc)
Row 2: Ch 1, sc2tog, sc in next 3 sts, sc2tog. Turn. (5 sc)
Row 3: Ch 1, sc2tog, sc in next st, sc2tog. Turn. (3 sc)
Row 4: Ch 1, sc2tog, sc in last st. Fasten off. (2 sc)
Crescent tip: Join color B at the outer edge of Row 1, ch 2, 2 dc in same st, sl st to next st. Fasten off. This creates a small crescent moon shape centered on the square. Repeat the moon motif on all 6 squares.
Assembly and Finishing
Step 1 – Mark the tube: lay the tube flat with the top edge facing you. Measure 27 in around and divide by 6, which gives 4.5 in between square centers. Place a stitch marker at each of the 6 positions, about 3.5 in (9 cm) down from the top edge.
Step 2 – Pin the squares: center one moon granny square over each marker with the right side facing out. Pin all four corners and the middle of each side.
Step 3 – Whipstitch: thread the 12 in tail on a tapestry needle. Whipstitch means bringing the needle up through the edge of the square and down through the surface of the tube, over and over, in small even stitches all the way around all 4 sides. Catch only the outer edge of the square and the surface of the tube. Do not sew through to the inside of the tube, or the stitches will show on the inside and may rub the tire. Remove the pins as you go.
Step 4 – Weave in ends: thread each remaining tail on the tapestry needle and run it through the inside of the tube for about 2 inches, then trim close. Weave in all ends on the inside so nothing shows on the outside.
Step 5 – Block: steam-block the assembled band lightly, holding the iron an inch above the surface. Avoid pressing the appliqués flat. The tube should stay straight and flexible. Let it dry completely.
Step 6 – Fit: slip the band over the spare tire mount so the moon squares sit on the outer rim.
Care: spot clean with mild soap and cool water. Do not machine wash or tumble dry. Reshape and air dry flat.
Pro Tips and Variations
- Change the palette: swap the spice colors for black, charcoal, and one bright accent for a monochrome streetwear look. Keep the same yardage per color so the stripes stay even.
- Adjust the size: the tube is a multiple of 2 stitches. To make it larger or smaller, add or remove 2 sc in Round 12, then work the same number of even rounds. Every 12 sc adds about 4 in (10 cm) of circumference.
- Substitute yarn: if macrame cord is hard to find, use two strands of worsted-weight cotton held together. Check your gauge again, because the tube must stay firm enough to hold its shape.
- More moons: for a bolder look, make 8 squares instead of 6 and space them 3.4 in apart. The squares will nearly touch, giving a full ring of moons around the band.