The Driftwood Dune Raglan Free Pattern – A Knitted Ode to Coastal Calm
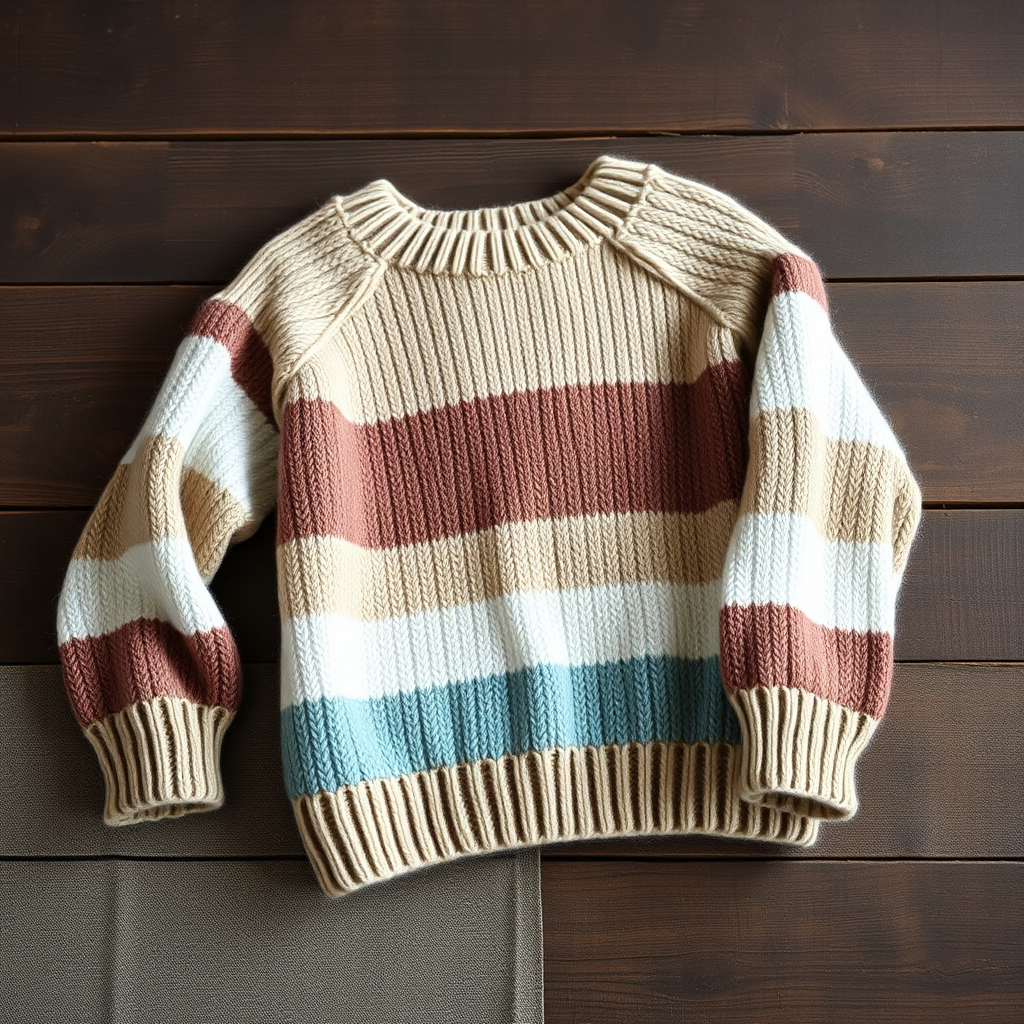
The Driftwood Dune Raglan Free Pattern – A Knitted Ode to Coastal Calm
There is something profoundly soothing about the rhythm of knitting—the gentle click of needles, the soft slide of yarn through your fingers, and the slow emergence of fabric from a single strand. This pattern, the Driftwood Dune Raglan, captures that same serenity in wearable form. Inspired by windswept shores and the quiet gradient of sand meeting sea, this oversized, textured sweater blends soft cables and gentle ribbing into a cozy layering piece perfect for cool, breezy days. Whether you are a seasoned knitter or a brave beginner ready for your first garment, this top-down raglan is designed to guide you smoothly from cast-on to final bind-off. The tonal palette of sandy neutrals—warm Sand, weathered Driftwood, and soft Sea Glass—creates a garment that feels both grounded and ethereal, like a walk along a quiet dune at dusk.
This free pattern is worked in one seamless piece from the neck down, meaning no fiddly seaming at the end. The raglan increases shape the shoulders naturally, and the simple stripe sequence keeps the knitting engaging without overwhelming a newer maker. With clear instructions and a relaxed, boxy silhouette, the Driftwood Dune Raglan is destined to become a wardrobe staple—a handmade hug you can throw on over a tee or a turtleneck whenever the world feels a little too loud.
Materials Needed
Before you cast on, gather your supplies. This pattern calls for worsted weight yarn in three complementary shades, which you can purchase individually or substitute with any worsted-weight yarn you love. The total yardage varies by size, so check the amounts carefully.
Yarn
- Yarn A (Sand): A warm, pale beige—approx. 400 (450, 500, 550, 600) yards
- Yarn B (Driftwood): A weathered gray-brown—approx. 400 (450, 500, 550, 600) yards
- Yarn C (Sea Glass): A soft blue-green—approx. 400 (450, 500, 550, 600) yards
- Total: Approx. 1200 (1350, 1500, 1650, 1800) yards of worsted weight yarn
Note: The yardage is split evenly among the three colors, but you may use more or less of each depending on your stripe preference. Any worsted weight yarn (e.g., wool, acrylic, or a blend) will work beautifully.
Needles & Notions
- US 8 (5 mm) circular needles, 24–32 inches long (for the body and yoke)
- US 8 (5 mm) double-pointed needles (for the sleeves) OR a long circular needle for the magic loop method
- Stitch markers (at least 8, but 10 is safer)
- Waste yarn or stitch holders (for holding sleeve stitches)
- Tapestry needle (for weaving in ends)
- Scissors
Gauge
18 stitches and 24 rows = 4 inches in stockinette stitch (knit every round). Always knit a gauge swatch before starting—this ensures your sweater fits as intended. If your gauge is off, switch needle sizes accordingly (smaller needles for tighter gauge, larger for looser).
Sizes & Finished Measurements
This pattern is written for sizes XS (S, M, L, XL). The finished chest circumference is:
- XS: 36 inches
- S: 40 inches
- M: 44 inches
- L: 48 inches
- XL: 52 inches
The sweater is designed to be oversized, so choose a size based on your actual chest measurement plus 4–6 inches of ease. For example, if your chest is 36 inches, knit the size M (44 inches) for a relaxed, boxy fit.
Step-by-Step Instructions
This sweater is worked top-down, in one piece, starting with the neckband and working down through the yoke, then separating the sleeves, and finally knitting the body and sleeves separately. Follow the instructions carefully, and use stitch markers to keep track of your raglan lines. The stripe pattern is simple: 2 inches of each color, repeated in sequence (A, B, C, A, B, C...).
Abbreviations
- k = knit
- p = purl
- M1L = Make 1 Left (increase): Insert left needle from front to back under the horizontal bar between stitches, knit through the back loop.
- M1R = Make 1 Right (increase): Insert left needle from back to front under the horizontal bar between stitches, knit through the front loop.
- pm = place marker
- sm = slip marker
- st(s) = stitch(es)
- rep = repeat
Neckband
With your circular needle and Yarn A (Sand), cast on 72 (76, 80, 84, 88) stitches using the long-tail method. Place a marker to indicate the beginning of the round, then join in the round, being careful not to twist the stitches.
Work in k1, p1 ribbing for 2 inches. This creates a snug, stretchy neckband that will frame the yoke beautifully.
Yoke Setup
Now you will place markers to divide the work into sections: back, two sleeves, front, and four raglan lines (each raglan line is 2 stitches wide). Follow these instructions for your size:
- K10 (11, 12, 13, 14) for the left back, pm,
- k2 for the raglan line, pm,
- k14 (15, 16, 17, 18) for the left sleeve, pm,
- k2 raglan, pm,
- k20 (22, 24, 26, 28) for the front, pm,
- k2 raglan, pm,
- k14 (15, 16, 17, 18) for the right sleeve, pm,
- k2 raglan, pm,
- k10 (11, 12, 13, 14) for the right back.
You should now have 8 markers total (including the beginning-of-round marker). The 2 stitches between each pair of markers are your raglan lines.
Raglan Increases
You will now work in the round, increasing 8 stitches every other round to shape the yoke. The increases happen on either side of each raglan line.
Round 1 (Increase Round): *Knit to 1 stitch before the next marker, M1L, k1, slip marker (sm), k2 (the raglan line), sm, k1, M1R; repeat from * around. You will have increased 8 stitches total.
Round 2: Knit all stitches plain (no increases).
Repeat these 2 rounds, maintaining the stripe pattern as follows:
- Work the first 2 inches of the yoke in Yarn A (Sand).
- Switch to Yarn B (Driftwood) and work 2 inches.
- Switch to Yarn C (Sea Glass) and work 2 inches.
- Switch back to Yarn A and continue this 2-inch stripe sequence.
Continue increasing until the yoke measures 8 (8.5, 9, 9.5, 10) inches from the neckband, ending with a plain knit round. At this point, you will have increased to 176 (192, 208, 224, 240) stitches total.
Tip: To change colors seamlessly, simply drop the old yarn and pick up the new one at the beginning of a round. Leave a 6-inch tail to weave in later. Do not carry yarn up the inside of the sweater—cut and rejoin each time for a clean finish.
Separate Sleeves
Now you will divide the work for the body and sleeves. This is a pivotal moment—take a deep breath, it's easier than it looks!
- Knit across the back stitches to the first sleeve marker (the marker before the left sleeve).
- Place the next 34 (38, 42, 46, 50) stitches (the left sleeve) onto a piece of waste yarn or a stitch holder. Remove the sleeve markers as you go.
- Cast on 6 (6, 8, 8, 10) stitches for the underarm using the backward loop method or cable cast-on.
- Knit across the front stitches to the next sleeve marker.
- Place the next 34 (38, 42, 46, 50) stitches (the right sleeve) onto waste yarn.
- Cast on 6 (6, 8, 8, 10) stitches for the second underarm.
- Knit to the end of the round (the back).
You now have 148 (164, 180, 196, 212) stitches on your needle for the body. Place a marker at the center of each underarm cast-on to help with sleeve decreases later (though you'll pick those up separately).
Body
Continue working in the round in stockinette stitch (knit every stitch), maintaining the stripe pattern (2 inches of each color, in sequence A, B, C, A, B, C...).
Work until the body measures 12 (13, 14, 15, 16) inches from the underarm cast-on edge. Try it on if you can—this is a great time to check the length and adjust if you prefer a longer or shorter sweater.
When you reach your desired length, switch to Yarn A (Sand) and work k1, p1 ribbing for 2 inches. This creates a neat, stretchy hem that anchors the oversized silhouette. Bind off loosely (use a larger needle or a stretchy bind-off like the Jenny's Surprisingly Stretchy Bind-Off) to prevent a tight edge.
Sleeves
Now for the sleeves! Transfer the stitches from one waste yarn holder onto your double-pointed needles (or a long circular for magic loop).
- Starting at the center of the underarm cast-on, pick up and knit 6 (6, 8, 8, 10) stitches from the cast-on edge.
- Knit across the held sleeve stitches.
- Place a marker at the center underarm to mark the beginning of the round.
You will now work in the round in stockinette stitch, continuing the stripe pattern where you left off (it's fine if the stripes don't perfectly align with the body—the underarm is hidden).
Decrease Round: K1, k2tog (knit two together), knit to 3 stitches before the marker, ssk (slip, slip, knit), k1. This decreases 2 stitches per round.
Work a decrease round every 6 rounds until the sleeve measures 16 (17, 18, 19, 20) inches from the underarm, or your desired length. For a more tapered sleeve, you can decrease more frequently; for a straighter sleeve, decrease less often.
When the sleeve reaches your desired length, switch to Yarn A (Sand) and work k1, p1 ribbing for 1.5 inches. Bind off loosely. Repeat for the second sleeve.
Finishing
Congratulations—you've knit a whole sweater! Now for the final touches:
- Weave in all ends using a tapestry needle. Be sure to weave in the color-change tails securely, but don't pull too tight or you'll pucker the fabric.
- Block your sweater to the measurements listed above. Wet block by soaking in lukewarm water with a drop of wool wash, gently squeeze out excess water (don't wring!), and lay flat on a towel. Shape to the correct dimensions and allow to dry completely. This evens out the stitches and gives the sweater a professional finish.
- Once dry, try it on and admire your handiwork!
Tips for Success
- Use a lifeline: Thread a piece of contrasting waste yarn through your stitches after the neckband and again after the yoke. If you make a mistake, you can rip back to the lifeline without losing all your work.
- Count your stitches regularly: After each increase round, count to ensure you have the correct number. It's much easier to fix a mistake early.
- Try it on as you go: The beauty of top-down knitting is that you can try the sweater on mid-project. If the yoke feels too tight or too loose, adjust your increase frequency accordingly.
- Don't stress about perfect stripes: The 2-inch stripe sequence is forgiving. If you run out of one color, simply switch to the next—the coastal vibe is all about organic transitions.
The Driftwood Dune Raglan is more than just a sweater—it's a meditation on texture, color, and the simple joy of making something with your own hands. Whether you're knitting it for yourself or as a gift, this pattern will reward you with a garment that feels like a warm embrace on a cool day. So pour yourself a cup of tea, settle into your favorite chair, and let the rhythm of the needles carry you to a place of calm. Happy knitting!


