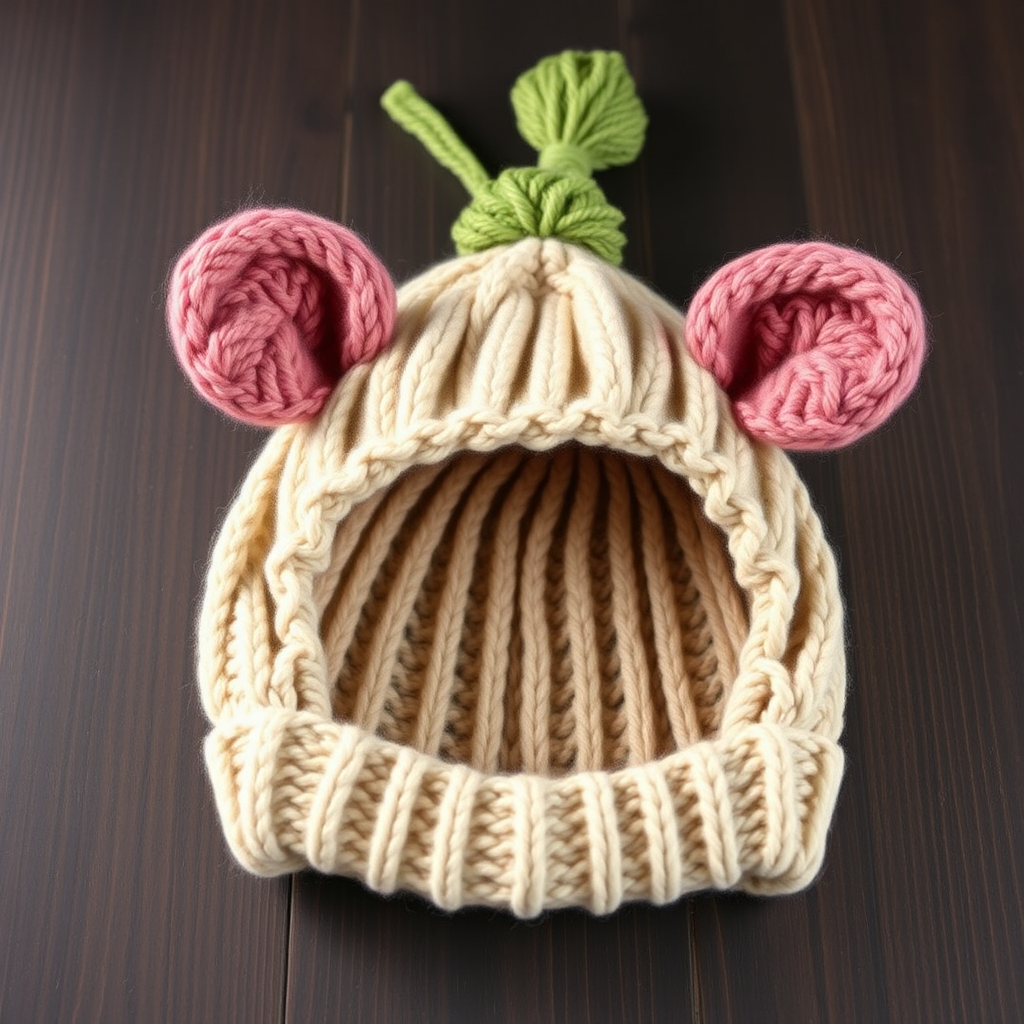
The Honeycomb Cub Cap Free Pattern – A Knitted Baby Bear Hat with Textured Hexagons

The Honeycomb Cub Cap: A Cozy Knitted Baby Bear Hat with Textured Hexagons
Wrap your little one in the warmth of a hand-knitted honeycomb-inspired bear hat, complete with adorable ears and a cozy, textured crown. This pattern uses simple slipped stitches to create a modern, geometric look that's perfect for autumn and winter adventures. The Honeycomb Cub Cap is an heirloom-quality piece that makes a thoughtful baby shower gift or a special addition to your own baby's wardrobe. With its neutral oatmeal base and playful forest green accents, this hat pairs beautifully with everything from denim overalls to woolen coats.
What makes this pattern truly special is its deceptive simplicity. The honeycomb texture looks intricate and complex, but it's created with a basic slipped-stitch technique that even beginners can master after a few rounds. The result is a squishy, warm fabric with beautiful stitch definition that will have everyone asking where you bought it—and beaming with pride when you say "I made it myself!"
Materials Needed
Before you begin, gather these supplies to ensure a smooth knitting experience:
Yarn
- Main Color (MC): Worsted weight yarn in warm oatmeal (approximately 100g / 200 yards). Look for a soft, machine-washable wool blend or premium acrylic for easy care.
- Contrast Color (CC): Deep forest green worsted weight yarn (approximately 20g / 40 yards) for the ears, pompoms, and optional ties.
Needles & Notions
- US 7 (4.5mm) 16-inch circular knitting needle
- US 7 (4.5mm) double-pointed needles (or a long circular for magic loop method)
- Stitch markers (at least 2)
- Tapestry needle for weaving in ends
- Small pompom maker (1.5-inch diameter) or cardboard for making pompoms
- Crochet hook (optional, for ties)
Gauge
20 stitches and 28 rows = 4 inches in stockinette stitch (knit one row, purl one row) after blocking. Always check your gauge before starting—if your swatch is too small, go up a needle size; if too large, go down a size. Getting the gauge right ensures the hat fits properly and uses the correct amount of yarn.
Step-by-Step Instructions
This pattern is worked in the round from the bottom up. The honeycomb texture is created with a simple slipped-stitch pattern that looks intricate but is easy to memorize. Take your time with the first few rounds, and you'll quickly fall into a rhythm.
Abbreviations
- k = knit
- p = purl
- k2tog = knit two stitches together (decrease)
- pm = place marker
- sm = slip marker
- st(s) = stitch(es)
- rnd = round
Honeycomb Pattern
Worked over an even number of stitches. This 4-round repeat creates the beautiful hexagon-like texture:
- Rnd 1: *K1, slip 1 purlwise with yarn in back*; repeat from * to end.
- Rnd 2: *P1, slip 1 purlwise with yarn in front*; repeat from * to end.
- Rnd 3: *Slip 1 purlwise with yarn in back, k1*; repeat from * to end.
- Rnd 4: *Slip 1 purlwise with yarn in front, p1*; repeat from * to end.
Pro tip: When slipping stitches, always slip them as if to purl (purlwise) to keep the stitch orientation consistent. The yarn position (front or back) is what creates the honeycomb effect.
Ribbing
- With MC, cast on 72 stitches using a long-tail cast-on. Place a marker and join in the round, being careful not to twist your stitches. Tip: Place a different colored marker at the beginning of the round so you can easily track your progress.
- Work in k1, p1 ribbing for 1.5 inches (about 10 rounds). The ribbing should be snug but not tight—this creates the stretchy brim that will hug your baby's forehead comfortably.
Body
- Switch to the Honeycomb Pattern and work even for 4 inches from the cast-on edge, ending after Rnd 4 of the pattern. Note: The honeycomb pattern will pull in slightly compared to stockinette, so don't be alarmed if the fabric looks a bit denser than expected—this is what creates the cozy, textured look.
Crown Shaping
Switch to stockinette stitch (knit every round) for the decreases. The crown shaping is worked in a classic spiral decrease pattern that creates a smooth, rounded top.
- Rnd 1: *K10, k2tog*; repeat from * to end (66 sts).
- Rnd 2 and all even rounds: Knit all stitches.
- Rnd 3: *K9, k2tog*; repeat from * to end (60 sts).
- Rnd 5: *K8, k2tog*; repeat from * to end (54 sts).
- Rnd 7: *K7, k2tog*; repeat from * to end (48 sts).
- Rnd 9: *K6, k2tog*; repeat from * to end (42 sts).
- Rnd 11: *K5, k2tog*; repeat from * to end (36 sts).
- Rnd 13: *K4, k2tog*; repeat from * to end (30 sts).
- Rnd 15: *K3, k2tog*; repeat from * to end (24 sts).
- Rnd 17: *K2, k2tog*; repeat from * to end (18 sts).
- Rnd 19: *K1, k2tog*; repeat from * to end (12 sts).
- Rnd 21: *K2tog*; repeat from * to end (6 sts).
Cut yarn, leaving a 6-inch tail. Thread the tail through a tapestry needle, slide it through the remaining 6 stitches, and pull tight to close the top. Weave in the end securely on the inside of the hat.
Ears (Make 2)
The ears are worked flat and then gathered to form a rounded cup shape—this gives them a natural, three-dimensional look that's perfect for a bear hat.
- With MC, cast on 10 stitches using a long-tail cast-on.
- Work back and forth in stockinette stitch (knit on right side, purl on wrong side) for 2 inches, ending with a purl row. Tip: Use a separate ball of yarn or a center-pull ball for each ear so you don't have to cut long strands.
- Next row (right side): K2tog, knit to last 2 sts, k2tog (8 sts).
- Purl one row.
- Repeat these two rows until 4 stitches remain. Note: You'll work the decrease row on every right-side row, with a purl row in between.
- Cut yarn, thread through remaining 4 stitches, and pull tight to gather. Sew the side seam of each ear to form a rounded cup shape. Tip: Use a mattress stitch for an invisible seam, or simply whipstitch the edges together—the seam will be hidden when the ear is attached.
Pompom Accents
- With CC, make a small pompom (1.5 inches in diameter) using a pompom maker or cardboard templates.
- Trim the pompom to create a neat, round shape.
- Attach one pompom to the center of each ear using the long tails from the pompom, tying them securely on the inside of the ear.
Ties (Optional)
These adorable ties add both charm and function—they help keep the hat securely on a wiggly baby!
- With CC, crochet two chains about 12 inches long, or knit an I-cord using two double-pointed needles.
- Attach one to each side of the hat at the ribbing level. Tip: Position them slightly toward the front of the hat (about 1 inch from the center front) so they tie comfortably under the chin.
Finishing
- Weave in all ends using a tapestry needle. Take your time to weave securely—this ensures the hat withstands washing and wear.
- Block the hat gently to even out the honeycomb texture. Method: Soak the hat in lukewarm water with a drop of wool wash for 15 minutes, gently squeeze out excess water (never wring), roll in a towel to remove moisture, and lay flat to dry. Shape the hat while damp to smooth the honeycomb pattern.
- Sew the ears onto the top of the hat, positioning them slightly forward for a bear look. Placement tip: Place them about 1-2 inches from the crown center, angled slightly outward. Use a whipstitch around the base of each ear, catching the hat fabric securely.
Tips for Success
- Stitch markers are your friends: Use them liberally, especially when working the honeycomb pattern. Place a marker every 12 stitches if you find yourself losing count.
- Check your yarn position: When slipping stitches in the honeycomb pattern, the yarn position is crucial. Take a moment to verify you're holding the yarn correctly before each slip.
- Blocking makes a difference: Don't skip the blocking step—it transforms the honeycomb texture from slightly bunched to beautifully defined.
- Make a gauge swatch: This pattern is designed for a specific baby size. If you want a larger or smaller hat, adjust your needle size or cast on more/fewer stitches in multiples of 12.
Customization Ideas
Once you've mastered the Honeycomb Cub Cap, feel free to make it your own! Try these variations:
- Color play: Swap the oatmeal and forest green for blush pink and cream, or navy and mustard for a gender-neutral look.
- Pompom-free ears: Skip the pompoms for a more minimalist bear look.
- Add a faux fur pompom: Top the crown with a fluffy pompom in a coordinating color for extra cuteness.
- Size it up: This pattern easily adapts to toddler or child sizes by adding 12 stitches for each size up and working the body longer.
The Honeycomb Cub Cap is more than just a hat—it's a labor of love that will keep your little one warm and stylish through countless adventures. Whether you're a seasoned knitter looking for a quick weekend project or a beginner ready to tackle your first textured pattern, this hat delivers satisfaction from the first cast-on to the final weave-in. Happy knitting!