The Prism Cascade Wall Hanging: A Free Crochet Pattern for a Textured, Rainbow-Hued Tapestry
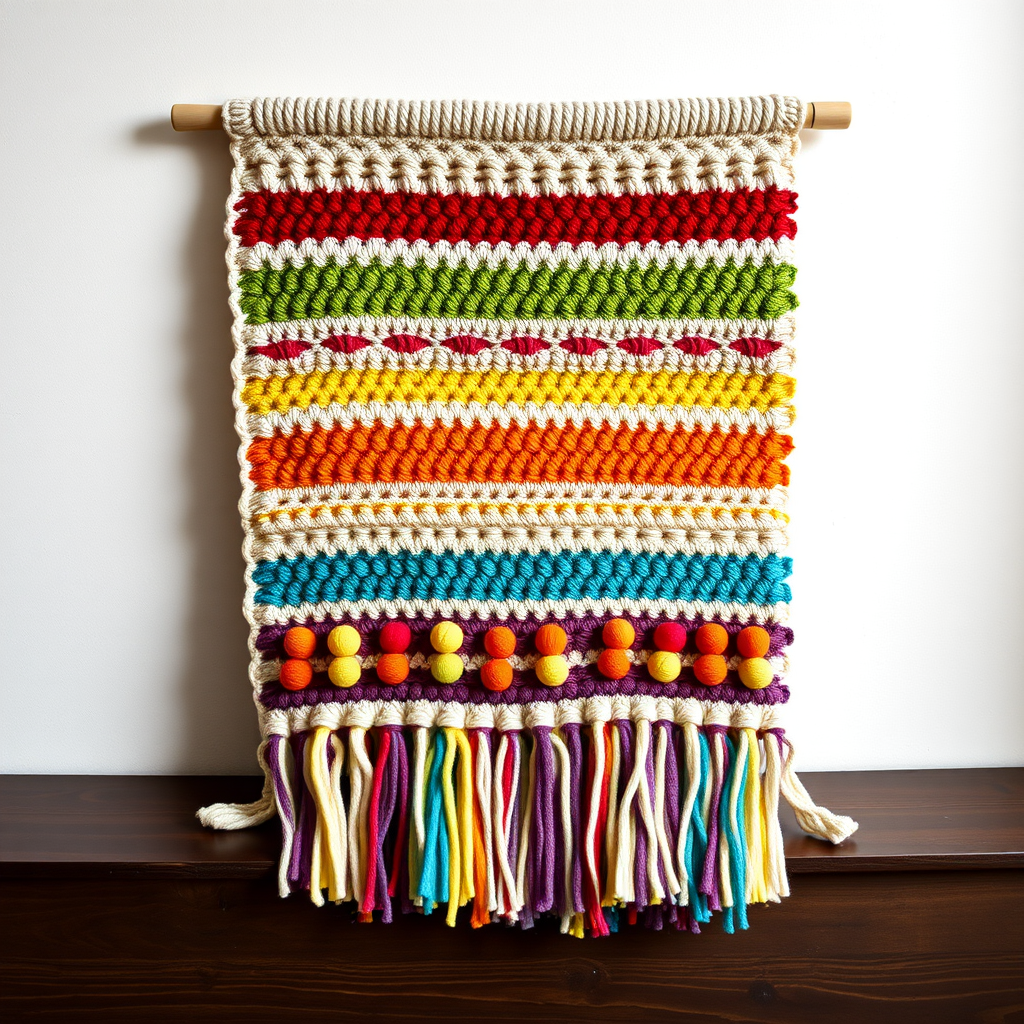
Introducing the Prism Cascade Wall Hanging
Transform your space with this stunning, textured wall hanging that captures the full spectrum of a rainbow in a soft, dimensional weave. Each color block is crafted with a unique stitch pattern, creating a tactile and visual masterpiece that brings cozy, artistic warmth to any room. This free crochet pattern is perfect for intermediate beginners looking to expand their stitch repertoire while creating a show-stopping piece of home decor.
Materials Needed
Yarn
- Worsted weight (#4) cotton or cotton-blend yarn in 11 colors: Red, Orange, Yellow, Green, Teal, Blue, Indigo, Violet, plus 3 accent shades (e.g., coral, lime, lavender). Approx. 50g each.
- Neutral background color (e.g., cream or natural) for the base panel.
Hook and Notions
- 5.0 mm (H-8) crochet hook
- Yarn needle for weaving ends
- Scissors
- Wooden dowel or branch (approx. 18 inches long) for hanging
- Optional: fringe maker or cardboard for cutting fringe
Gauge
14 sc x 16 rows = 4 inches (10 cm) in single crochet. Gauge is important for achieving the correct dimensions, but slight variations will still yield a beautiful piece.
Step-by-Step Instructions
Base Panel (Neutral Color)
This forms the foundation of your wall hanging. All color blocks will be worked directly onto this panel.
- Chain 41.
- Row 1: Sc in 2nd ch from hook and across. (40 sc)
- Row 2-40: Ch 1, turn, sc in each st across. (40 sc)
- Fasten off.
Color Block Sections (Worked Horizontally Across the Base Panel)
Each color block is 4 rows tall and spans the full width (40 sts). You will attach new colors at the end of each row. The base panel rows are numbered 1-40; each color block corresponds to a set of 4 rows.
Block 1 (Red) – Rows 1-4
- Row 1: Attach red with a slip stitch to the first sc of Row 1 of base panel. Ch 1, sc in same st and each st across. (40 sc)
- Row 2: Ch 1, turn, *sc in next st, dc in next st* repeat across. (40 sts)
- Row 3: Ch 1, turn, *dc in next st, sc in next st* repeat across. (40 sts)
- Row 4: Ch 1, turn, sc in each st across. (40 sc)
- Fasten off.
Block 2 (Orange) – Rows 5-8
- Row 5: Attach orange to the first sc of Row 5 of base panel. Ch 1, sc in same st and each st across. (40 sc)
- Row 6: Ch 1, turn, *fpdc around next st, bpdc around next st* repeat across. (40 sts)
- Row 7: Ch 1, turn, *bpdc around next st, fpdc around next st* repeat across. (40 sts)
- Row 8: Ch 1, turn, sc in each st across. (40 sc)
- Fasten off.
Block 3 (Yellow) – Rows 9-12
- Row 9: Attach yellow to the first sc of Row 9 of base panel. Ch 1, sc in same st and each st across. (40 sc)
- Row 10: Ch 1, turn, *sc in next st, ch 1, skip 1* repeat across, ending with sc in last st. (20 sc + 19 ch-1 spaces)
- Row 11: Ch 1, turn, sc in first st, *sc in ch-1 space, sc in next st* repeat across. (40 sc)
- Row 12: Ch 1, turn, sc in each st across. (40 sc)
- Fasten off.
Block 4 (Green) – Rows 13-16
- Row 13: Attach green to the first sc of Row 13 of base panel. Ch 1, sc in same st and each st across. (40 sc)
- Row 14: Ch 1, turn, *dc in next 3 sts, ch 1, skip 1* repeat across, ending with dc in last 3 sts. (30 dc + 10 ch-1 spaces)
- Row 15: Ch 1, turn, sc in each st and ch-1 space across. (40 sc)
- Row 16: Ch 1, turn, sc in each st across. (40 sc)
- Fasten off.
Block 5 (Teal) – Rows 17-20
- Row 17: Attach teal to the first sc of Row 17 of base panel. Ch 1, sc in same st and each st across. (40 sc)
- Row 18: Ch 1, turn, *sc in next st, hdc in next st, dc in next st, hdc in next st* repeat across. (40 sts)
- Row 19: Ch 1, turn, *hdc in next st, dc in next st, hdc in next st, sc in next st* repeat across. (40 sts)
- Row 20: Ch 1, turn, sc in each st across. (40 sc)
- Fasten off.
Block 6 (Blue) – Rows 21-24
- Row 21: Attach blue to the first sc of Row 21 of base panel. Ch 1, sc in same st and each st across. (40 sc)
- Row 22: Ch 1, turn, *sc in next 2 sts, ch 2, skip 2* repeat across, ending with sc in last 2 sts. (20 sc + 10 ch-2 spaces)
- Row 23: Ch 1, turn, sc in first 2 sts, *2 sc in ch-2 space, sc in next 2 sts* repeat across. (40 sc)
- Row 24: Ch 1, turn, sc in each st across. (40 sc)
- Fasten off.
Block 7 (Indigo) – Rows 25-28
- Row 25: Attach indigo to the first sc of Row 25 of base panel. Ch 1, sc in same st and each st across. (40 sc)
- Row 26: Ch 1, turn, *dc in next st, ch 1, skip 1* repeat across. (20 dc + 20 ch-1 spaces)
- Row 27: Ch 1, turn, *sc in ch-1 space, sc in next dc* repeat across. (40 sc)
- Row 28: Ch 1, turn, sc in each st across. (40 sc)
- Fasten off.
Block 8 (Violet) – Rows 29-32
- Row 29: Attach violet to the first sc of Row 29 of base panel. Ch 1, sc in same st and each st across. (40 sc)
- Row 30: Ch 1, turn, *fpdc around next st, dc in next st* repeat across. (40 sts)
- Row 31: Ch 1, turn, *dc in next st, fpdc around next st* repeat across. (40 sts)
- Row 32: Ch 1, turn, sc in each st across. (40 sc)
- Fasten off.
Accent Blocks (Coral, Lime, Lavender) – Rows 33-40
Repeat the same 4-row pattern for each accent block, attaching them to rows 33-40 of the base panel. Use a different stitch pattern for each accent block to add variety:
- Coral: Shell stitch (e.g., 5 dc in same st, skip 2 sts)
- Lime: Star stitch (work 2 dc together, ch 1, repeat)
- Lavender: Bobble stitch (work 4 dc together in same st)
For each accent block, follow this structure:
- Row 1: Attach accent color to first sc of corresponding base panel row. Ch 1, sc in same st and each st across. (40 sc)
- Row 2: Work chosen stitch pattern across.
- Row 3: Work return row to match stitch pattern.
- Row 4: Ch 1, turn, sc in each st across. (40 sc)
- Fasten off.
Finishing
- Weave in all ends using a yarn needle, ensuring all tails are secure and hidden on the back side.
- Create the hanging casing: Fold the top edge of the wall hanging over the wooden dowel or branch (approx. 18 inches long). The fold should be about 1 inch deep. Sew the folded edge down using a whip stitch or slip stitch, creating a casing for the dowel to slide through.
- Add a hanging cord: Cut a 24-inch piece of yarn or cord. Tie each end to the ends of the dowel, creating a loop for hanging.
- Optional fringe: Cut 8-inch strands of yarn from all 11 colors. Fold each strand in half and attach to the bottom edge using a lark’s head knot. Space them evenly across the width. Trim fringe to desired length.
Your Prism Cascade Wall Hanging is now complete! Hang it on a plain wall with soft natural light to highlight the dimensional stitches and rainbow hues.