Whispering Willow Wall Hanging Free Pattern – Crochet a Misty Forest Tapestry
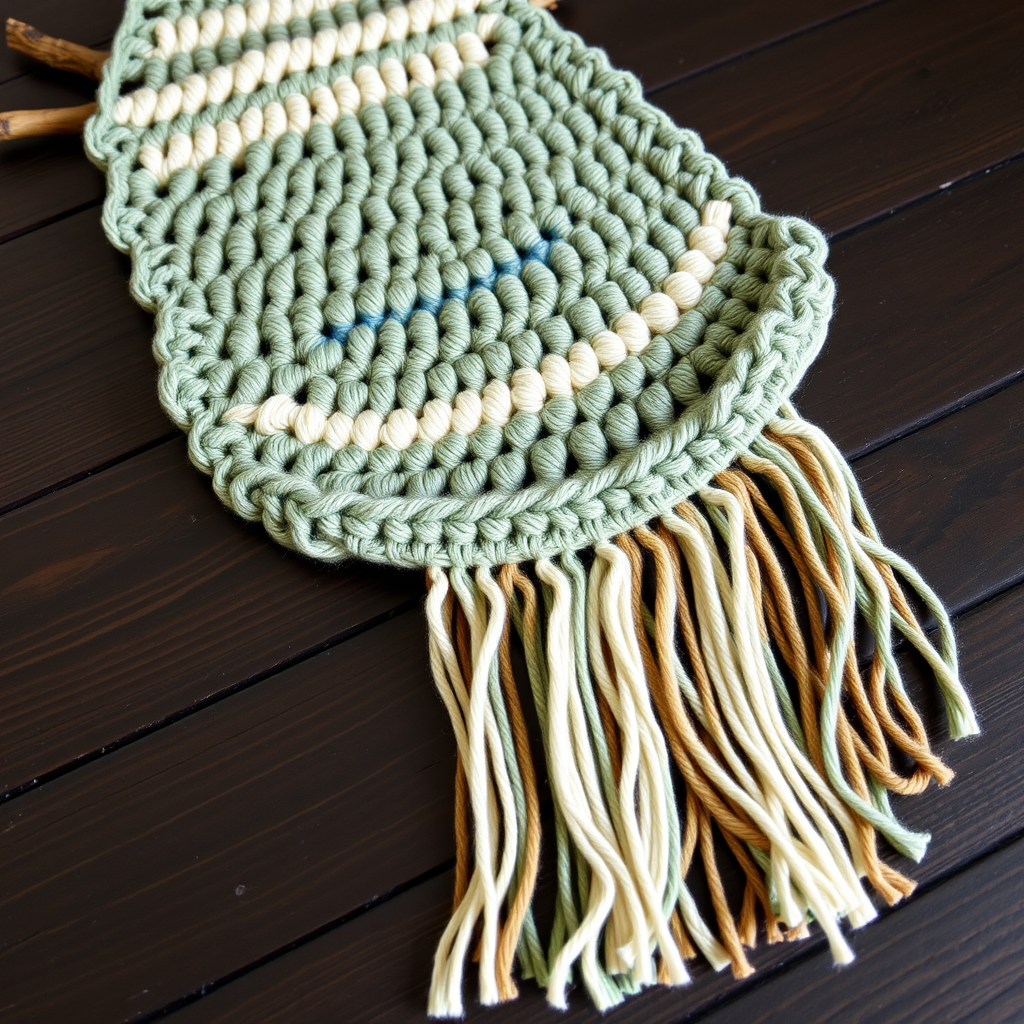
Whispering Willow Wall Hanging: A Beginner-Friendly Crochet Tapestry
Imagine bringing the tranquil beauty of a misty forest into your living room—not through a painting, but through the warm, tactile art of crochet. The Whispering Willow Wall Hanging is a textured, bohemian tapestry that captures the organic charm of woodland hues. With its cascading fringe and earthy ombre gradient of sage green, dusty blue, cream, and warm taupe, this piece adds a cozy, nature-inspired focal point to any wall. Best of all, this pattern is designed with beginners in mind, using simple stitches and a repetitive rhythm that is both meditative and rewarding.
This project is worked from the top down, creating a gently flared silhouette that mimics the graceful droop of willow branches. The combination of single crochet and front post double crochet creates a rich, woven-like texture that feels like tree bark or soft moss. Whether you're a seasoned maker or picking up a hook for the first time, this pattern will guide you through every step to create a stunning piece of fiber art.
Materials Needed
Before you begin, gather the following supplies. The beauty of this project is its flexibility—gauge is not critical, but maintaining consistent tension will ensure a polished finish.
- Yarn: Worsted weight cotton or cotton-blend yarn in 4 shades: sage green, dusty blue, cream, and warm taupe (approx. 250g total). Each color should be roughly 60-65g.
- Hook: 5.5mm (I-9) crochet hook
- Notions: Tapestry needle for weaving in ends and whipstitching, scissors
- Hanging Rod: A wooden dowel or branch, 12-14 inches long
- Optional: Stitch markers to help track row counts
Gauge: 14 sc x 16 rows = 4 inches. Gauge is not critical for this project, but consistent tension is recommended for a uniform texture.
Step-by-Step Instructions
This wall hanging is worked in rows from the top down. The pattern alternates between simple sc rows and textured rows that combine sc and front post double crochet (fpdc). The flared shape is achieved by increasing 2 stitches at the edges every 4th row section. Follow along carefully, and you'll have a beautiful tapestry in no time.
Foundation and First Texture (Sage Green)
Foundation Row: With sage green yarn, chain 31. Turn.
Row 1: Sc in the 2nd ch from the hook and in each ch across. (30 sc) Turn.
Row 2: Ch 1, sc in first st, *dc in next st, sc in next st* repeat from * to * across. (15 dc, 15 sc) Turn.
Row 3: Ch 1, sc in each st across. (30 sc) Turn.
Row 4: Ch 1, sc in first st, *fpdc around the next dc, sc in next st* repeat from * to * across. (This creates a vertical ribbed texture.) Turn.
Color Block 1: Dusty Blue (Rows 5-8)
Row 5: Switch to dusty blue yarn. Ch 1, sc in each st across. Turn. (You can carry the yarn up the side or cut and rejoin—whichever you prefer.)
Row 6: Ch 1, sc in first st, *fpdc around next dc, sc in next st* repeat from * to * across. Turn.
Row 7: Ch 1, sc in each st across. Turn.
Row 8: Ch 1, sc in first st, *fpdc around next dc, sc in next st* repeat from * to * across. Turn.
Color Block 2: Cream (Rows 9-12) – Begin Flaring
Row 9: Switch to cream yarn. Ch 1, sc in each st across. Turn.
Row 10: Ch 1, 2 sc in first st, sc in each st across until the last st, 2 sc in last st. (32 sc) Turn. This increase starts the gentle flare.
Row 11: Ch 1, sc in first st, *fpdc around next dc, sc in next st* repeat from * to * across. Turn.
Row 12: Ch 1, sc in each st across. Turn.
Color Block 3: Warm Taupe (Rows 13-16)
Row 13: Switch to warm taupe yarn. Ch 1, sc in each st across. Turn.
Row 14: Ch 1, 2 sc in first st, sc in each st across until the last st, 2 sc in last st. (34 sc) Turn.
Row 15: Ch 1, sc in first st, *fpdc around next dc, sc in next st* repeat from * to * across. Turn.
Row 16: Ch 1, sc in each st across. Turn.
Color Block 4: Sage Green (Rows 17-20)
Row 17: Switch back to sage green yarn. Ch 1, sc in each st across. Turn.
Row 18: Ch 1, 2 sc in first st, sc in each st across until the last st, 2 sc in last st. (36 sc) Turn.
Row 19: Ch 1, sc in first st, *fpdc around next dc, sc in next st* repeat from * to * across. Turn.
Row 20: Ch 1, sc in each st across. Turn.
Color Block 5: Dusty Blue (Rows 21-24)
Row 21: Switch to dusty blue yarn. Ch 1, sc in each st across. Turn.
Row 22: Ch 1, 2 sc in first st, sc in each st across until the last st, 2 sc in last st. (38 sc) Turn.
Row 23: Ch 1, sc in first st, *fpdc around next dc, sc in next st* repeat from * to * across. Turn.
Row 24: Ch 1, sc in each st across. Turn.
Color Block 6: Cream (Rows 25-28)
Row 25: Switch to cream yarn. Ch 1, sc in each st across. Turn.
Row 26: Ch 1, 2 sc in first st, sc in each st across until the last st, 2 sc in last st. (40 sc) Turn.
Row 27: Ch 1, sc in first st, *fpdc around next dc, sc in next st* repeat from * to * across. Turn.
Row 28: Ch 1, sc in each st across. Turn.
Color Block 7: Warm Taupe (Rows 29-32)
Row 29: Switch to warm taupe yarn. Ch 1, sc in each st across. Turn.
Row 30: Ch 1, 2 sc in first st, sc in each st across until the last st, 2 sc in last st. (42 sc) Turn.
Row 31: Ch 1, sc in first st, *fpdc around next dc, sc in next st* repeat from * to * across. Turn.
Row 32: Ch 1, sc in each st across. Turn.
Final Row and Finishing
Final Row: Ch 1, sc in each st across. (42 sc) Fasten off and weave in all ends with your tapestry needle.
Adding the Fringe
Cut strands of yarn in all four colors, each about 12 inches long. For each fringe tassel, fold a strand in half. Insert your hook through the bottom edge of the hanging, catch the folded loop, and pull it through. Then, pull the two loose ends through the loop and tighten gently. Space the fringe strands evenly across the bottom edge, alternating colors for a dynamic, earthy look. Once all fringe is attached, trim the ends to an even length.
Mounting Your Tapestry
Fold the top edge of the crochet piece over your wooden dowel or branch. Using your tapestry needle and a length of yarn, whipstitch the folded edge securely to the back of the hanging. Make sure the stitches are even and snug so the weight of the piece is supported. Trim any loose ends.
Finally, add a piece of twine or rope to each end of the dowel to create a hanging loop. Step back and admire your handiwork—you've just created a stunning, misty forest tapestry that brings warmth and organic texture to your home.
Tips for Success
- Consistent Tension: Try to keep your stitches even throughout. The texture of the fpdc rows will look best if your tension is relaxed but consistent.
- Color Changes: When switching colors, you can either cut the yarn and weave in ends later, or carry the unused yarn up the side. Carrying is faster but may create visible loops on the edge; cutting gives a cleaner finish.
- Customization: Feel free to adjust the length or width by adding or removing rows. Just remember to maintain the increase pattern to keep the flare balanced.
- Blocking: If your piece curls at the edges, gently steam block it with an iron on a low setting (using a cloth between the iron and yarn) to flatten it.
This Whispering Willow Wall Hanging is more than just a craft project—it's a piece of art that brings the calm of the forest indoors. The rhythmic repetition of stitches makes it a perfect mindful activity, and the result is a beautiful, handmade tapestry you'll be proud to display. Happy crocheting!